As a beginner with Arduino development boards, it can be very challenging for those without an electronics background, and you will encounter many mistakes, some of which may have simple solutions but may take days to resolve. Therefore, to make things easier, I have created a list of the 10 most common Arduino mistakes along with possible solutions.

1. Arduino Development Board Not Recognized
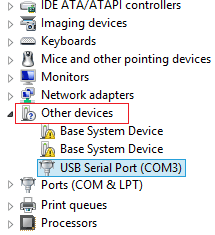
This refers to the situation when the computer cannot recognize the connected Arduino development board. When this happens, the board is usually not listed under the port list in the Arduino IDE, and sometimes marked as USB2.0 in the device manager.

Solution:
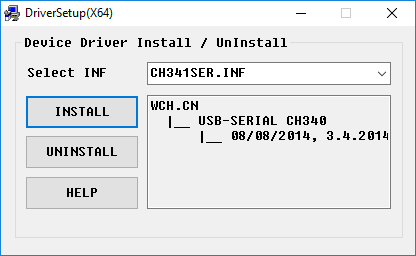
This usually happens when using some cheap Arduino clone boards that use the CH340g USB-to-serial converter chip instead of the FTDI (FT232RL) chip used by standard Arduino boards. The drivers for the USB-to-serial chips used by standard Arduino boards are always bundled with the Arduino IDE installation files, so when you install the IDE, the drivers are automatically installed on your PC. To be able to use this Arduino development board based on the CH340g USB-to-serial converter, you need to download and install the driver for that chip. You can download the driver from this link. Installing it is as simple as clicking the install button on the setup interface shown below.

After doing this, you should now be able to find the port connected to the development board in the Arduino IDE.
2. Board Not Synchronized
Usually, when this happens, you will be unable to upload code (even though the IDE sometimes shows “Upload Complete”) to the Arduino development board, and the IDE will prompt the error code: “avrdude: stk500_getsync(): not in sync: resp=0x00“.
Solution:
sync: resp = 0x00 is a generic response meaning that the “Atmega chip on the Arduino board is not working”. When this occurs, there could be many possible mistakes. Here are some steps you can take to clear this error.
1. Ensure that there are no connections on digital pins 0 and 1 on the Arduino (including shields).
2. Ensure that the correct COM port and board are selected under the Tools menu.
3. Press the reset button on the Arduino a few times and then re-upload the code.
4. Disconnect and reconnect the Arduino to the PC.
5. Restart the Arduino IDE.
If any of these do not work, it may be time to try using a different Arduino development board on the PC or using the “faulty” Arduino on another PC. This should help you determine what the root of the problem is. If you find the issue lies with the PC, reinstall the Arduino IDE. However, if the “faulty” Arduino board is the source of the problem, the final solution is to refresh the firmware on the board. If none of the above work, it may be time to replace the Arduino development board.
3. Code Does Not Start After Power Reset
This refers to the situation where the Arduino does not run the uploaded program after powering on, and in most cases, it simply reverts to the blinking sketch associated with the bootloader.
Solution:
Just like the other issues handled, there are many things that could cause this.
If the board hangs and does nothing, you should check your code to ensure you are not sending serial data to the board. When the Arduino powers on, the bootloader listens for a few seconds for the computer to send it a new sketch to upload to the board. If it does not receive a new sketch, after a moment, the bootloader will time out and run the last sketch uploaded to the board. If your code sends serial data within the first few minutes of powering on, the bootloader will not time out, and the previous sketch uploaded to the board will not start.
If sending serial data immediately after the board starts is an important part of your project, you may need to find a way to delay the serial data from reaching the Arduino directly. If making adjustments affects the tasks the project is to perform, you may need to use an external programmer to upload the sketch to the board, as they can bypass the bootloader.
If the board does not hang but returns to the Arduino blinking sketch (the LED on pin 13 blinks occasionally), a simple fix is to re-burn the Arduino bootloader onto the board, as the one on the board may have been corrupted.
4. Invalid Device Signature Error

This error appears when trying to upload code to the board, which differs from the board selected under Tools > Board List in the Arduino IDE. This error usually occurs because the device signature on the target board differs from the board selected in the IDE.
Solution:
The solution to this error is as simple as ensuring the correct board is selected in the Arduino IDE. If this does not work, you may need to burn the latest version of the Arduino bootloader onto the microcontroller.
5. Launch4j Error

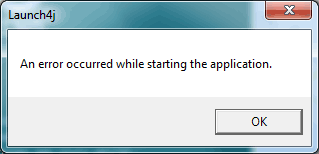
Sometimes, the Arduino IDE takes a while to load, and during the loading process, if anything is clicked, it will display a Launch4J error as shown above. Launch4j is a tool for wrapping Java applications (jar) in Windows native executable files, allowing them to be used as regular Windows programs.
The Arduino IDE itself is written in JAVA, and this error occurs due to incompatibility with the Java Run Time Environment (JRE) libraries provided by the Arduino IDE.
Solution:
In practice, this error can be resolved by simply turning off the Bluetooth or WiFi connection on the PC. However, a more complete and thorough solution is to replace the JRE in the Arduino package with the latest version.
6. Serial Port Already in Use

This is one of the easiest errors to solve. This usually occurs when you try to upload code to the Arduino while the serial monitor is open (this is no longer an issue with the latest IDE version) or when the Arduino is communicating with another software or device through the serial port. Essentially, this happens when you try to use the Arduino serial port for two different things simultaneously.
Solution:
As the IDE suggests, close all other software/tools that may be using the com port (including the serial monitor/plotter). If you are unsure of specific software, unplug the Arduino. When you plug it back in, it should be ready.
7: Sketch Upload Successful but Nothing Happens
This error is similar to some other errors already addressed above. For this error, the Arduino IDE will suggest that the code was successfully uploaded, but the board is inactive.
Solution:
● Ensure that the development board selected in the IDE is the same as the target board.
● This may be due to the sketch size being greater than the capacity of the board. Check the sketch size and use some of the methods mentioned above to reduce it.
● Finally, this error may occur when using a power supply with a lot of ripple. Ensure the power supply is stable enough.
8. Unsatisfied Link Error
This may be the only rare error that appears on this list. This occurs when there is an old version of the communication library on your PC, likely from a previous installation.
Solution:
To resolve this error, search for comm.jar or jcl.jar in the /System/Library/Frameworks/JavaVM.framework/ or in the CLASSPATH or PATH environment variables of the PC.
9. Sketch Too Large

This error occurs when your code exceeds the flash memory of a specific Arduino development board. For example, the Arduino Uno has a flash size of 32Kb, and the Arduino bootloader has already used 2KB. If you try to upload code larger than 32Kb, the Arduino will display this warning.
Solution:
As mentioned above, this occurs when the sketch is larger than the flash memory of the specific board you are using, so to resolve this issue, you need to find ways to reduce the space occupied by the code. Some tips to achieve this include:
● Use integer data types instead of floating-point numbers where possible.
● Use the “const” qualifier when declaring variables as much as possible.
● Only include necessary libraries. Use lightweight versions of the most important libraries where possible.
● General code improvements. Development can help shorten the code and generally lightweight algorithms.
● A more radical solution is to transfer the project to another board, such as the Arduino Mega, which has larger flash memory compared to the Uno.
10. java.lang.StackOverflowError
When processing sketches, the Arduino uses some regular expressions, and it can sometimes get confused when encountering certain string-related errors (such as missing quotes).
Solution:
This error can be resolved by reviewing the code again, especially the parts that use string sequences. Ensure that the quotes are complete and that backslashes are used correctly.
For more content, please click“Read Original” 》》