1. Account Security Control
1. Basic Measures
1) System Account Cleanup
Set the shell of non-login users to /sbin/nologin
Lock accounts that have not been used for a long time
Delete unnecessary accounts
Lock account files passwd, shadow
2) Password Security Control
Set password expiration: chage -M 30 username
Require users to change their password at next login: chage -d 0 username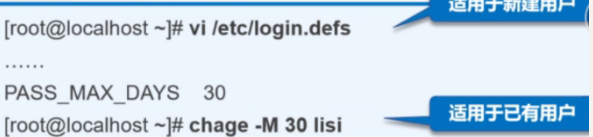
3) Command History Limitation
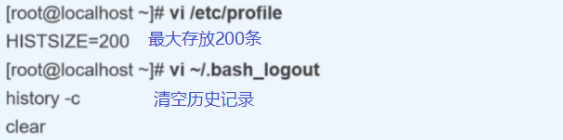
Reduce the number of recorded command lines (default history is 1000 lines)
Automatically clear command history upon logout
4) Automatic Logout of Terminal
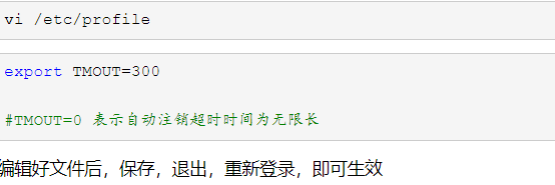
Automatically log out after 600 seconds of inactivity
2. Using the su Command to Switch Users
su -username Purpose: Switch users
Password verification: root–any user, no password verification; regular user–other users, verify the target user’s password

1) Restrict Users of the su Command
By default, any user is allowed to use the su command, which poses a security risk as they can repeatedly attempt to log in as other users (e.g., root). To strengthen control over the use of the su command, the pam_wheel authentication module can be used to allow only a few specific users to use the su command.
The implementation process is as follows:
Add authorized users to the wheel group, modify the /etc/pam.d/su authentication configuration to enable pam_wheel authentication.
In the /etc/pam.d/su file, set to prohibit users from using the su commandvim /etc/pam.d/su2 #auth sufficient pam_rootok.so6 #auth required pam_wheel.so use_uid
a) The above two lines are the default state (i.e., enabling the first line, commenting out the second line), in this state, all users are allowed to use the su command to switch.
b) If both lines are commented out, all users can use the su command, but root must enter a password to switch to other regular users; if the first line is uncommented, root can switch to regular users without entering a password (the main function of the pam_rootok.so module is to allow the user with uid 0, i.e., the root user, to authenticate directly without entering a password).
【2 closed, 6 closed: root switching users requires a password】
c) If the second line is enabled, it means that only the root user and users in the wheel group can use the su command
【2 open, 6 open: root and wheel group can su】
d) If the first line is commented out and the second line is enabled, it means that only users in the wheel group can use the su command, and the root user is also prohibited from using the su command.
【2 closed, 6 open: only the wheel group can su】
2) Restrict Users of the su Command, Enable pam_wheel Authentication Module
gpasswd -a username wheel: Add authorized user, add user to the wheel group
grep wheel /etc/group: Confirm wheel group members
auth required pam_wheel.so use_uid Remove the # at the beginning of this line
After enabling pam_wheel authentication, other users not in the wheel group will not be able to use the su command, and an attempt to switch will prompt “Permission Denied”, thus controlling the user switching permissions to a minimum range. 【Regular user switching login test verification, using the su command to switch users will be recorded in the security log /var/log/secure file】
3. PAM Security Authentication in Linux
1) Security Risks of the su Command
● By default, any user is allowed to use the su command, which poses a security risk as they can repeatedly attempt to log in as other users (e.g., root).
● To strengthen control over the use of the su command, the PAM authentication module can be used to allow only a few specific users to use the su command.
2) PAM (Pluggable Authentication Modules)
● An efficient and flexible user-level authentication method.
● It is also the commonly used authentication method for current Linux servers.
3) PAM Authentication Principles
1. The general order followed:Service → PAM (configuration file) → pam_*.so
2. First, determine which service, then load the corresponding PAM configuration file (located in /etc/pam.d), and finally call the authentication file (located in /lib/security) for security authentication.
3. When a user accesses the server, a certain service program sends the user’s request to the PAM module for authentication.
4. Different applications correspond to different PAM modules.
If you want to check whether a certain program supports PAM authentication, you can use the ls command to check /etc/pam.d/
Each line in the PAM configuration file is an independent authentication process, and they are called by the PAM module in order from top to bottom.
4) Meaning of Each Column in PAM Authentication
The first column represents the PAM authentication module typeauth: Identifies the user, such as prompting for a password, determining if it is root.
account: Checks various attributes of the account, such as whether login is allowed, whether the account has expired, whether the maximum number of users has been reached, etc.
password: Uses user information to update data, such as changing user passwords.session: Defines session management operations to be performed before login and after logout, such as login connection information, opening and closing user data, mounting file systems.
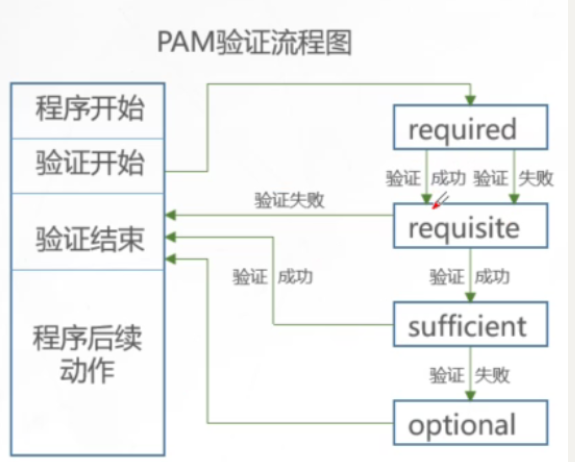
The second column represents the PAM control flagsrequired: Indicates that a successful return value is needed; if it returns failure, it will not immediately return the failure result but will continue to execute the next verification of the same type. After all modules of this type have been executed, it will return failure.requisite: Similar to required, but if this module returns failure, it will immediately return failure and indicate this type of failure.sufficient: If this module returns success, it directly returns success to the program, indicating this type of success; if it fails, it does not affect the return value of this type.optional: Does not return success or failure; generally not used for verification, only for displaying information (usually used for session type).include: Indicates that other PAM configuration files are called during the verification process. For example, many applications achieve authentication by fully calling /etc/pam.d/system-auth (which is mainly responsible for user login authentication) without needing to rewrite configuration items one by one.
The third column represents the PAM module, which is by default in the /lib64/security/ directory. If it is not in this default path, the absolute path must be specified. The same module can appear in different module types, and the operations it performs in different types are not the same, as each module has different execution functions for different module types.
The fourth column represents the parameters of the PAM module, which need to be added according to the module used. Parameters can be multiple and separated by spaces.
5) Supplementary Explanation of Control Flags:
required: Indicates that the success of this line and the involved modules is a [necessary condition] for the user to pass authentication.
In other words, only when all modules with the required: flag corresponding to the application program succeed can the program pass authentication. Moreover, if any module with the required flag encounters an error, PAM does not immediately return the error message to the application but returns the error message after all modules of this type have been called.
In short, all modules of this type must be executed once, and if any module verification fails, the verification will continue, and the error message will be returned only after execution is complete. The purpose of this is to prevent users from knowing which module rejected them, thus protecting system services in a covert manner. Just like when setting firewall rules, the reject rules are set to drop, so that when users fail to access the network, they cannot accurately determine whether they were rejected or if the target network is unreachable.
requisite: Similar to required, only if the module with this flag returns success can the user pass authentication. The difference is that if it fails, it will not execute the subsequent modules in the stack, and the authentication process ends here, and it will immediately return an error message. Compared to the above required, it seems to be more straightforward.
sufficient: Indicates that the success of this line and the involved modules is a [sufficient condition] for the user to pass authentication.
That is to say, as long as the module marked as sufficient verifies successfully, PAM will immediately return a success result to the application without trying any other modules. Even if the subsequent stacked modules use requisite or required control flags, it is the same. When the module marked as sufficient fails, it will be treated as optional. Therefore, the use of this control flag must be cautious.
optional: It indicates that even if the module involved in this line fails verification, the user can still pass authentication. In the PAM system, when a module with this flag fails, it will continue to process the next module. This means that even if the module specified in this line fails verification, the user is still allowed to enjoy the services provided by the application. By using this flag, the PAM framework will ignore the verification errors produced by this module and continue to execute the next stacked module in order.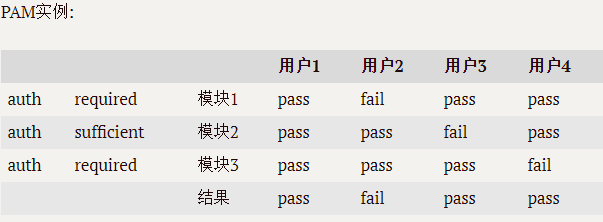
6) Composition of PAM Authentication
To check whether a certain program supports PAM authentication, you can use the ls command● Example: Check if su supports PAM module authenticationls /etc/pam.d | grep su
Check the PAM configuration file for su: cat /etc/pam.d/su● Each line is an independent authentication process● Each line can be divided into three fields:
Authentication TypeControl TypePAM Module and its Parameters
7) PAM Authentication Process
1. required verification continues even if it fails, but returns Fail.
2. requisite verification fails, then the entire verification process ends immediately, returning Fail.
3. sufficient verification succeeds, then it returns immediately, no longer continuing; otherwise, it ignores the result and continues.
4. optional is not used for verification, only displays information (usually used for session type)
4. Using the sudo Mechanism to Elevate Permissions (Key Point)
Disadvantages of the su Command
1) Purpose and Usage of the sudo Command
● Purpose: Execute authorized commands as another user (e.g., root)● Usage: sudo authorized command
visudoorvi /etc/sudoers (the default permission of this file is 440, must execute “:wq!” to force the operation when saving and exiting)
Syntax format:User Hostname=Command Program ListUser Hostname=(User) Command Program List
User: Directly authorize the specified username, or use “%groupname” format (authorize all users in a group).
Hostname: The hostname where this rule applies. If the hostname is not configured, localhost can be used; if configured, use the actual hostname; ALL represents all hosts.
(User): The identity under which the user can execute the command. This item can be omitted; by default, the command runs as the root user.
Command Program List: The privileged commands that authorized users can execute via sudo, must specify the full path of the command program, and separate multiple commands with commas; ALL represents all commands in the system.
ExampleTom ALL=/sbin/ifconfigJerry localhost=/sbin/* ,!/sbin/reboot, !/sbin/poweroff
The wildcard “*” represents all, and the negation symbol “!” represents exclusion
%wheel ALL=NOPASSWD:ALL
Indicates that members of the wheel group can use sudo to execute any command without password verification
Mike ALL=(root) NOPASSWD:/bin/kill,/usr/bin/killall gpasswd -M lisi wheel
Li Si joins the wheel group
2) sudo [parameter options] command vim /etc/sudoers
-l: List the commands available and prohibited for the user on the host; generally, after configuring /etc/sudoers, this command is used to check and test if the configuration is correct;-v: Verify the user’s timestamp; if the user runs sudo and enters their password, they can perform sudo operations directly without entering a password for a short time; -v can track the latest timestamp;-u: Specify to execute a specific operation as a certain user;-k: Delete the timestamp, requiring the next sudo command to provide a password:
Case 1wangliu user can use useradd usermodRequirement: wangliu under root user permissions useradd usermodConfigurationvisudowangliu ALL=(root) /usr/sbin/useradd, /usr/sbin/usermodAs wangliu ALL=(root) NOPASSWD:/usr/sbin/useradd, /usr/sbin/usermod
No password required in front, password required in the back
Verification 1[wangliu@kgc root] $ sudo /usr/sbin/useradd tom [sudo] Enter password for wangliu:[wangliu@kgc root]$ tail -2 /etc/passwdwangliu:x:1005:1005::/home/wangliu:/bin/bash tom:x:1006:1006::/home/tom:/bin/bash
3) User Alias Case
When there are many users with the same authorization or many authorized commands, centralized definition of aliases can be used. User, host, and command parts can all be defined as aliases (must be uppercase), set using the keywords User_Alias, Host_Alias, Cmd_Alias.
View users under the group
grep “wheel” /etc/group User alias syntax format:
-
User_Alias User Alias: Contains users, user groups (%groupname (using 3 quotes)), and can also include other already defined user aliases user_Alias OPERATORS=zhangsan, tom, lisi2) Host_AliasHost Alias: Hostname, IP, network address, other host aliases! Negation Host_Alias MAILSVRS=smtp, pop3) Cmd_AliasCommand path, directory (all commands in this directory), other previously defined command aliases Cmd_Alias PKGTOOLS=/bin/rpm, /usr/bin/yum
Case 1 User AliasUse keywords user_Alias, Host_Alias, Cmd_Alias to set aliases (aliases must be uppercase)
Host_Alias MYHOSTS = kgc, localhostUser_Alias MYUSERS zhangsan, wangwu, lisiCmd_Alias MYCMNDS = /sbin/*, !/sbin/reboot, !/sbin/poweroff, !/sbin/init, !/usr/bin/rm
MYUSERS MYHOSTS=NOPASSWD:MYCMNDS2)User_Alias USERS=Tom, Jerry, Mike Host Alias HOSTS=localhost, bogonCmd_Alias CMNDS=/sbin/ifconfig, /usr/sbin/useradd, /usr/sbin/userdel
USERS HOSTS=CMNDS
Case 2
User AliasFor example, the following operation adds authorization records in alias form, allowing users wangliu, wangliu group, useradmin group, and defining command aliases. Execute rpm, yum commands on hosts smtp, pop
User_Alias USERADMIN = wangliu, 8wangliu, suseradmin
Cmd_Alias USERADMINCMND=/usr/sbin/useradd,/usr/sbin/usermod,/usr/sbin/userdel,/usr/bin/passwd, !/usr/bin/passwd root # Negation has the highest priorityUSERADMIN ALL=(root) NOPASSWD:USERADMINCMNDVerify alias and command pathNote bugsudo passwd root testSolutionCmd_Alias USERADMINCMND=/usr/sbin/useradd,/usr/sbin/usermod,/usr/sbin/userdel,/usr/bin/passwd[A-Za-z]*,!/usr/bin/passwd rootEnable sudo operation loggingvisudoDefaults logfile=”/var/log/sudo”Sudo log records for administrator review, should add “Defaults logfile” setting in /etc/sudoers file. If sudo logging is already enabled, user sudo operation records can be seen from /var/log/sudo file. Note: Enable logging: Defaults logfile=/var/log/sudoAnother method is to view sudo operation user steps in /var/log/secure logsudo -l # View which sudo authorizations the current user has
5. Restrict Changes to GRUB Boot Parameters
Generally, when the system boots into the GRUB menu, pressing the e key allows viewing and modifying GRUB boot parameters, which poses a significant threat to servers. A password can be set for the GRUB menu, and only by providing the correct password can the boot parameters be modified.
grub2-mkpasswd-pbkdf2 # Set the GRUB menu password as promptedPBKDF2 hash of your password is grub.pbkd….. “Y# Omitted part is the encrypted generated password string I
cp /boot/grub2/grub.cfg /boot/grub2/grub.cfg.bakcp /etc/grub.d/00_header /etc/grub.d/00_header.bak
vim /etc/grub.d/00_headercat <<EOFset superusers=”root” # Set username to root
password_pbkdf2 root grub.pbkd2 ….-
Set password, omitted part is the encrypted generated password string
EOFgrub2-mkconfig -o /boot/grub2/grub.cfg # Generate new grub.cfg fileWhen rebooting the system and entering the GRUB menu, pressing the e key will require entering the account password to modify the boot parameters.
One-step solutiongrub2-setpassword
2. Power On/Off Security Control
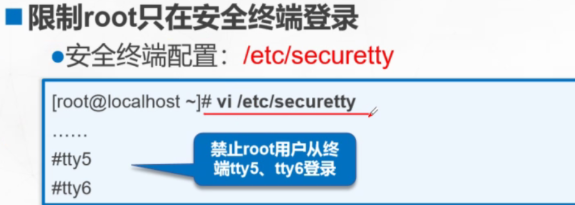
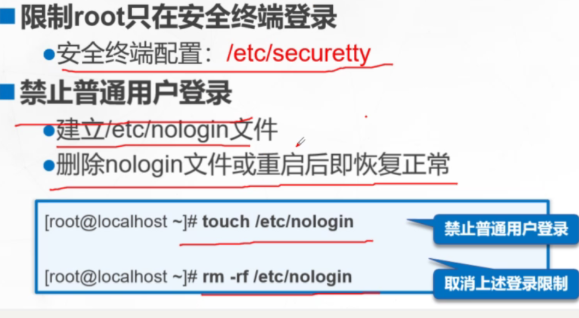
Adjust BIOS boot settings● Set the first boot device to the current system hard disk● Prohibit booting from other devices (CD, USB, network)
● Set the security level to setup and set the administrator password
GRUB Restrictions● Use grub2-mkpasswd-pbkdf2 to generate keys● Modify /etc/grub.d/00_header file, add password records
● Generate a new grub.cfg configuration file
3. Weak Password Detection
1) System Weak Password Detection
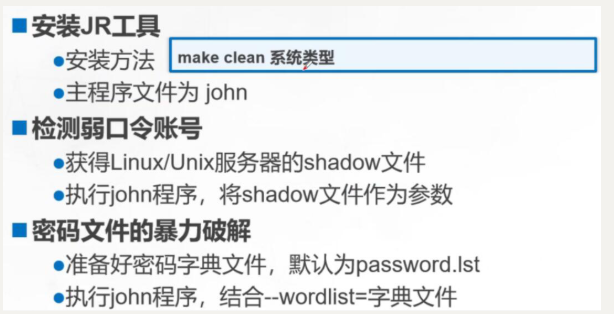
Weak password detection – John the Ripper.John the Ripper is an open-source password cracking tool that can use a password dictionary (a list file containing various password combinations) for brute-force cracking.
Unzip the toolkit
cd /opttar.zxf john-1.8.0.tar.gz
Install software compilation tools
yum install -y gcc gcc-c++ make
Switch to the src subdirectory
cd /opt/john-1.8.0/src
Compile and install
make clean linux-x86-64
Prepare the password file to be cracked
cp /etc/shadow /opt/shadow.txt
Execute brute-force cracking
cd /opt/john-1.8.0/run
./john /opt/shadow.txt
View the list of cracked accounts
./john –show /opt/shadow.txt
Use the password dictionary file
john.pot
Clear the list of cracked accounts for re-analysis
./john –wordlist=./password.1st /opt/shadow.txt
Use the specified dictionary file for cracking
2) Network Port Scanning
Control bits.SYN establishes a connection
ACK confirmsFIN ends disconnectionPSH sends data to the upper application protocol
RST resetsURG urgentrpm -qa | grep nmap Check nmap
yum install -y nmapCommon options and description types of the nmap command
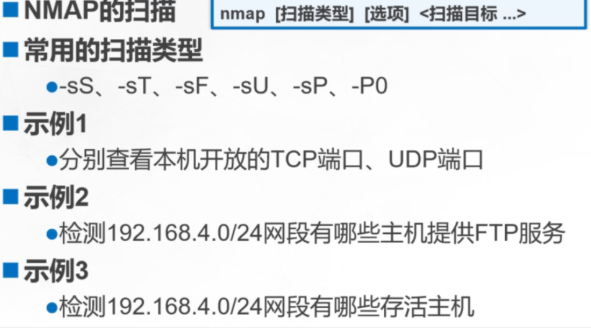
-p: Specify the ports to scan.-n: Disable reverse DNS resolution (to speed up scanning)-sS: TCP SYN scan (half-open scan), only sends SYN packets to the target; if an SYN/ACK response packet is received, it is considered that the target port is listening, and the connection is immediately disconnected; otherwise, it is considered that the target port is not open.-sT: TCP connect scan, this is the complete TCP scanning method (default scanning type), used to establish a TCP connection; if successful, it is considered that the target port is listening; otherwise, it is considered that the target port is not open.-sF: TCP FIN scan, open ports will ignore this packet, closed ports will respond with RST packets. Many firewalls only perform simple filtering on SYN packets and ignore other forms of TCP attack packets. This type of scan can indirectly detect the robustness of the firewall.-sU: UDP scan, detects which UDP services the target host provides; UDP scanning is relatively slow.-sP: ICMP scan, similar to ping detection, quickly determines whether the target host is alive, without performing other scans.-P0: Skip ping detection; this method assumes that all target hosts are alive, and when the other party does not respond to ICMP requests, this method can avoid giving up scanning due to inability to ping.
Further ExpansionPrevent brute-force cracking of ssh through pam modulevim /etc/pam.d/sshd
Add a line below the first line:auth required pam_tally2.so deny=3 unlock_time=600 even_deny_root root_unlock_time=1200 Explanation: If login attempts fail more than 3 times, ordinary users will unlock after 600 seconds, and root users will unlock after 1200 seconds.Manually unlock:Check the number of failed login attempts for a certain user: pam_tally2 –userFor example, check the number of failed login attempts for the work user: pam_tally2 –user workClear the number of failed login attempts for a certain user: pam_tally2 –user –resetFor example, clear the number of failed login attempts for the work user: pam_tally2 –user work –reset
Link: https://www.cnblogs.com/qfzr2508/p/15781775.html
(Copyright belongs to the original author, infringement will be deleted)
WeChat group
WeChat group

To facilitate better communication on operation and maintenance and related technical issues, a WeChat group has been created. Friends who need to join the group can scan the QR code below to add me as a friend (note: join the group).

Blog
Guest
Blog
CSDN Blog: https://blog.csdn.net/qq_25599925

Juejin Blog: https://juejin.cn/user/4262187909781751

Knowledge Planet: https://wx.zsxq.com/group/15555885545422

Long press to recognize the QR code to visit the blog website and see more high-quality original content.