This article introduces how to connect a custom HTTP client to the MCP server without the MCP client. MCP is a protocol that enables large language models (LLM) to connect to any endpoint, simplifying the connection between developers and external tools. The article details the architectural components of MCP and provides an implementation process, including setting up the environment, creating a Python class to capture server responses, and using LLM to generate SQL queries.
Key Points
MCP is hailed as a significant revolution in the LLM field, allowing LLM to connect to any endpoint.
MCP clients are typically used to communicate with MCP servers, but a more flexible connection can be achieved through an HTTP client.
The architecture of MCP includes the MCP host, client, and server, as well as local and remote services.
The article provides steps to connect a custom HTTP client to a MySQL MCP server, including setting up the Python environment and cloning the MCP server code.
By using subprocess to capture the response from the MCP server and implementing data sending and receiving with a Python class.
Using LLM to generate SQL queries and executing these queries through the MCP server.
The article emphasizes that the alternative implementation of the MCP client makes applications more flexible and secure in an internet environment.
This content was generated by AI.
If you are in the field of language modeling or working around language modeling, you have certainly heard of MCP. It is touted as the biggest revolution in the LLM field since the emergence of agent frameworks like LangGraph and crew.ai.
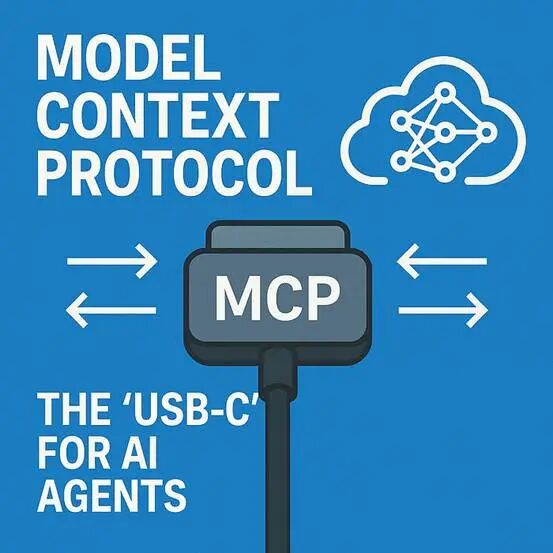
Creating the Model Context Protocol (MCP) image, which is the “USB-C” of AI agents. (Image generated by ChatGPT).
However, most available tutorials still limit you to using these MCP servers on the Claude desktop, and there must be an MCP client for communication between the host and the MCP server.
In this article, we will learn how to call the MCP server from any HTTP client (we will simply demonstrate how to intercept STDIO output and use it). Before proceeding, let’s quickly review what MCP is and how it can benefit us.
Note -> You can use HTTP Stream Transport in MCP instead of STDIO Stream (default) to perform the same task, but we will make it more flexible by completely eliminating the need for an MCP client.
What is the Model Context Protocol (MCP)?
For those who want to skip this section,
By enabling LLM to connect to any endpoint, we can shift the burden of understanding the API from developers to LLM. MCP provides this capability for LLM to connect to any endpoint.
In November 2024, Anthropic published a blog post in which they announced that they are open-sourcing a framework that will standardize the bidirectional connection between AI assistants and external tools. They called this standard the Model Context Protocol (MCP).
Let’s take a look at the components of MCP (excerpted from the official documentation),
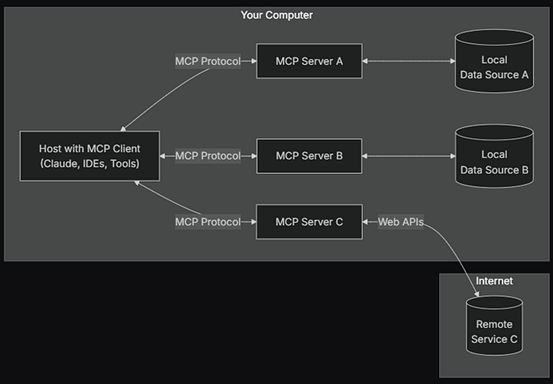
General client-server architecture with MCP implementation (Image excerpted from official documentation)
MCP Host: The program that wishes to use data via MCP.
MCP Client: A client that maintains a 1:1 connection with the server (we will not use this in the implementation).
MCP Server: Each program exposes specific functionalities through standardized MCP.
Local and remote services: Resources provided locally or through external API endpoints.
Understanding the difference between accessing the MCP server using the MCP client and using a custom HTTP client
By default, the Model Context Protocol uses STDIO as the transport mechanism, which is great for local development and simple applications, but when we talk about web-based applications, HTTP is the preferred protocol as it allows us to have a single endpoint with session management and authentication.
MCP also provides HTTP stream transport, but when everything you do is on the same machine and you don’t want to set up a server, you will need something simpler with zero deployment overhead.
Now let’s start implementing a custom HTTP client to connect to the MySQL MCP server!
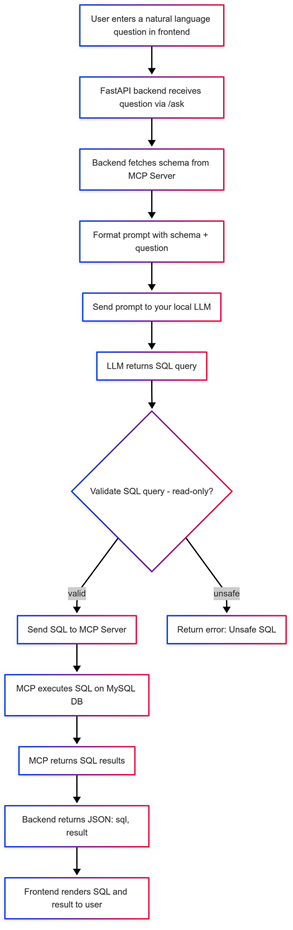
You can perform the general process of using a custom HTTP client (we will not cover all steps here, just the important steps — as created by the author’s flowchart).
Prerequisites
- Python (3.7+)
- Node.js (14.x or higher)
- MySQL Server (8.x or higher)
Setting Up the Environment
We will first create a separate Python environment.
# Creating the environment
conda create -n mysql_mcp
# Activating the environment
conda activate mysql_mcp
Clone the MCP server for MySQL (https://github.com/benborla/mcp-server-mysql),
git clone https://github.com/benborla/mcp-server-mysql
cd mcp-server-mysql
In the repository, you will find a .env.dist file as shown below:
# Basic MySQL connection settings
MYSQL_HOST=127.0.0.1
MYSQL_PORT=3306
MYSQL_USER=root
MYSQL_PASS=your_password
MYSQL_DB=name_of_your_db
# Additional environment variables...
Only change the MySQL connection settings and save the file as .env.
I am using XAMPP to maintain my MySQL instance, but you can use any other MySQL installation.
This is what my example table (called “customers”) looks like:

The “customers” table is used for testing the MCP server.
After saving the .env file, install the Node.js dependencies in the cloned repository and compile the scripts.
npm install
# Compiling the TypeScript code
npm run build
Testing the Server by Capturing Responses Using Subprocess
This is what my directory tree looks like now,
mcp
|->local_app
    |->.env # This .env file is identical to the one in the repo
    |->cature_mcp.py
    |->mcp-server-mysql # This is the cloned repo
Let’s go into subprocess.py and create a class to capture “stdio” messages (used by the MCP server),
import subprocess
import json
import threading
class Capture:
    def __init__(self, cmd=["node", # or path to your node.exe "../mcp-server-mysql/dist/index.js"]):
        self.process = subprocess.Popen(
            cmd,
            stdin=subprocess.PIPE,
            stdout=subprocess.PIPE,
            stderr=subprocess.PIPE,
            text=True,
            bufsize=1
        )
Note -> subprocess.PIPE is used to send data to the process.
Here, we simply capture standard input, output, and error, and store everything in a variable called process.
Now we need the following functions:
1 — Function to Read Standard Output
# Inside the Capture class
def _read_stdout(self):
    for line in self.process.stdout:
        print("Stdout: ", line.strip())
2 – Function to Send Data to the MCP Server
# Inside the Capture class
def send(self, payload):
    data = json.dumps(payload) + '\n'
    with self.lock:  # Locking the thread
        self.process.stdin.write(data)
        self.process.stdin.flush()  # Ensuring that the data is sent
        self._read_stdout()
3 — Function to Terminate the Process
# Inside the Capture class
def shutdown(self):
    self.process.terminate()
Now let’s call these functions in the class constructor.
# Inside the __init__ function of the Capture class
self.lock = threading.Lock()
self.reader = threading.Thread(target=self._read_stdout, daemon=True)
self.reader.start()
Thus, the complete Capture class looks like this:
import subprocess
import json
import threading
class Capture:
    def __init__(self, cmd=["node", # or path to your node.exe "../mcp-server-mysql/dist/index.js"]):
        self.process = subprocess.Popen(
            cmd,
            stdin=subprocess.PIPE,
            stdout=subprocess.PIPE,
            stderr=subprocess.PIPE,
            text=True,
            bufsize=1
        )
        self.lock = threading.Lock()
        self.reader = threading.Thread(target=self._read_stdout, daemon=True)
        self.reader.start()
    def _read_stdout(self):
        for line in self.process.stdout:
            print("Stdout: ", line.strip())
    def send(self, payload):
        data = json.dumps(payload) + '\n'
        with self.lock:  # Locking the thread
            self.process.stdin.write(data)
            self.process.stdin.flush()  # Ensuring that the data is sent
            self._read_stdout()
    def shutdown(self):
        self.process.terminate()
Let’s test it with the following driver code,
# Inside the subprocess.py file
client = Capture()
# This format of this payload will be according to the MCP server
payload = {"jsonrpc": "2.0",
            "id": "1",
            "method": "tools/call",
            "params": {"name": "mysql_query",
                        "arguments": {"sql": "SELECT * FROM customers;"  # Manual SQL query
                        }
                    }
}
client.send(payload)
The output will look like this:
Stdout: {"result":{"content":[{"type":"text","text":"[\n {\n\"id\": 1,\n\"name\": \"Alice Smith\",\n\"email\": \"[email protected]\"\n },\n {\n\"id\": 2,\n\"name\": \"Bob Jones\",\n\"email\": \"[email protected]\"\n }\n]"}],"isError":false},"jsonrpc":"2.0","id":"1"}If you do not see this content, please double-check your .env file and ensure all environment variables are correct.
Note -> If there are no logs printed in the console, go to dist/index.js repo and change all log to console.log (except for import statements).
Integrating Everything Together
What we now need to do is have an LLM in a loop that will generate MCP server SQL queries for validation and execution.
Add a new Python file in the directory tree. I will call it main.py,
mcp
|->local_app
    |->.env # This .env file is identical to the one in the repo
    |->cature_mcp.py
    |->main.py             # New Python file
    |->mcp-server-mysql # This is the cloned repo
In my case, I will use DeepSeek v3 directly from OpenRouter, but you can use any other LLM you prefer.
In main.py, we will now write a function to prompt the LLM,
import os
from dotenv import load_dotenv
from openai import OpenAI
from capture_mcp import Capture
load_dotenv()
def llm(prompt):
    client = OpenAI(
        base_url="https://openrouter.ai/api/v1",
        api_key=os.getenv("OPENAI_API_KEY"),
    )
    completion = client.chat.completions.create(
        extra_body={},
        model="deepseek/deepseek-chat-v3-0324:free",
        messages=[
            {"role": "system", "content": "You are a SQL expert. Convert natural language into SQL queries. Give only the SQL queries in the output without any additional tokens or formatting."},
            {"role": "user", "content": prompt}
        ],
        temperature=0,
    )
    return completion.choices[0].message.content
Note -> For replication, use the same model with the same prompt and keep the temperature equal to 0.
Now, we will create a simple while loop that will continuously request user input and maintain the entire workflow.
def main():
    client = Capture()
    try:
        while True:
            prompt = input("Enter your query (or 'exit'): ")
            if prompt.lower() == "exit":
                break
            try:
                sql = llm(prompt)
                print("Generated SQL:", sql)
                payload = {"jsonrpc": "2.0",
                            "id": "1",
                            "method": "tools/call",
                            "params": {"name": "mysql_query",
                                        "arguments": {"sql": sql}
                                        }
                            }
                client.send(payload)
            except Exception as e:
                print("Error:", e)
    finally:
        client.shutdown()
Upon executing the main function and prompting with “Tell me the names of all the customers”, I received the following output,

Output generated by main.py is exactly the same as what we got when we wrote the query manually.
Note -> This article is not about the MySQL implementation; better MySQL implementations can be achieved by passing the DB schema to the LLM, using specific fine-tuned LLM, etc.
You can easily extend this implementation to include API endpoints and send GET and POST requests to access the MCP server. We have now successfully seen how to access the MCP server without an MCP client to make our applications more flexible and secure on the Internet.
Related Recommendations
Top 10 MCP Servers: From Data Scraping to Frontend Development, One-Click Integration
Beginner’s Guide: Building an MCP Server with Python! A Comprehensive Guide to Integrating Claude Desktop from Scratch (with Code + Pitfall Guide)
AI Generates 1-Minute [Tom and Jerry] New Plot Video, Stanford Team Achieves Infinite Animation Refills, Free Local Deployment of Beginner’s Tutorial
First Medical AI Agent Symposium – International Medical Image Computing and Computer-Assisted Intervention Association (MICCAI) Held
Edge Computing + Open Source Models: Smartwatch “Brain” Evolution, Opening a New Era of Real-Time Health Monitoring
Human Intelligence Exchange
Bringing Future Intelligence Closer
Human and Future Intelligence Communication Platform
All Networks | Human Intelligence Exchange
Join the Discussion Group ·

|
|
|
|
|
|