Today, Teacher Cheng from the Mark Pen Design Study Abroad continues to bring knowledge about Arduino. In previous articles, many common sensors have been introduced, such as ultrasonic sensors, human infrared sensors, and photoresistors.This time we will talk about a slightly more complex module – the SD card module.
Actually, when it comes to music playback, many students should have used the buzzer module. A buzzer is an electronic sound-emitting component that can emit a “beep” sound. It uses DC voltage for power supply and is widely used in computers, printers, copiers, alarms, electronic toys, automotive electronic devices, telephones, timers, and other electronic products as a sound-emitting device.
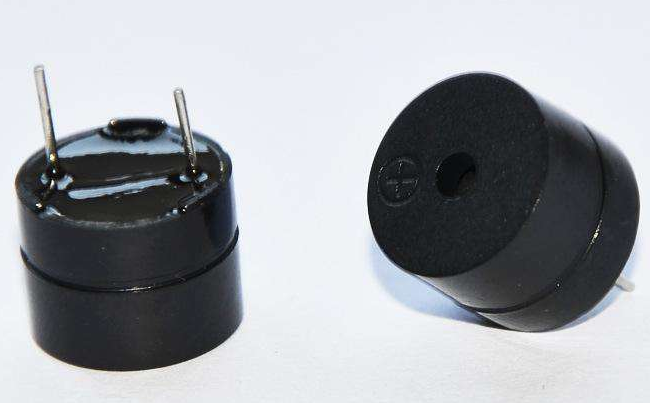
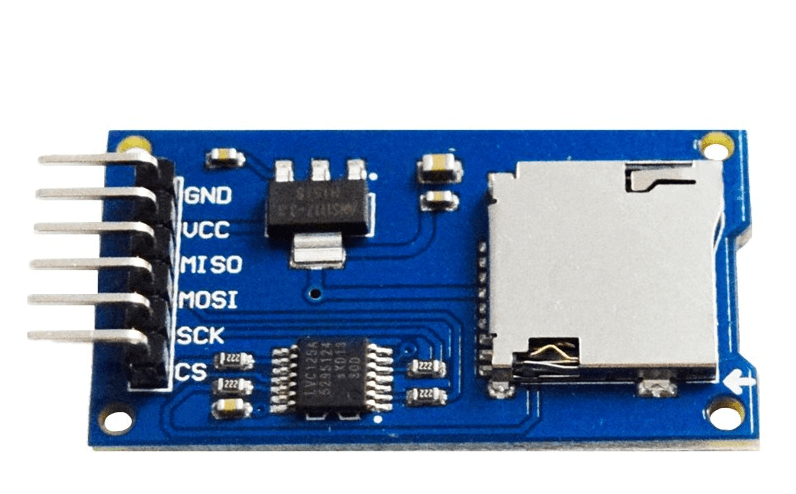
Buzzer modules are divided into two types: active buzzers and passive buzzers. Active buzzers: have an internal oscillation source and will emit a fixed frequency sound as soon as power is applied. Passive buzzers: do not have an internal oscillation source and require a pulse signal of 2KHz to 5KHz to drive sound, with variable sound frequency. From the appearance, the two types of buzzers look similar; the active buzzer has a sealed bottom, while the passive buzzer has a visible circuit board on the bottom. Both types of buzzers are marked with positive and negative poles. Those who have used buzzers should know that the sound they emit is not pleasant and is quite harsh, so today we will not focus on the connection method of the buzzer but will return to the SD card module. As shown in the figure below, the SD card module has six pins and a slot for the SD card.
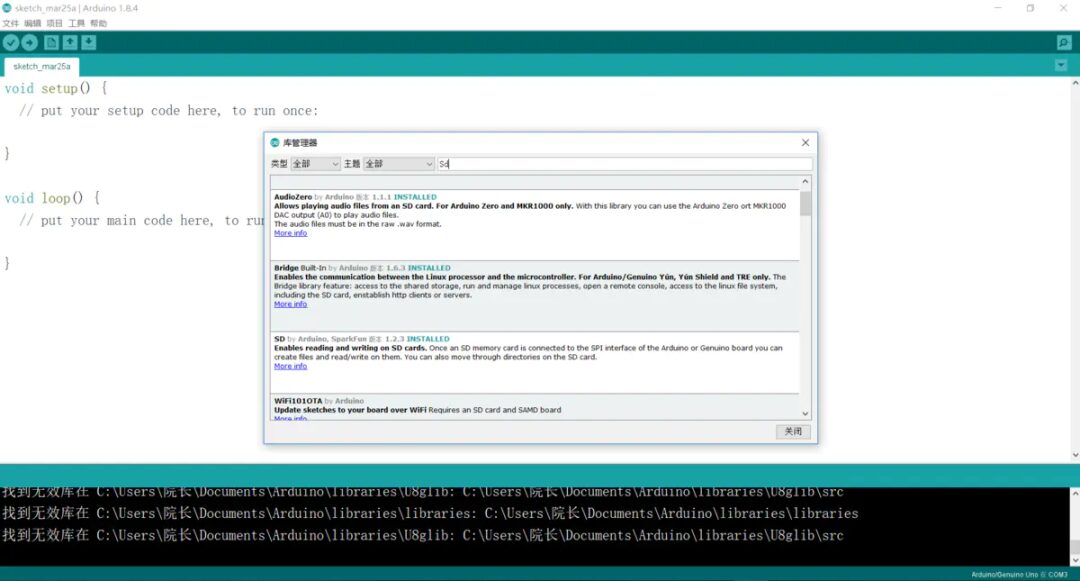
In the entire program, the third-party libraries we reference are the SPI and SD libraries, which are displayed in the sample program as “#include <SPI.h>” and “#include <SD.h>”. We use the SD utility library functions to set variables. I have detailed the steps to download and install third-party libraries in previous articles; students who are unclear can refer back to those articles. We need to install these two libraries in the Arduino IDE path. How to Install Libraries for Arduino IDE
Of course, if you want to create your own music player with Arduino, you will also need an Arduino speaker. The SD card inserted in the module is a Micro SD card, and we need to put the desired music into the card. Note that the audio/music files need to be converted to WAV format, meaning they should be .wav files. This is because the third-party libraries mentioned above only support PCM audio in WAVE file format (.wav).
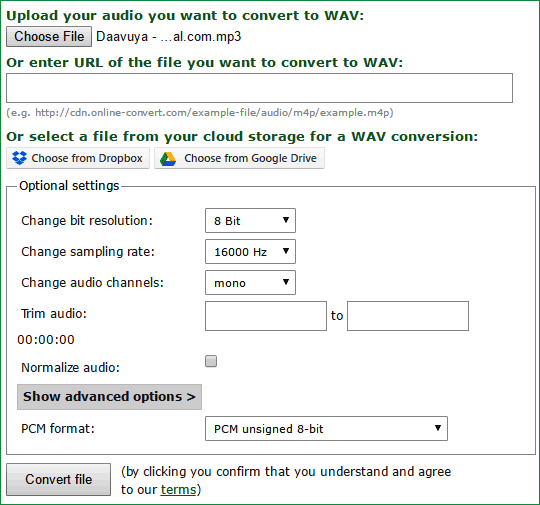
Therefore, the first step is to convert mp3 files to .wav files. We can use any audio converter software, the conversion option in VLC Media Player, or any online tool. The online tool I often use is ONLINE-CONVERT.com. It supports various file types, such as archives, audio, documents, etc. Upload the mp3 file and set the following options in the optional settings: Change bit resolution: 8-bit; Change sample rate: 16000Hz; Change audio channel: mono; PCM format: PCM unsigned 8-bit; After modifying according to the above format, click start conversion, and the converted file will be downloaded automatically.
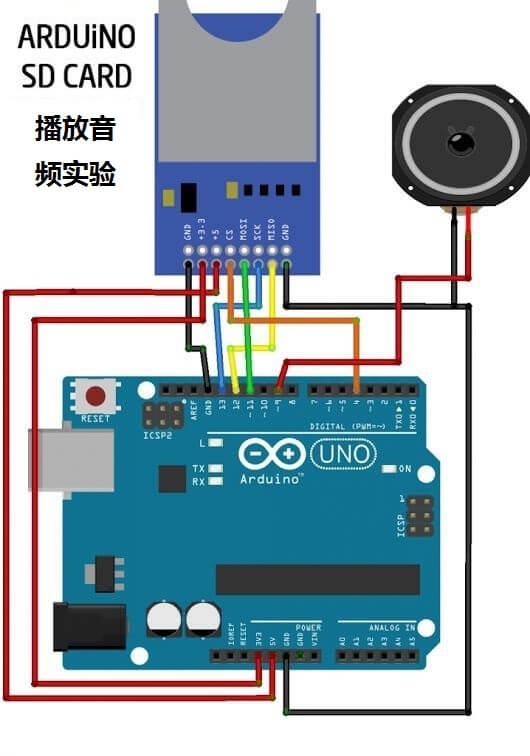
When connecting the SD card module, we can follow the wiring rules defined in the libraries we referenced. Arduino Uno <—–> SD Card Module; GND <—–> GND; 5V <—–> +5; CS <—–> Pin 4; MOSI <—–> Pin 11; SCK <—–> Pin 13; MISO <—–> Pin 12. The connection of the Arduino speaker is very simple, with only a red and a black wire. The red wire will be connected to a digital pin on the Arduino development board, and the black wire will be connected to the negative interface of the Arduino.
Connect the Arduino UNO to the computer and Arduino IDE, using the code provided in the example. In the code, make the necessary changes, namely in the void song() function, replace the filename with the song name on the SD card. For example, if we name all audio files as song1.wav, song2.wav, etc., then the same names should be used in the function. After making the necessary changes, we will upload the code.
After reading the above content, everyone can start making their own music player. There are many videos on YouTube demonstrating how to control the SD card module with various input devices, such as using a human infrared sensor to switch songs. It is recommended that when testing such circuits with controls, first ensure that each component of the circuit can operate normally on its own, so that we can quickly identify circuit problems later.
Image source from the internet
How to Achieve Animation Effects with Arduino (1) – Dot Matrix Module
Several Common Lighting Effects Achievable with Arduino
How to Connect Basic Circuits with Arduino
Summary of the Most Common Sensors Used with Arduino
Author:Cheng Yaqiu
Master’s in Product Design from the Royal College of Art
Specializes in product service system design, user experience design, and hardware Arduino interaction
Any questions regarding schools and portfolios
Welcome to communicate anytime
Knowledge is to be shared, and sharing is endless
