
Introduction: The 【Micro:bit】 is a microcomputer development board designed for youth programming education, and it has gained significant popularity in the maker education community. Tutorials and applications surrounding 【Micro:bit】 are constantly being updated. Additionally, Meow Star has customized a high-end expansion version for 小bit – Robot:bit, which has captured the hearts of many enthusiasts!

Recently, a student asked how to use Robot:bit firmware in Mu-Editor. This post will explain how to import Robot:bit firmware into Mu-Editor. So, the question arises, What is Mu-Editor?

Mu-Editor is a cross-platform editor suitable for developers who prefer simplicity. It only includes the most basic core features without complex interfaces or settings, and no various plugins; it is optimized specifically for Micro:bit, allowing users to write micropython programs directly and flash them onto the Micro:bit.
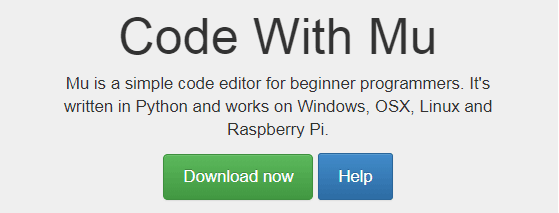
It is compatible with Windows, OSX, Linux, and Raspberry Pi (depending on the version used). This article takes Windows as an example.

Mu-Editor Editor Usage Instructions


1. New: Create a new program file, opening a new editing interface;
2. Load: Load a previously saved .py file;
3. Save: Save the current page;
4. Flash: Upload the code to Micro:bit to make it run;
5. Files: Display files (programs) on Micro:bit;
6. repl: A command control mode;
7. Zoom-in / -out: Zoom in / out;
8. Theme: Theme color of Mu Editor;
9. Check: Check the code for errors and mark errors; it is recommended to run the check before Flashing;
10. Help: Help interface of the editor;
11. Quit: Exit Mu Editor.
Next, let’s introduce today’s topic: how to useRobot:bit Python Firmware
Robot:bit Python Firmware
Meow Star has made deep customizations to Micro:bit’s micropython:
-
Supports 8-channel servos on the expansion board;
-
Supports 4-channel motors on the expansion board;
-
Supports 2-channel stepper motors on the expansion board;
-
Directly supports ultrasonic modules.
This firmware is the same as the micropython mode used in Kittenblock software.
Usage Guide (Six Steps)
Step 1: First, ensure that your Mu-Editor is the latest version.
Step 2: Download the firmware Robotbit.hex from the attachment (please click “Read the original text” at the bottom of the article to download).

Step 3: Copy Robot:bit.hex to Mu’s working directory C:\Users\YourUsername\Mu_code;
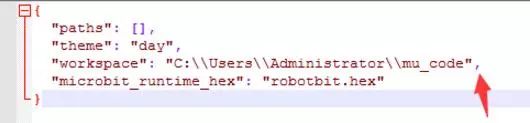
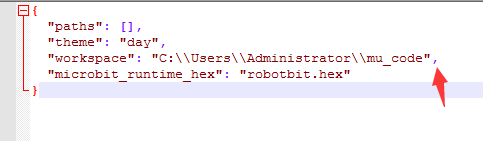
Step 4: Edit Mu’s configuration file C:\Users\YourUsername\AppData\Local\python\mu\settings.json, and insert the following content;

The edited file should look like this, note that a comma should be added at the end of the previous line, and the username is still your computer’s username;
Step 5: Save the file, and reopen Mu. Create a new empty project and flash it;
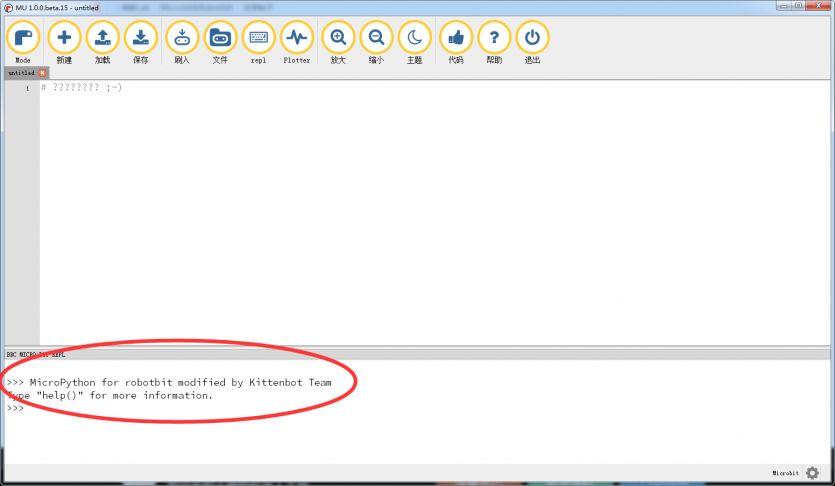
Step 6: Open Mu’s serial terminal (click the ‘repl’ icon), if you see the prompt with KittenBot team information, congratulations, you have configured it successfully~
If you cannot find that configuration file, it may be because the version is too old, or try reinstalling Mu. If you don’t know how to write a program, you can refer to the code automatically generated for Micro:bit in Kittenblock, as both use the same firmware.
New APIs Added to Robot:bit Firmware are as follows
1. Import Robot:bit Library

2. DC Motor Control
Robot:bit.motor(motorNumber, speed, duration)
Motor Number: 0 (all motors), 1~4 (corresponding to M1A M1B M2A M2B)
Speed: -255~255, duration: how many ms after which the motor stops; if 0, it will not stop.

3. Stop DC Motor
Robot:bit.motorstop(1) Motor Number: 0 (all motors), 1~4 (corresponding to M1A M1B M2A M2B)
4. Stepper Motor Movement
Robot:bit.stepper(stepperMotor1Angle, stepperMotor2Angle)

5. Servo Control
Robot:bit.servo(servoNumber, servoAngle) Servo Number: 0~7 corresponding to S1~S8, Angle: 0~180

6. Ultrasonic
(Compatible with Meow Star’s cat ear ultrasonic, for general HC-04 ultrasonic, please short TRIG and ECHO) Robot:bit.sonar(pin) Pin: pin0 ~ pin3 (corresponding to microbit pins)

The tutorial ends here. If you encounter any issues during the experience, feel free to interact by leaving a message~ Programs that need to be downloaded can also be obtained through “Read the original text”.
END