 1. What is KVMKVM (Kernel-based Virtual Machine) is an open-source virtualization technology integrated into the Linux kernel. It allows you to transform the Linux kernel itself into a Type-1 (bare-metal) hypervisor, enabling multiple isolated virtual machines (VMs) to run on a single physical host.2. Key Features of KVMThe core of KVM is the Linux kernel module. KVM itself is not a standalone application or a complete virtual machine monitor. It consists of two loadable kernel modules: kvm.ko (the core module) and kvm-intel.ko or kvm-amd.ko (processor-specific modules). These modules turn the Linux kernel into a hypervisor.KVM relies on hardware virtualization extensions of modern CPUs: Intel VT-x or AMD-V. These extensions provide support for CPU virtualization directly at the hardware level, making the execution of virtual machines highly efficient, almost close to native speed.Since KVM runs directly on physical hardware (as part of the kernel), it is classified as a Type-1 hypervisor. This is different from VirtualBox or VMware Workstation, which are Type-2 hypervisors that run on top of a host operating system. This architecture offers better performance, higher efficiency, and lower latency.While KVM provides core virtualization features (CPU and memory virtualization), it does not simulate hardware devices (such as hard drives, network cards, graphics cards, etc.) or provide management interfaces. This is typically handled by a modified version of QEMU, which is an open-source machine emulator and virtualization tool.libvirt is a commonly used management toolkit and API that provides a unified interface to manage KVM (as well as other virtualization technologies like Xen, LXC, etc.). Tools like virt-manager (graphical interface) and virsh (command line) are based on libvirt, greatly simplifying the creation, configuration, and management of KVM virtual machines.3. How KVM Works
- The host operating system (Host OS) is a Linux system running the KVM kernel modules.
- When a KVM virtual machine is started:
- The Linux kernel loads the virtual machine image through the KVM module.
- Using the CPU’s hardware virtualization extensions, the instructions of the operating system in the virtual machine (Guest OS) are executed directly on the physical CPU (in protected mode).
- KVM handles sensitive instructions and events that require hypervisor intervention (such as I/O requests, interrupts).
- QEMU handles device emulation (for example, emulating a virtual hard disk, network card), converting the virtual machine’s device I/O requests into accesses to actual devices or files on the host.
- Each virtual machine runs as a regular Linux process on the host. This means you can use standard Linux tools (like top, ps, kill) to view and manage virtual machine processes.
4. Main Application Scenarios of KVMServer Virtualization: Consolidating multiple workloads (web servers, databases, application servers, etc.) on a single physical server.Cloud Computing Infrastructure: The default or primary hypervisor for mainstream open-source cloud platforms and virtualization management platforms like OpenStack, oVirt, Proxmox VE.Virtual Desktop Infrastructure: Providing a centralized virtual desktop environment.Development and Testing: Creating isolated environments for software development, testing, and debugging.Disaster Recovery: Utilizing snapshot and migration features to ensure business continuity.Isolated Environments: Running different services or applications that require strong isolation.5. Setting Up a KVM Virtualization PlatformExperimental EnvironmentUsing CentOS 7, a graphical interface needs to be installed, and virtualization support must be enabled. The case environment is as follows:
| Hostname | Operating System | IP Address | Main Software |
| KVM01 | CentOS 7 | 10.211.55.7 | KVM Virtual Machine |
Basic Environment Configuration:Configure the hostname, disable the firewall and SELinux.
[root@localhost ~]# hostnamectl set-hostname kvm01
[root@localhost ~]# bash
[root@kvm01 ~]# systemctl disable --now firewalld
Removed symlink /etc/systemd/system/multi-user.target.wants/firewalld.service.
Removed symlink /etc/systemd/system/dbus-org.fedoraproject.FirewallD1.service.
[root@kvm01 ~]# setenforce 0
[root@kvm01 ~]# sed -i '/^SELINUX=/s/enforcing/disabled/g' /etc/selinux/config
[root@kvm01 ~]# grep '^SELINUX=' /etc/selinux/config
SELINUX=disabled
Install KVM using yum.
[root@kvm01 ~]# yum -y install qemu-kvm qemu-img bridge-utils virt-manager libguestfs-tools virt-install libvirtCheck if CPU virtualization features are supported.
[root@kvm01 ~]# grep -o vmx /proc/cpuinfo
vmx
vmx
[root@kvm01 ~]# lsmod | grep kvm
kvm_intel             188740  0
kvm                   637515  1 kvm_intel
irqbypass              13503  1 kvm
Check if the libvirtd service is running.
[root@kvm01 ~]# systemctl status libvirtd
● libvirtd.service - Virtualization daemon   Loaded: loaded (/usr/lib/systemd/system/libvirtd.service; enabled; vendor preset: enabled)   Active: active (running) since Thu 2025-08-07 17:41:34 CST; 2min 55s ago     Docs: man:libvirtd(8)           https://libvirt.org Main PID: 3652 (libvirtd)    Tasks: 19 (limit: 32768)   CGroup: /system.slice/libvirtd.service           ├─1627 /usr/sbin/dnsmasq --conf-file=/var/lib/libvirt/dnsmasq/default.conf --leasefile-ro --dh...           ├─1628 /usr/sbin/dnsmasq --conf-file=/var/lib/libvirt/dnsmasq/default.conf --leasefile-ro --dh...           └─3652 /usr/sbin/libvirtd
Aug 07 17:41:34 kvm01 systemd[1]: Starting Virtualization daemon...
Aug 07 17:41:34 kvm01 systemd[1]: Started Virtualization daemon.
Aug 07 17:41:35 kvm01 dnsmasq[1627]: read /etc/hosts - 2 addresses
Aug 07 17:41:35 kvm01 dnsmasq[1627]: read /var/lib/libvirt/dnsmasq/default.addnhosts - 0 addresses
Aug 07 17:41:35 kvm01 dnsmasq-dhcp[1627]: read /var/lib/libvirt/dnsmasq/default.hostsfile
Set up KVM networking.
[root@kvm01 ~]# nmcli connection add type bridge con-name br0 ifname br0
Connection "br0" (614d683e-caf1-490d-84da-5c6b1cae2c59) successfully added.
[root@kvm01 ~]# nmcli connection add type ethernet con-name br0-slave-eth0 ifname eth0 master br0
Connection "br0-slave-eth0" (4ddde5aa-aafe-4f7f-a707-26d6b11b135f) successfully added.
[root@kvm01 ~]# nmcli connection modify br0 ipv4.method manual ipv4.addresses 10.211.55.7/24 ipv4.gateway 10.211.55.1 ipv4.dns 114.114.114.114
[root@kvm01 ~]# nmcli connection down eth0;nmcli connection up br0;nmcli connection up br0-slave-eth0
Connection "eth0" successfully deactivated (D-Bus active path: /org/freedesktop/NetworkManager/ActiveConnection/1)
Connection successfully activated (master waiting for slaves) (D-Bus active path: /org/freedesktop/NetworkManager/ActiveConnection/6)
Connection successfully activated (D-Bus active path: /org/freedesktop/NetworkManager/ActiveConnection/8)
[root@kvm01 ~]# ip a
1: lo: <loopback,up,lower_up> mtu 65536 qdisc noqueue state UNKNOWN group default qlen 1000    link/loopback 00:00:00:00:00:00 brd 00:00:00:00:00:00    inet 127.0.0.1/8 scope host lo       valid_lft forever preferred_lft forever    inet6 ::1/128 scope host       valid_lft forever preferred_lft forever
2: eth0: <broadcast,multicast,up,lower_up> mtu 1500 qdisc pfifo_fast master br0 state UP group default qlen 1000    link/ether 00:1c:42:0e:e8:55 brd ff:ff:ff:ff:ff:ff
3: virbr0: <no-carrier,broadcast,multicast,up> mtu 1500 qdisc noqueue state DOWN group default qlen 1000    link/ether 52:54:00:67:1c:47 brd ff:ff:ff:ff:ff:ff    inet 192.168.122.1/24 brd 192.168.122.255 scope global virbr0       valid_lft forever preferred_lft forever
4: virbr0-nic: <broadcast,multicast> mtu 1500 qdisc pfifo_fast master virbr0 state DOWN group default qlen 1000    link/ether 52:54:00:67:1c:47 brd ff:ff:ff:ff:ff:ff
5: br0: <broadcast,multicast,up,lower_up> mtu 1500 qdisc noqueue state UP group default qlen 1000    link/ether 00:1c:42:0e:e8:55 brd ff:ff:ff:ff:ff:ff    inet 10.211.55.7/24 brd 10.211.55.255 scope global noprefixroute br0       valid_lft forever preferred_lft forever    inet6 fdb2:2c26:f4e4:0:2b2:4120:1f20:787d/64 scope global noprefixroute dynamic       valid_lft 2591971sec preferred_lft 604771sec    inet6 fe80::f23c:5fcf:70ee:e147/64 scope link noprefixroute       valid_lft forever preferred_lft forever</broadcast,multicast,up,lower_up></broadcast,multicast></no-carrier,broadcast,multicast,up></broadcast,multicast,up,lower_up></loopback,up,lower_up>
6. KVM Virtualization ApplicationsLog in as the root user to the graphical interface system and execute the virt-manager command in the terminal to open the virtual machine management interface.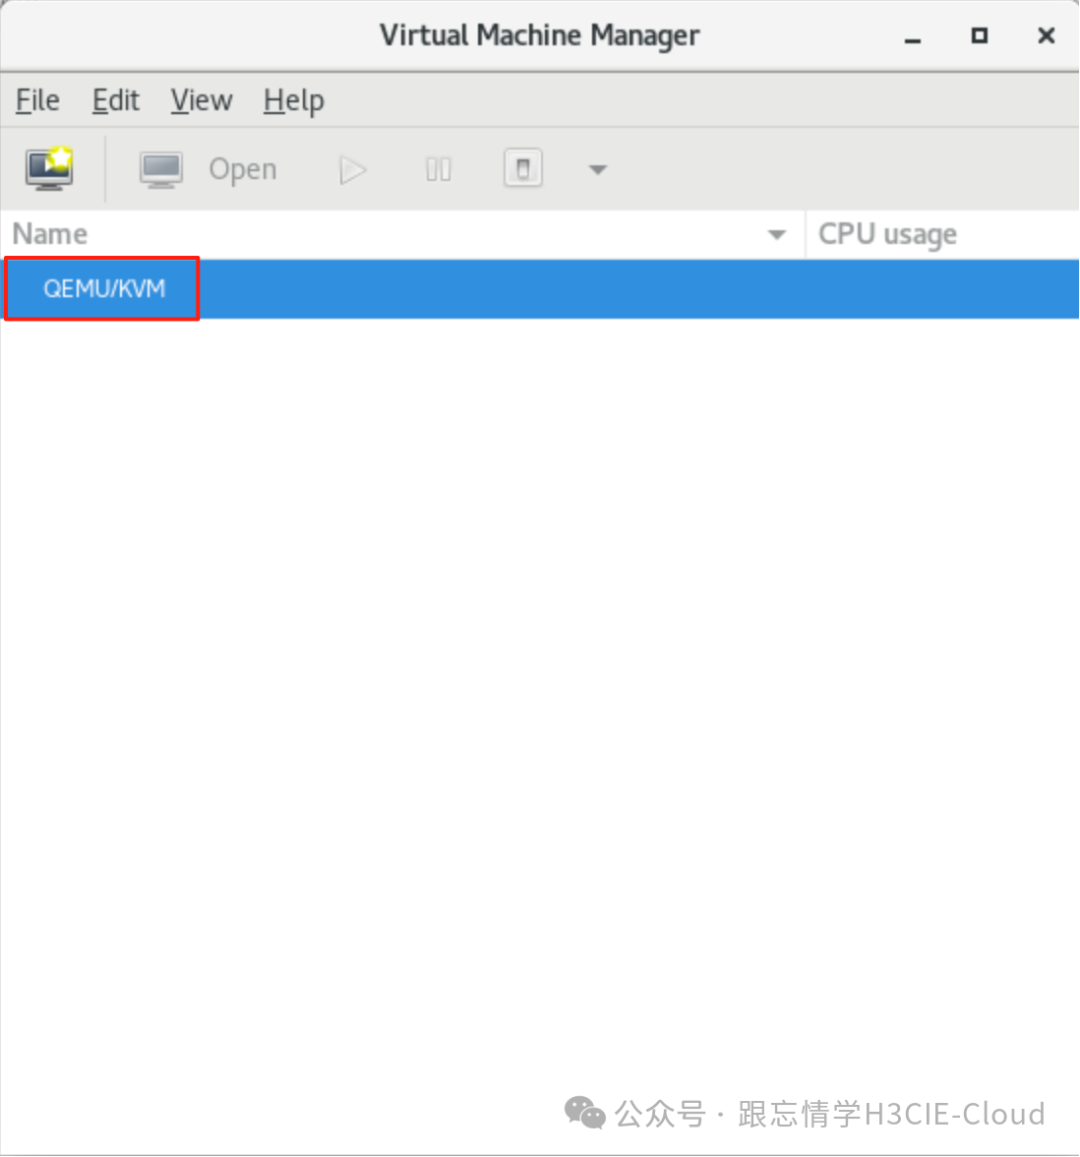 Double-click the QEMU/KVM option, then click the storage option to open the storage pool creation interface, and click the + sign to create storage.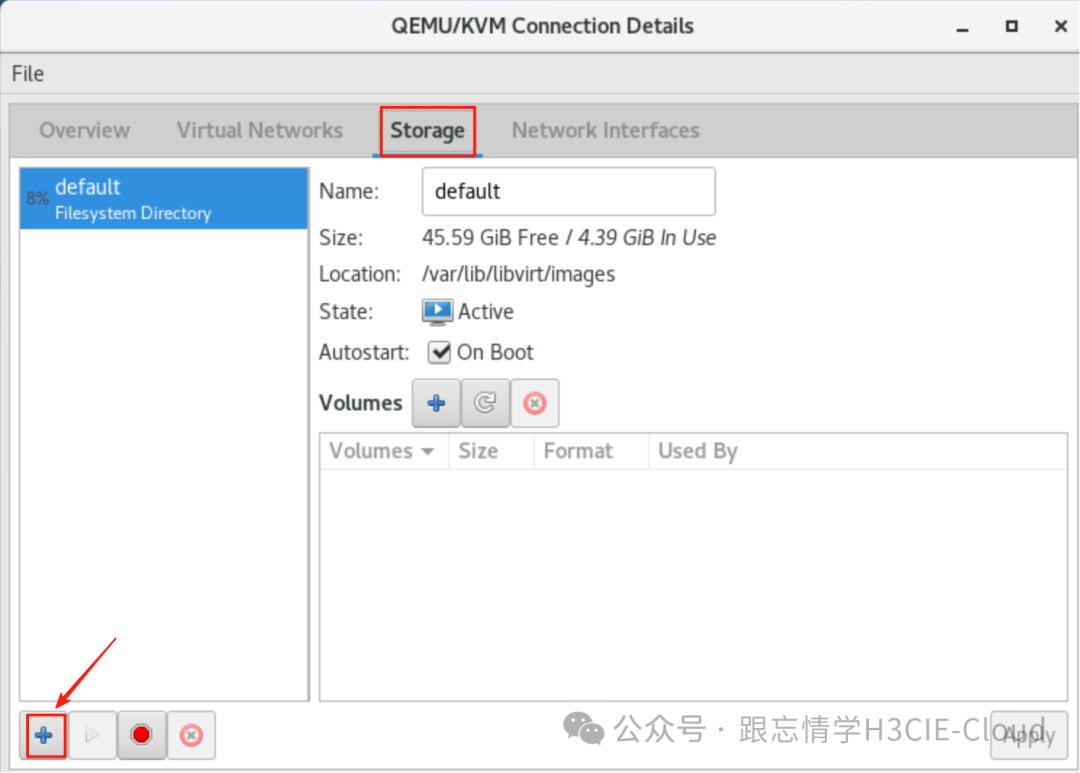
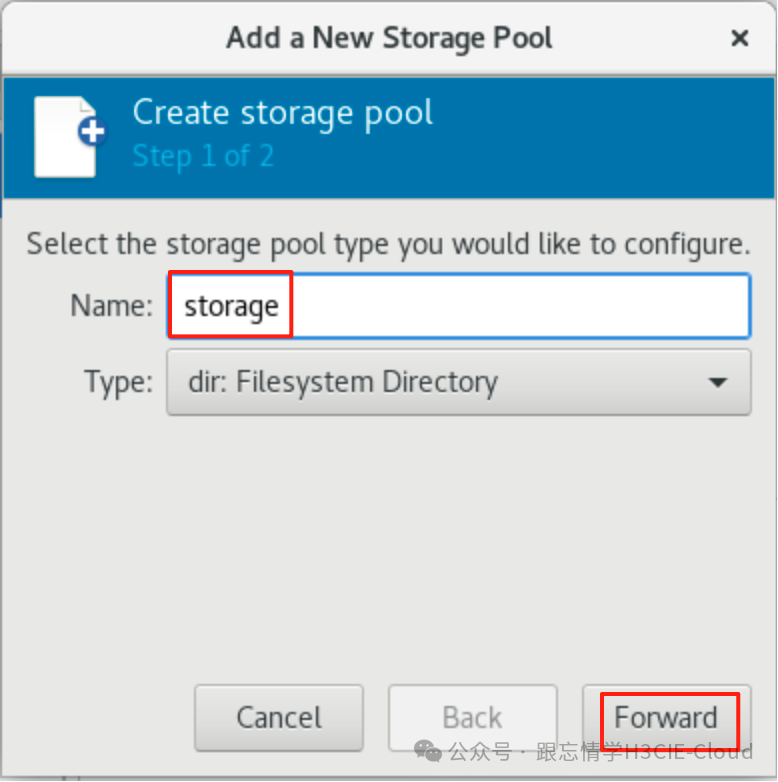
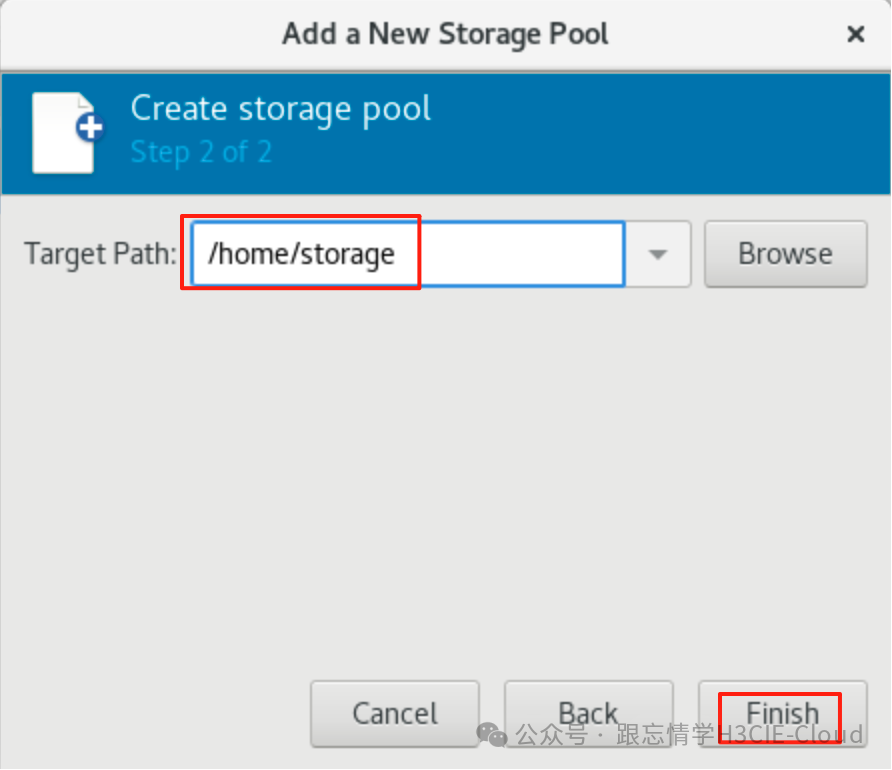 Here, you should choose a directory with sufficient space to store virtual machine resources. In my environment, the /home directory is relatively spacious, so I choose to create the storage pool in the /home directory.Next, create a storage volume to be used by the virtual machine as the hard disk file.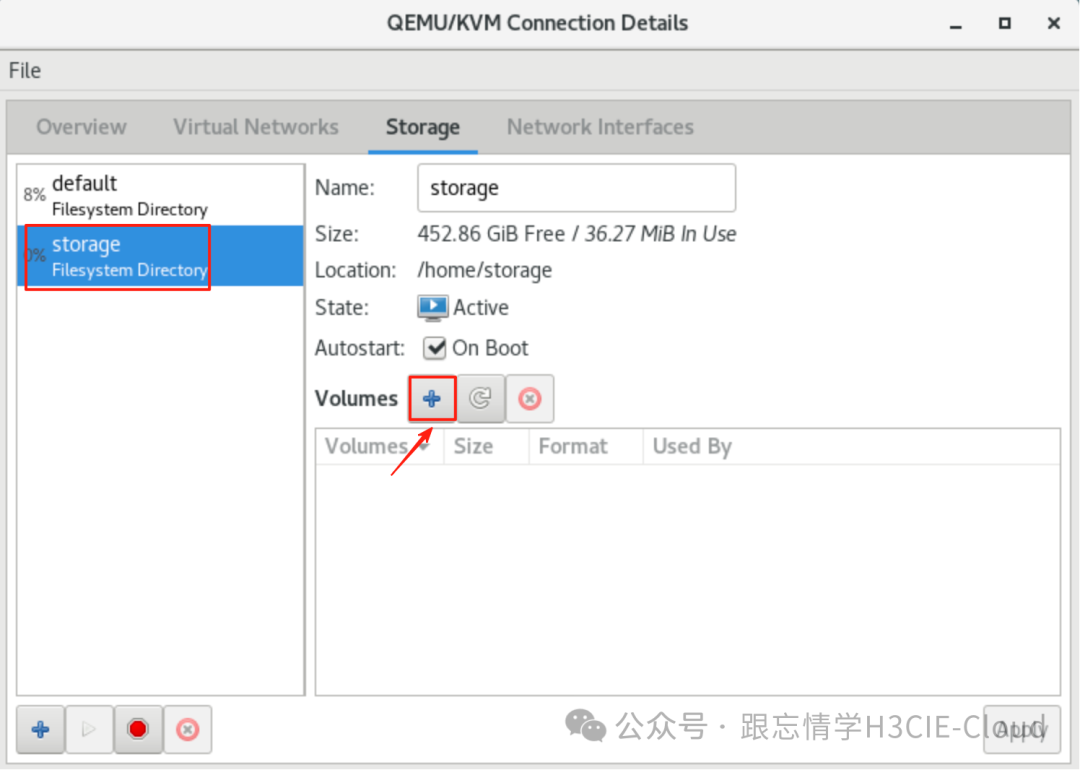
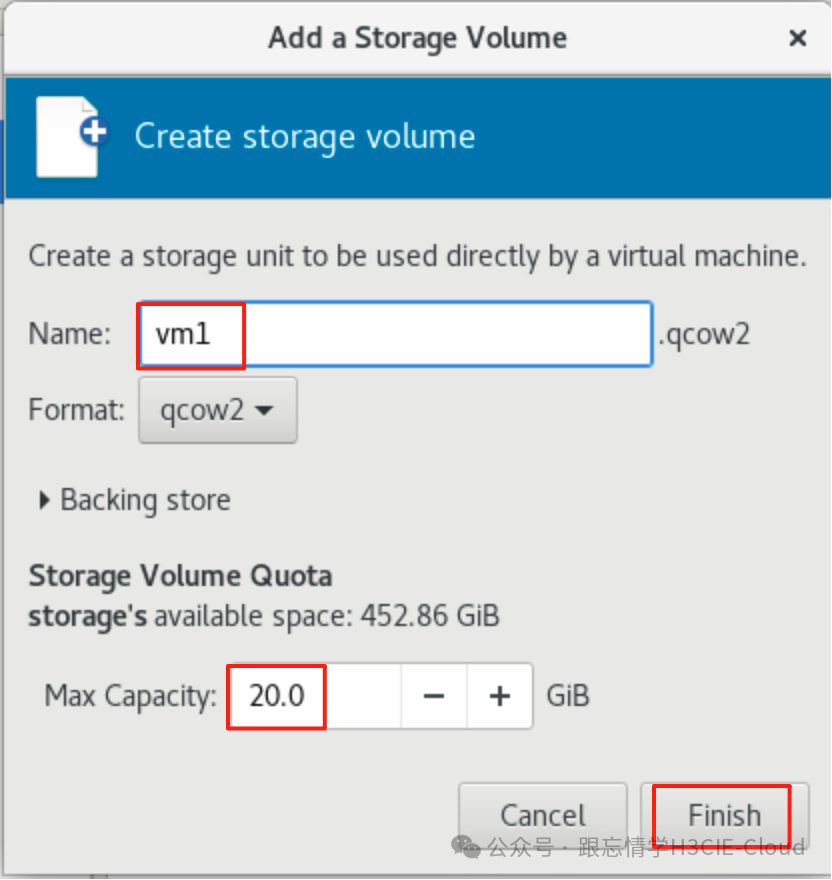 Upload the system installation ISO file to the /opt/ directory.
[root@kvm01 ~]# ls /opt/CentOS-7-x86_64-Everything-2207-03.isoCreate the virtual machine.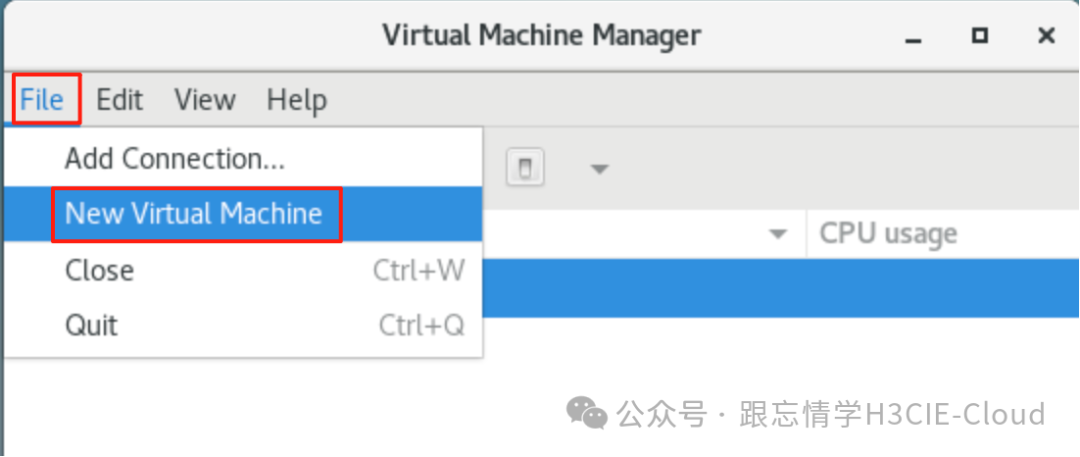
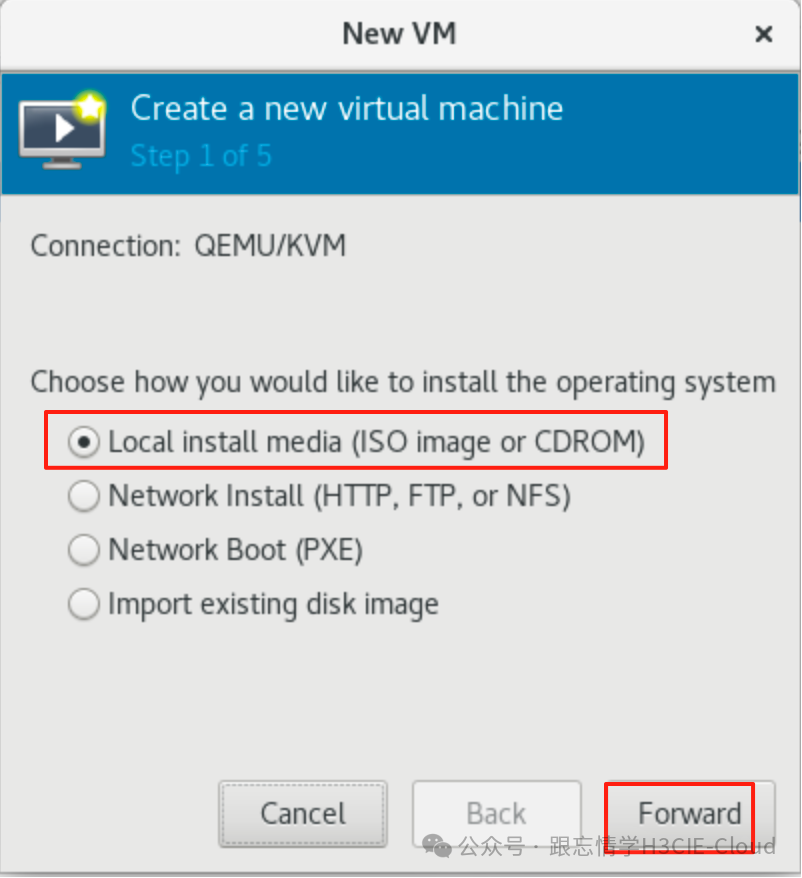
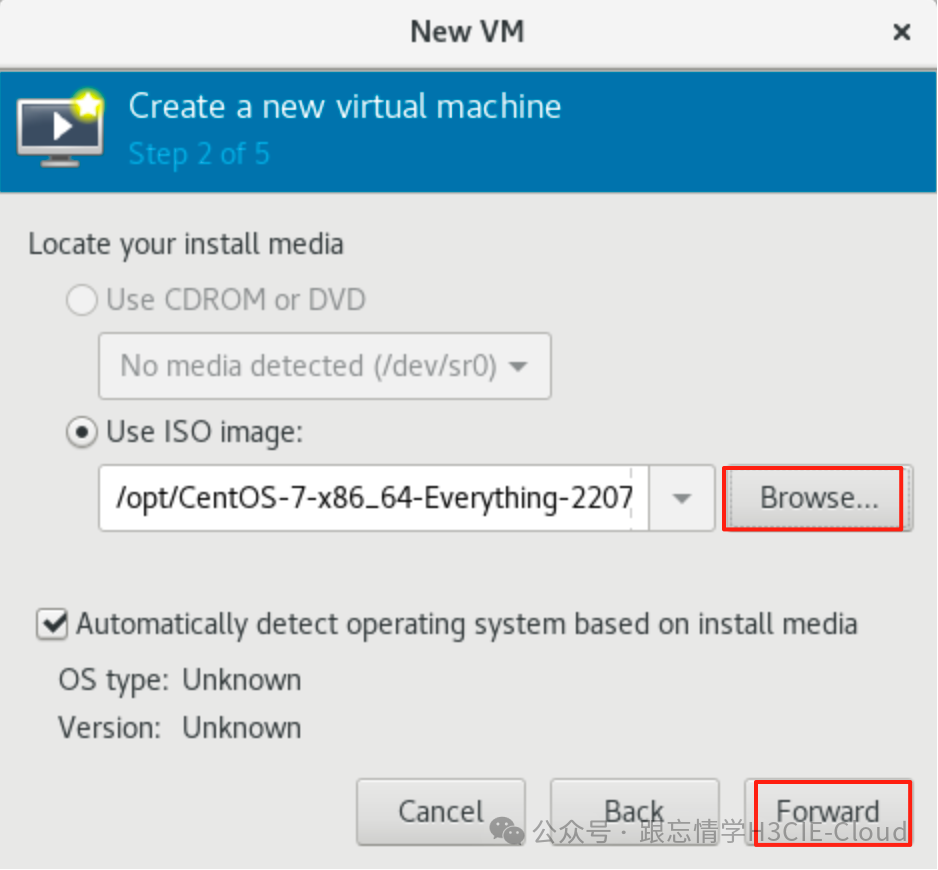 Click Browse to select the system ISO file uploaded to the /opt directory.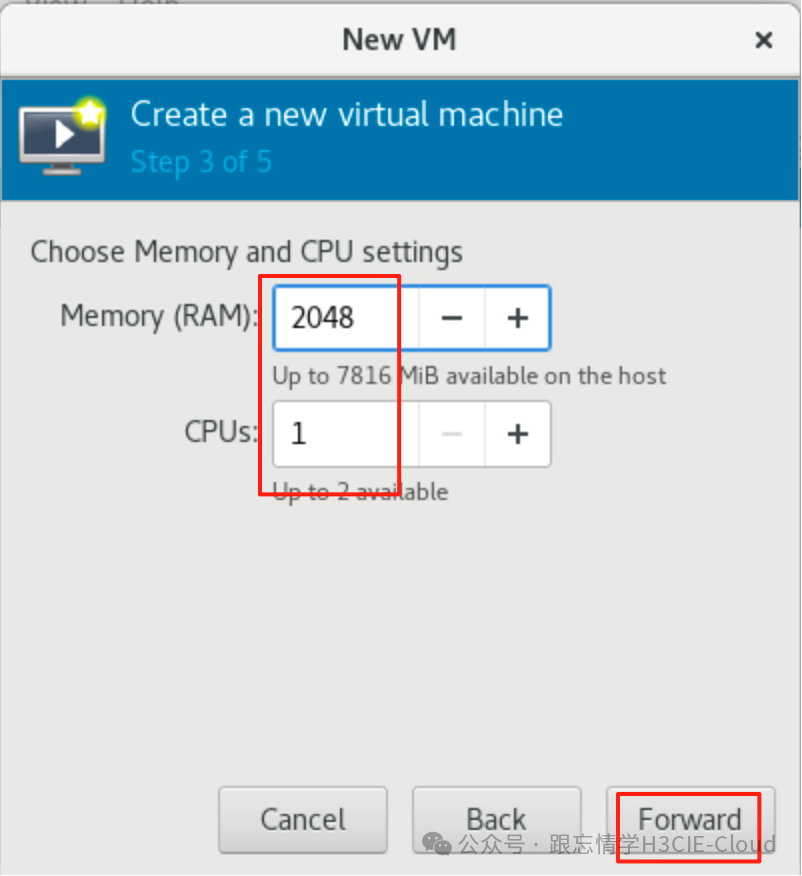
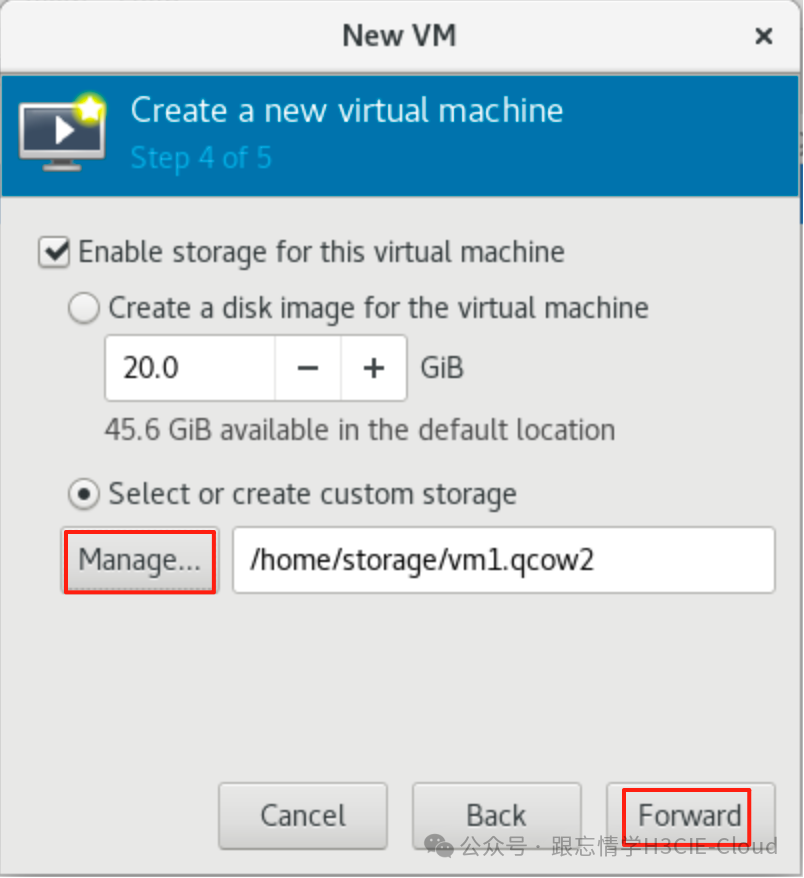 Click the Manage option to find the storage volume created earlier, and click Forward to continue.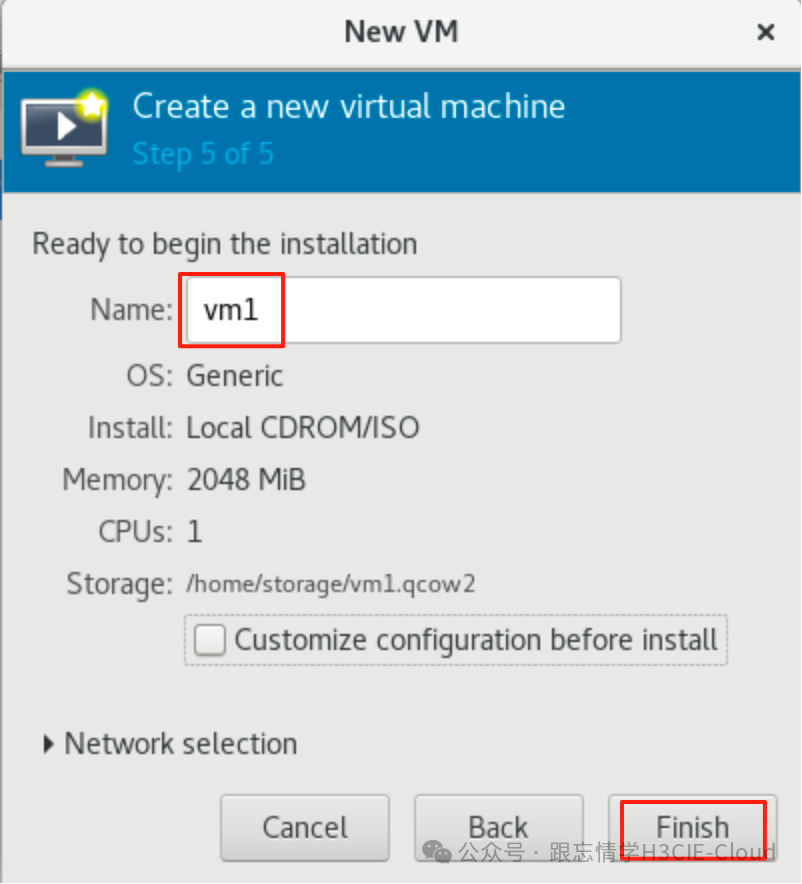
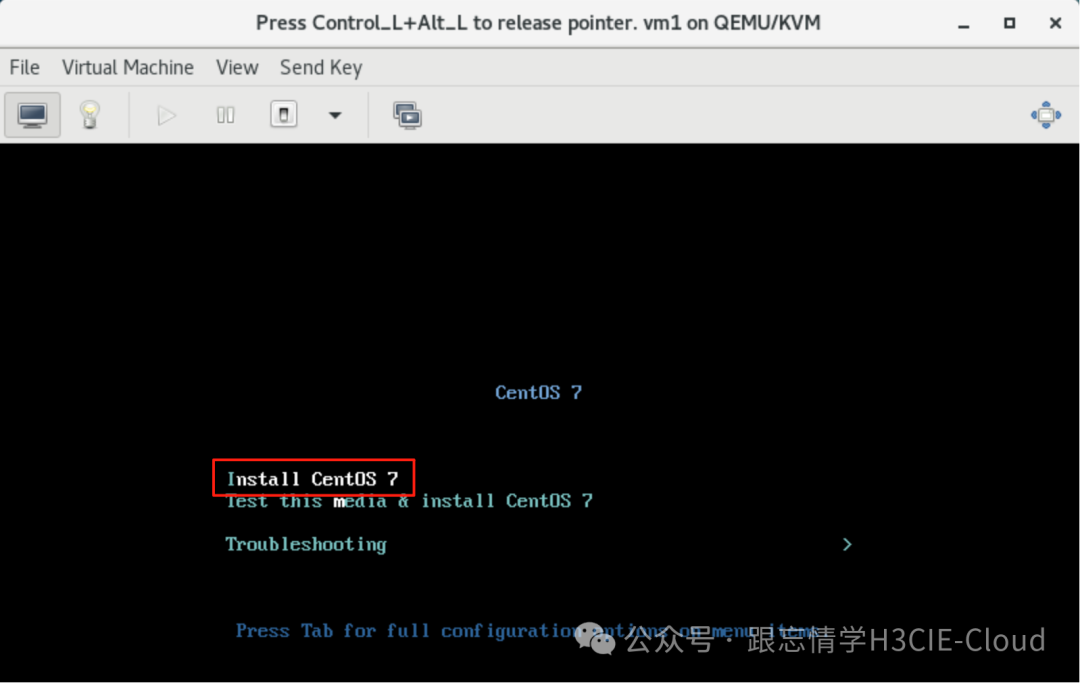
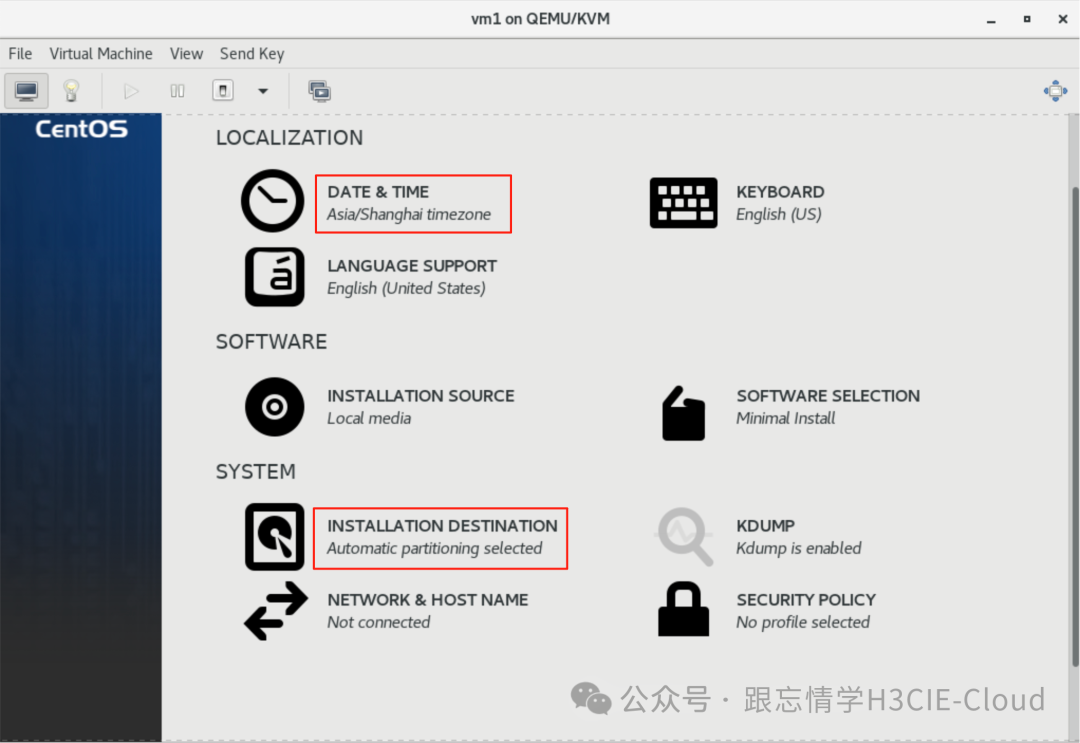
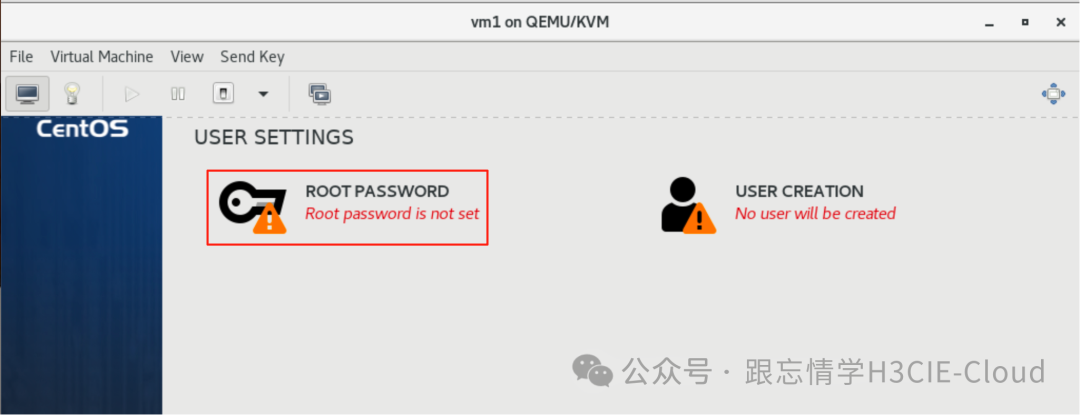
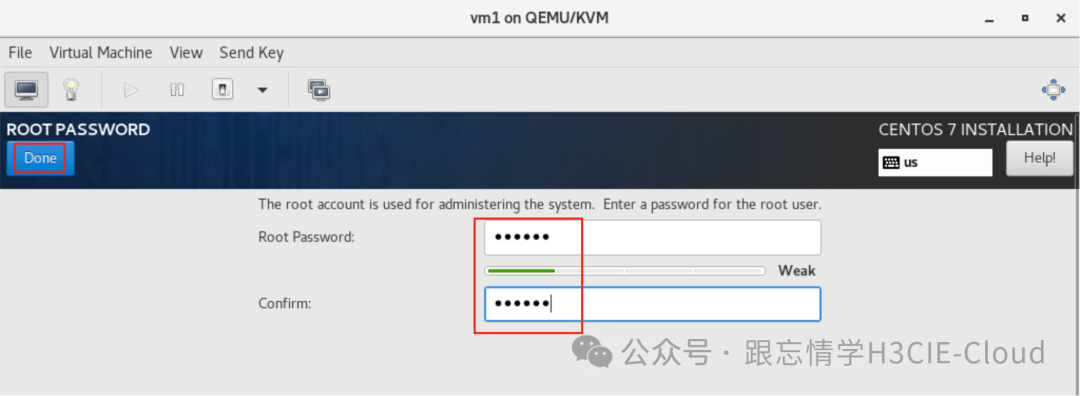
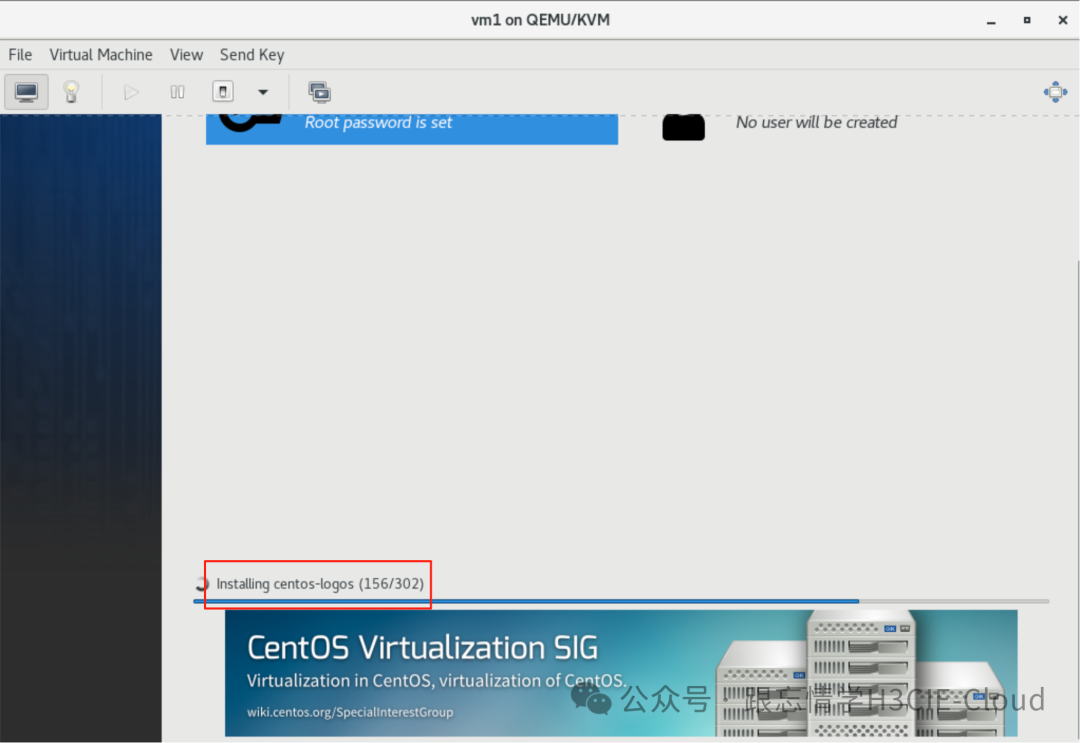 After the installation is complete, click reboot to restart the system.