This article will introduce how to create a wake-on-LAN device using ESP32 hardware and implement the WOL (Wake-on-LAN) function through .Net nanoFramework, sending WOL packets to wake up remote computers.
1. Background
In previous articles, we introduced how to use libraries related to .Net nanoFramework to achieve various functions, such as reading sensor data, controlling LED lights, and displaying on OLEDs. We also discussed how to implement WOL (Wake-on-LAN) functionality using .NET and deploy it on NAS or through ASP.NET. Some of you may not have a NAS or server, but if you have ESP32 hardware, we can create a wake-on-LAN device using ESP32 hardware to send WOL packets to wake up remote computers. In this article, we will explain how to implement WOL (Wake-on-LAN) functionality through .Net nanoFramework by sending WOL packets to wake up remote computers.
Related articles:
•Implementing WOL to Wake Remote PCs with .NET•Using ASP.NET Version WOL Service•Deploying .NET Version WOL Remote Wake Service on NAS•Getting Started with .NET nanoFramework Development on ESP32-Pico•Solving the Inverted Color Issue of WS2812B LED on ESP32 and Application of Status Indicator
The above articles cover basic implementations and introductions related to WOL and foundational development knowledge of .Net nanoFramework. If you are not familiar with .Net nanoFramework, it is recommended to read these articles first, which can help you better understand the content of this article.
2. Implementation Method
In the article about the application of the status indicator, we introduced a sample project called <span>ProjectImprovWifi</span>, which includes basic control of the status indicator. We can quickly implement WOL functionality based on this project framework.
The principle of WOL implementation is to send a specific data packet (Magic Packet) over the network to the target computer’s MAC address, which will wake up the target computer. In .Net nanoFramework, we can use the <span>nanoFramework.System.Net.Sockets.UdpClient</span> library to send UDP packets.
The following code example demonstrates how to implement WOL functionality using .Net nanoFramework. It is important to note that due to environmental limitations, the use of <span>UdpClient</span> and the absence of the <span>Replace</span> method require us to modify the previous .NET code:
using System;using System.Net;using System.Net.Sockets;
namespace WakeOnLan_ESP32{    internal class WakeOnLan    {
        internal static void Send(string macAddress)        {            byte[] magicPacket = CreateMagicPacket(macAddress);            SendMagicPacket(magicPacket);        }
        static byte[] CreateMagicPacket(string macAddress)        {            byte[] macBytes = ParseMacAddress(macAddress);            byte[] magicPacket = new byte[6 + (6 * 16)];
            for (int i = 0; i < 6; i++)            {                magicPacket[i] = 0xFF;            }
            for (int i = 6; i < magicPacket.Length; i += 6)            {                Array.Copy(macBytes, 0, magicPacket, i, 6);            }
            return magicPacket;        }
        static byte[] ParseMacAddress(string macAddress)        {            if (macAddress.Length == 17)            {                macAddress = macAddress.Substring(0, 2) + macAddress.Substring(3, 2) + macAddress.Substring(6, 2) + macAddress.Substring(9, 2) + macAddress.Substring(12, 2) + macAddress.Substring(15, 2);            }
            if (macAddress.Length != 12)            {                throw new ArgumentException("Invalid MAC address.");            }
            byte[] macBytes = new byte[6];
            for (int i = 0; i < 6; i++)            {                macBytes[i] = Convert.ToByte(macAddress.Substring(i * 2, 2), 16);            }
            return macBytes;        }
        static void SendMagicPacket(byte[] magicPacket)        {            UdpClient udpClient = new UdpClient();            udpClient.Connect(IPAddress.Broadcast, 9);            udpClient.Send(magicPacket);            udpClient.Close();            Console.WriteLine("Magic packet sent.");        }
    }}
In this example, we define a <span>WakeOnLan</span> class that contains the <span>Send</span> method for sending WOL packets. In the <span>Send</span> method, we first call the <span>CreateMagicPacket</span> method to create a Magic Packet, and then call the <span>SendMagicPacket</span> method to send the packet.
3. Page Design
After completing the core wake-up code, we need to allow users to input the target computer’s MAC address and click a button to send the WOL packet. We can use an OLED display to show prompt messages and the MAC address entered by the user. Here, we can create a web server using ESP32, allowing users to input the MAC address via a browser and send the WOL packet.
We will need the <span>nanoFramework.System.Net.Http</span> library, which can be used to create a simple web server that receives user input and sends WOL packets.
string responseString =    "<HTML><HEAD>" +    "<meta name='viewport' content='width=device-width, initial-scale=1'>" +    "<style>" +    "body { font-family: Arial, sans-serif; margin: 20px;text-align: center;}" +    "h2 { color: #333; }" +    "form { margin-top: 20px; }" +    "input[type='text'] { padding: 10px; border: 1px solid #ccc; border-radius:4px 0 0 4px; width: 250px; }" +    "input[type='submit'] { padding: 10px 20px; border: none; border-radius:0 4px 4px 0; background-color: #4CAF50; color: white; cursor: pointer; }" +    "input[type='submit']:hover { background-color: #45a049; }" +    "p { line-height: 1.6; }" +    "a { color: #1E90FF; text-decoration: none; }" +    "a:hover { text-decoration: underline; }" +    "#mac-list { margin: 20px auto; background: white; padding: 20px; border-radius: 8px; box-shadow: 0 0 10px rgba(0, 0, 0, 0.1); width: 100%; max-width: 350px; }" +    "#mac-list ul { list-style-type: none; padding: 0; }" +    "#mac-list li { padding: 5px 0; border-bottom: 1px solid #ccc; }" +    "</style>" +    "</HEAD><BODY>" +    "<h2>ESP32 WakeOnLan</h2>" +    "<p>Click the button to send a Wake On LAN packet.</p>" +    "<form method='get' action='/wol' onsubmit='return validateAndFormatMac()'>" +    "<input type='text' id='mac' name='mac' value='' />" +    "<input type='submit' value='Wake On LAN' />" +    "</form>" +    "<div id='mac-list'>" +    "<h3>Stored MAC Addresses</h3>" +    "<ul id='list'></ul>" +    "</div>" +    "<script>" +    "function validateAndFormatMac() {" +    "    var macInput = document.getElementById('mac');" +    "    var mac = macInput.value;" +    "    var macRegex = /^([0-9A-Fa-f]{2}[:-]){5}([0-9A-Fa-f]{2})$/;" +    "    if (!macRegex.test(mac)) {" +    "        alert('Invalid MAC address format. Please use XX:XX:XX:XX:XX:XX or XX-XX-XX-XX-XX-XX.');" +    "        return false;" +    "    }" +    "    mac = mac.replace(/[:-]/g, '');" +    "    macInput.value = mac;" +    "    storeMac(mac);" +    "    return true;" +    "}" +    "function storeMac(mac) {" +    "    var macs = JSON.parse(localStorage.getItem('macs')) || [];" +    "    macs.push(mac);" +    "    localStorage.setItem('macs', JSON.stringify(macs));" +    "    displayMacs();" +    "}" +    "function displayMacs() {" +    "    var macs = JSON.parse(localStorage.getItem('macs')) || [];" +    "    var list = document.getElementById('list');" +    "    list.innerHTML = '';" +    "    macs.forEach(function(mac) {" +    "        var li = document.createElement('li');" +    "        var a = document.createElement('a'); " +    "        a.href = '/wol?mac=' + mac;" +    "        a.textContent = mac;" +    "        li.appendChild(a);" +    "        list.appendChild(li);" +    "    });" +    "}" +    "document.addEventListener('DOMContentLoaded', displayMacs);" +    "</script>" +    "</BODY></HTML>";
byte[] buffer = System.Text.Encoding.UTF8.GetBytes(responseString);
HttpListener listener = new("http", 80);
listener.Start();
The web content here is hardcoded in the code. We can create a simple web server using the <span>HttpListener</span> class, which listens to user input. The user’s MAC address will be stored in local storage and displayed at the bottom of the page. Users can click the MAC addresses in the list to send WOL packets.
After starting the service, we use a simple infinite loop to listen for user requests, checking if the URL contains <span>/wol?mac=</span> to send the WOL packet and then return a JSON formatted response.
while (true){    try    {        HttpListenerContext context = listener.GetContext();        var url = context.Request.RawUrl;        HttpListenerResponse response = context.Response;
        if (url.StartsWith("/wol?mac="))        {            var macAddress = url.Substring(9);            Console.WriteLine($"WOL packet sent to {macAddress}");            WakeOnLan.Send(macAddress);
            // Output json format            response.ContentType = "application/json";            var json = System.Text.Encoding.UTF8.GetBytes("{\"status\":\"ok\"}");            response.ContentLength64 = json.Length;            response.OutputStream.Write(json, 0, json.Length);        }        else        {            // Output default page            response.ContentLength64 = buffer.Length;            response.OutputStream.Write(buffer, 0, buffer.Length);        }        context.Response.Close();        Console.WriteLine("Web response sent");        context.Close();    }    catch (Exception ex)    {        Console.WriteLine("* Error getting context: " + ex.Message + "\r\nSack = " + ex.StackTrace);    }}
4. Usage
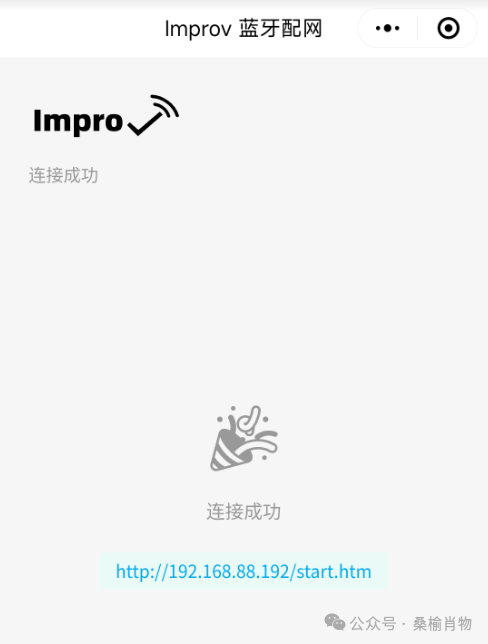
After completing the code, we can deploy it to the ESP32. The first use requires completing the Improv Bluetooth configuration, which can be done using the “Improv Bluetooth Configuration” WeChat mini-program or through the Improv official website[1]. It is recommended to use the mini-program, as it can directly display the ESP32’s IP address after successful configuration.
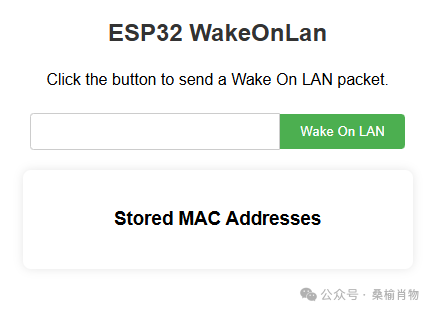
Then, by accessing the ESP32’s IP address via a browser, you can see the hardware’s web service, where you can input the MAC address and click the button to send the WOL packet.
5. Summary
In this article, we introduced how to implement WOL functionality using .Net nanoFramework by sending WOL packets to wake up remote computers. We first implemented the core WOL code and then used a web server to receive user input, finally sending the WOL packets. This allows us to conveniently send WOL packets through a browser, achieving remote boot functionality.
The related code introduced in the article has been open-sourced on GitHub, and you are welcome to view and bookmark it. We hope this article is helpful to you, and if you have any questions or suggestions, please feel free to leave a comment.
If you are interested in the ESP32 version of WOL, you can follow “Sang Yu Xiao Wu” and reply “Network Wake” to get the complete source code.
GitHub homepage: https://github.com/sangyuxiaowu?WT.mc_id=DT-MVP-5005195
References
<span>[1]</span> Improv official website: https://improv-wifi.com/