I previously wrote an article titled: “Reading the Linux Kernel Source: Downloading the Source, Compiling the Kernel, and Running a Minimal System.” However, many fans reported encountering various issues, including but not limited to:
-
Unable to create files, with a message indicating a read-only file system
-
Configuration file errors
-
Unable to mount the root filesystem, etc.
Today, I am updating this article in hopes of resolving the issues everyone has encountered.
My environment:
Development Environment:Ubuntu 18.04
Linux Source Version:linux-4.9.229
BusyBox Source Version:busybox-1.30.0
QEMU System Version:2.0.0
This article will guide you through the following processes:
1. Downloading and compiling the Linux kernel source
2. Compiling BusyBox
3. Creating a minimal root filesystem
4. Starting your compiled kernel and root filesystem with QEMU

Linux source download link:
https://mirrors.edge.kernel.org/pub/linux/kernel/
I chose version: 4.9.229
https://cdn.kernel.org/pub/linux/kernel/v4.x/linux-4.9.229.tar.xz
Download it locally, extract it, and then enter the linux-4.9.229 directory:
1. Specify the hardware architecture.
To reduce the installation of compilers, I am using x86 in this example, as my development environment is x86. If you want to compile an ARM kernel, specify ARCH=arm and install the cross-compiler.
# export ARCH=x862. Configure the board config, here set to x86_64_defconfig. Now, we have selected the menu, which is x86_64_defconfig# make x86_64_defconfig3. Configure the kernelThis step is actually a fine-tuning of the menu from step 2. We need the kernel to support the ramdisk driver, so we need to select the following configuration:
General setup --->----> [*] Initial RAM filesystem and RAM disk (initramfs/initrd) supportDevice Drivers --->[*] Block devices ---><*> RAM block device support(65536) Default RAM disk size (kbytes)4. Compile the kernel
# makeThe compiled kernel is located at: arch/x86_64/boot/bzImage
Download the BusyBox source, download link:
https://busybox.net/downloads/
I am using version busybox-1.30.0
1. Extract the BusyBox source
# tar xvf busybox-1.30.0.tar.bz22. Configure the BusyBox sourceHere we configure BusyBox for static compilation, so that BusyBox does not require additional dynamic libraries when running.
# make menuconfigBusyBox Settings --->Build Options --->[*] Build BusyBox as a static binary (no shared libs)3. Compile and install
# make && make install4. The compiled BusyBox is installed in the _install directory at the root of the source code. We enter the _install directory and add some necessary files or directories, with the following shell commands:# mkdir etc dev mnt# mkdir -p proc sys tmp mnt# mkdir -p etc/init.d/# vim etc/fstabproc /proc proc defaults 0 0tmpfs /tmp tmpfs defaults 0 0sysfs /sys sysfs defaults 0 0# vim etc/init.d/rcSecho -e "Welcome to tinyLinux"/bin/mount -aecho -e "Remounting the root filesystem"mount -o remount,rw /mkdir -p /dev/ptsmount -t devpts devpts /dev/ptsecho /sbin/mdev > /proc/sys/kernel/hotplugmdev -s# chmod 755 etc/init.d/rcS# vim etc/inittab::sysinit:/etc/init.d/rcS::respawn:-/bin/sh::askfirst:-/bin/sh::ctrlaltdel:/bin/umount -a -r# chmod 755 etc/inittab# cd dev# mknod console c 5 1# mknod null c 1 3# mknod tty1 c 4 1Thus, a minimal, complete filesystem that can be booted by the kernel is ready.

Creating the root filesystem image file.
Approach:
1. First, create an empty image file;
2. Then format this image file to ext3 format;
3. Next, mount this image file and copy the root filesystem to the mount directory;
4. Unmount the image file.
5. Compress it into a gzip package.
#!/bin/bashrm -rf rootfs.ext3rm -rf fsdd if=/dev/zero of=./rootfs.ext3 bs=1M count=32mkfs.ext3 rootfs.ext3mkdir fsmount -o loop rootfs.ext3 ./fscp -rf ./_install/* ./fsumount ./fsgzip --best -c rootfs.ext3 > rootfs.img.gzThe final generated filesystem image is named: rootfs.img.gz
With the kernel and filesystem image ready, a moment of happiness is about to arrive:

Start our compiled kernel and filesystem using the QEMU emulator:
# qemu-system-x86_64 \ -kernel ./linux-4.9.229/arch/x86_64/boot/bzImage \ -initrd ./busybox-1.30.0/rootfs.img.gz \ -append "root=/dev/ram init=/linuxrc" \ -serial file:output.txtA complete minimal Linux system is up and running!
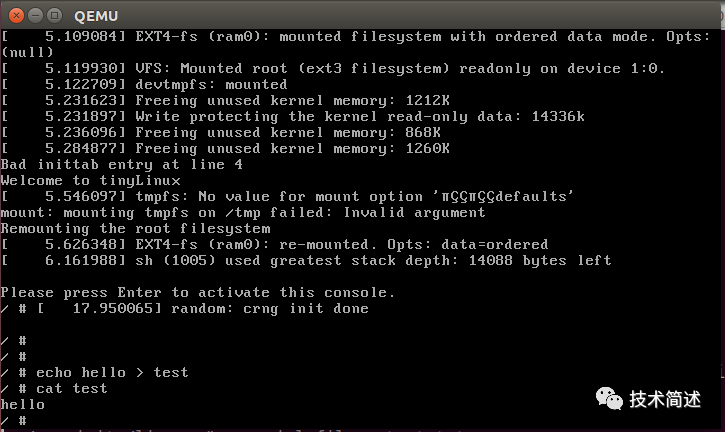
Now, after following the above steps, you can compile your own kernel and filesystem. With this foundation, you can freely modify the Linux kernel code and run it for verification. You can:
-
Modify the TCP/IP stack code to change the processing of network packets;
-
Modify the memory management code to manage and utilize physical pages more efficiently;
-
Make the Linux kernel print your own logo at startup, etc.;
Personal WeChat of JianShuoJun
Add JianShuoJun’s personal WeChat to obtain learning materials
→ One-on-one technical Q&A
→ Multi-person group discussions