Since the late 1970s, when microcontrollers were first introduced, there has been a long history of development in microcontroller technology.
Microcontrollers are particularly suitable for embedded systems and are subject to strict size management, which is why almost every electronic device you see today integrates a microcontroller.
The widespread application means that learners of microcontrollers have a wealth of experience from predecessors to draw upon, and reproducing classic examples is a shortcut to mastering microcontroller technology.
Therefore, after completing our first rough microcontroller project, we will begin a new chapter, reproducing common microcontroller examples over six lessons.
On the first day, we will use the LCD1602 module to display information using graphics and text, as the operation of the LCD1602 is relatively simple. We will also standardize our project files through this example to ensure the code is clear and readable.
Introduction to the LCD1602 Module
The LCD1602 is a very basic and common display module, featuring three control pins and eight data pins. Among these, E is the enable pin, RS indicates whether the next transmission is a command or data to be displayed, and RW indicates whether the next step is to read data or write to the module.
Additionally, the LCD1602 integrates an ASCII code table in its CGROM (Character Generator ROM), where each character has a fixed address, allowing it to easily display English words and some common characters.
For example, the storage address for ‘A’ is 41H; when displaying ‘A’, the character graphic at address 41H is retrieved and shown on the screen.
If you are familiar enough with the LCD1602 module, you can even use it for data storage (though it is not very effective and cannot retain data without power) and display custom character patterns. However, this is an advanced feature of the LCD1602, which will only be briefly mentioned here. Please refer to the LCD1602 Chinese manual for further understanding.
01
LCD1602 Pin Interface Functions
VSS: Ground
VDD: Connect to 5V power supply
VE: Contrast voltage, used to adjust the display contrast of the LCD screen
RS: Data/command selection port; high level indicates that the data being transmitted is data, while low level indicates the opposite
RW: Read/write selection port; high level indicates that the data is for external RAM data reading, while low level indicates the opposite
E: Enable port, active at low level
D0~D7: Data bits
A: Positive terminal of the backlight
K: Negative terminal of the backlight
As can be seen, when the enable port is available, the main interaction relies on the RS and RW ports working together to complete the module’s initialization configuration (command/writing) and character display (data/writing).
First, we will sequentially write the following commands to the LCD1602 for configuration (both RS and RW are at low level).
02
Common Control Commands for LCD1602
Set mode: 0x38
Turn on display, hide cursor, cursor does not blink: 0x0C
After reading/writing characters, increment address without moving display: 0x06
Clear screen, reset data pointer: 0x01
Set initial value for data address pointer: 0x80
After configuration is complete, we can switch RS to data mode and input ASCII code values into the 8-bit data port to display different characters on the screen, one by one and line by line.
Next, we will start from project creation and teach you how to build a clear and organized project.
A Structured Project Layout + Project Code
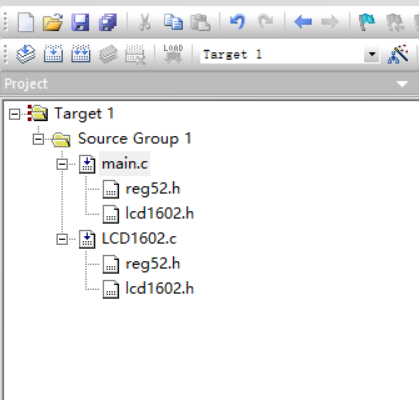
First, we create a folder to store project files and within it, create Doc, User, and Project folders to store project documentation, code files, and Keil project files, respectively.
Open the User folder and create main.c, LCD1602.c, and LCD1602.h files.
The main.c file naturally contains the main function;
LCD1602.c contains the defined LCD commands and data read/write functions; readers can also place character redefinition functions inside;
LCD1602.h contains function declarations and #define statements.
After the project is built, the layout in Keil is as shown in the figure below.
01
Code for LCD1602.h File
#ifndef __LCD1602_H
#define __LCD1602_H
#define LCDData P0
#define uchar unsigned char
#define uint unsigned int
#define register_addr 0x00
#define device_addr 0x80
void delay(uchar c);
void LCDWriteCom(uchar i);
void LCDWriteData(uchar i);
void LCDClean();
void LCDInit();
#endif /*__LCD1602_H*/
Where
#ifndef __LCD1602_H
#define __LCD1602_H
……
……
#endif /*__LCD1602_H*/
This structure is to prevent the header file from being included multiple times.
02
Code for LCD1602.c
#include <reg52.h>
#include <LCD1602.h>
sbit RS = P1^3;
sbit RW = P1^4;
sbit E = P1^5;
void delay(uchar c){uchar a,b;for(;c>0;c--)for(a=199;a>0;a--)for(b=1;b>0;b--);}
void LCDWriteCom(uchar i){E = 0;RS = 0;RW = 0;LCDData = i;delay(1);E = 1;delay(5);E = 0;}
void LCDWriteData(uchar i){E = 0;RS = 1;RW = 0;LCDData = i;delay(1);E = 1;delay(5);E = 0;}
void LCDClean(){LCDWriteData(0x01);}
void LCDInit(){E = 0;RS = 0;RW = 0;LCDWriteCom(0x38);LCDWriteCom(0x0c);LCDWriteCom(0x06);LCDClean();LCDWriteCom(0x80);}
LCDWriteCom() is the command writing function
LCDWriteData() is the data writing function
LCDClean() clears the screen (as it is commonly used, it is listed as a separate function)
LCDInit() is the module initialization function, which includes the initialization commands discussed above
03
Code for main.c
#include <reg52.h>
#include <LCD1602.h>
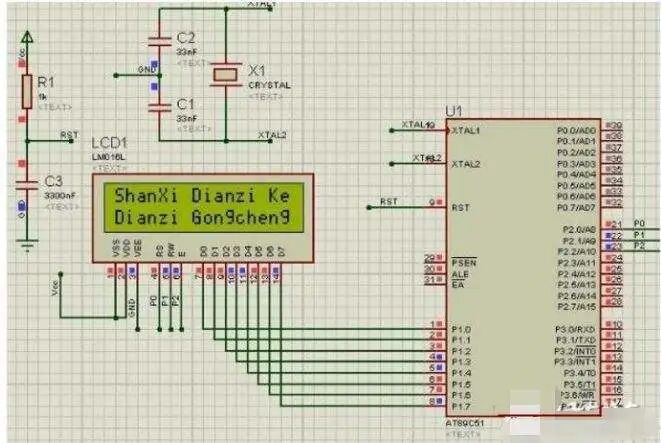
void main(){uchar a[]="I LOVE YOU";uchar i;LCDInit();while(1);{LCDClean();LCDInit();i = 10;while(i--)LCDWriteData(a[9-i]);}}If you have not yet purchased a development board and the LCD1602 display module, you can continue to simulate in Proteus, where the LCD1602 is called LM016L in the Proteus component library. The effect is shown in the figure below (image from the internet).
Having completed today’s lesson, we can now use the LCD1602 to provide feedback from the device, which can also be used for debugging the program, such as displaying error codes to indicate which part of the program or module has an issue.

Scan to follow us


AI Learning for Beginners
Scan to get more exciting content