Building a Raspberry Pi 4B Home Server: A Guide to Setting Up an Open Source Free Jellyfin Private Cinema Using an Idle Laptop

Jellyfin is an open-source free private cinema (media management) system that helps us manage the film and television resources on our hard drive and add beautiful posters.

Jellyfin can record our playback progress; for instance, if a movie is played to 10 minutes and 20 seconds on device A, it can continue from the same point on device B.

Jellyfin has a complete user management system, allowing family members to have independent accounts without affecting each other’s playback progress.

Jellyfin supports client playback and web playback, enabling us to manage and play our collected movies and TV shows directly from the web.

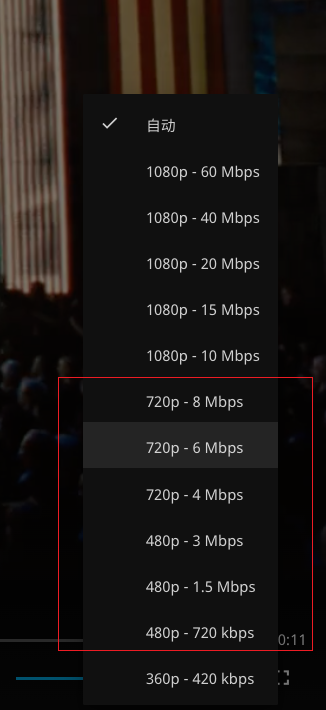
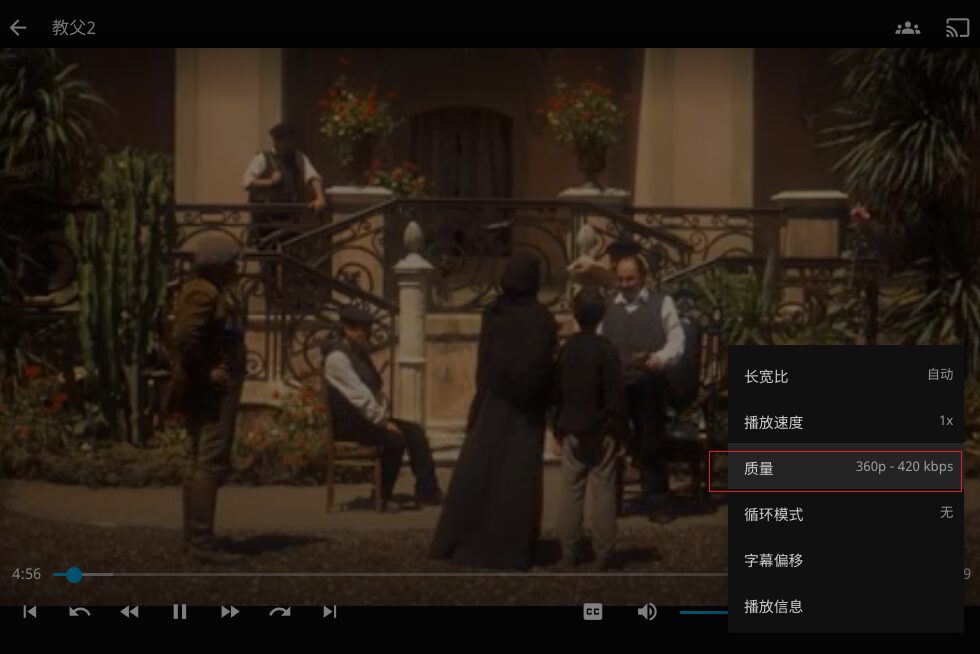
Jellyfin can freely convert formats, automatically converting high-bitrate formats like mkv into formats suitable for network transmission for browser playback. It can convert our high-bitrate 4K movies into 720p or even 360p for streaming to family members outside the home network. If the TV box at home is not powerful enough to play 4K originals, Jellyfin can convert resources in real-time to 2K or 1080P streams for the TV box.
Building a Raspberry Pi 4B Home Server: A Guide to Setting Up an Open Source Free Jellyfin Private Cinema Using an Idle Laptop
image.png
Building a Raspberry Pi 4B Home Server: A Guide to Setting Up an Open Source Free Jellyfin Private Cinema Using an Idle Laptop
image.png

This article is the 17th issue of the “Raspberry Pi Doesn’t Gather Dust” series. The performance of the Raspberry Pi 4B is insufficient to support real-time transcoding of 1080P videos, so we will use the Raspberry Pi as a gateway, allowing an old computer in the home to run the core Jellyfin service while the Raspberry Pi reverse proxies the Jellyfin service to both the home network and the public network.

Installing the Jellyfin Server

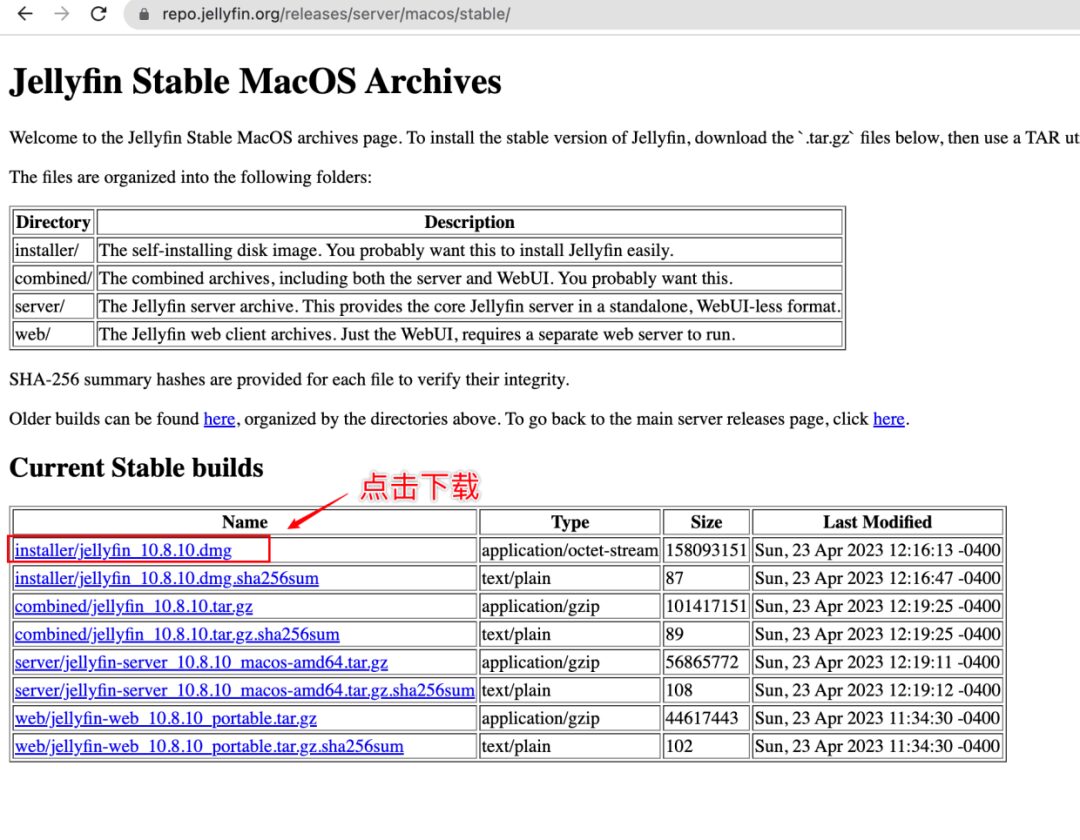
I happen to have a MacBook at home that is not frequently used, and this article will use the macOS platform as an example (Windows configuration is simpler), using the MacBook as the machine running the Jellyfin service.

Jellyfin Server download link: https://jellyfin.org/downloads/server
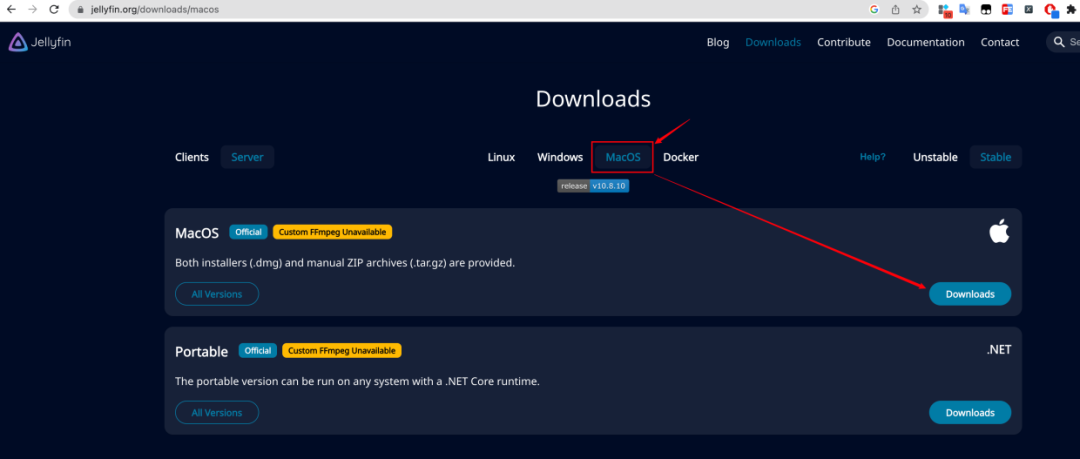
Building a Raspberry Pi 4B Home Server: A Guide to Setting Up an Open Source Free Jellyfin Private Cinema Using an Idle Laptop
image.png
Building a Raspberry Pi 4B Home Server: A Guide to Setting Up an Open Source Free Jellyfin Private Cinema Using an Idle Laptop
image.png
Building a Raspberry Pi 4B Home Server: A Guide to Setting Up an Open Source Free Jellyfin Private Cinema Using an Idle Laptop
image.png
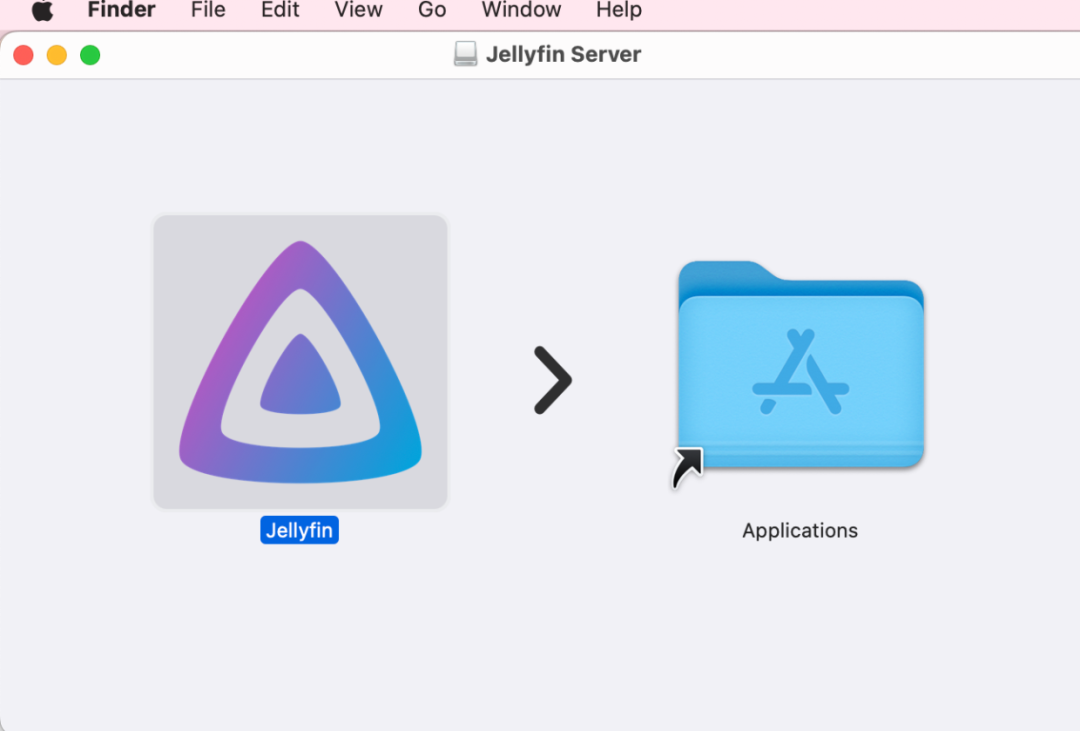
  • After successful installation, click the Jellyfin icon to start.
Building a Raspberry Pi 4B Home Server: A Guide to Setting Up an Open Source Free Jellyfin Private Cinema Using an Idle Laptop
image.png
  • After starting successfully, the Jellyfin Server icon appears at the top.
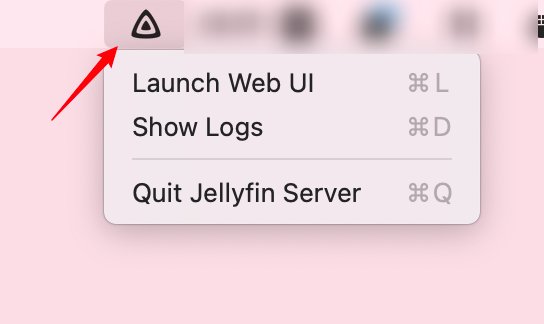
Building a Raspberry Pi 4B Home Server: A Guide to Setting Up an Open Source Free Jellyfin Private Cinema Using an Idle Laptop
image.png
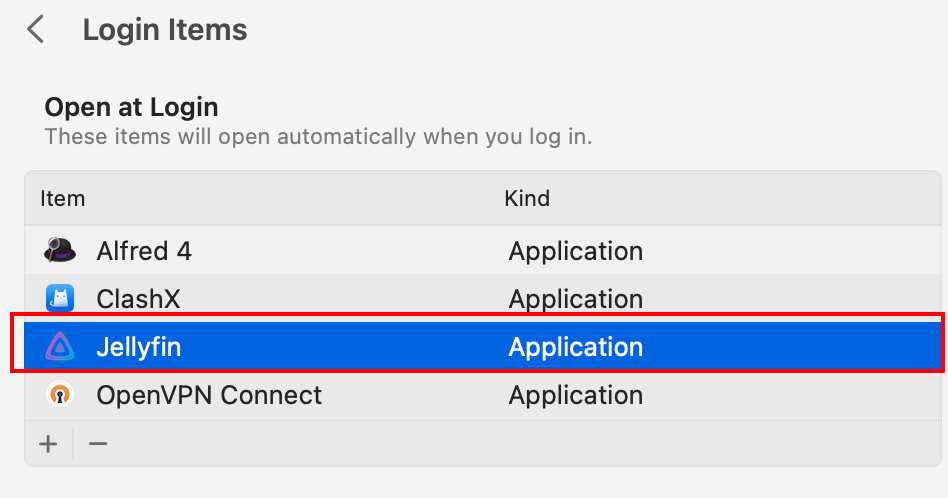
  • To ensure that Jellyfin Server starts automatically after each boot, we can add Jellyfin Server to the startup items.
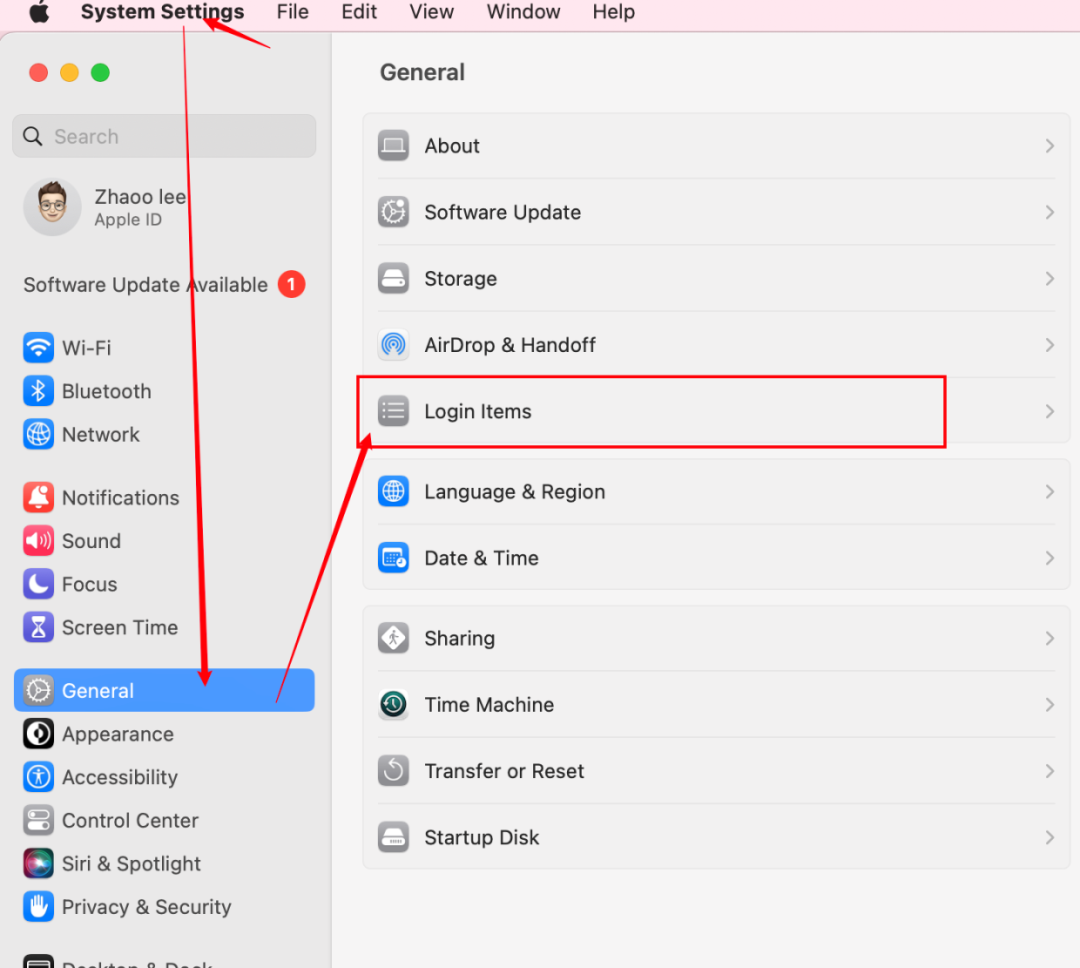
Building a Raspberry Pi 4B Home Server: A Guide to Setting Up an Open Source Free Jellyfin Private Cinema Using an Idle Laptop
image.png
Building a Raspberry Pi 4B Home Server: A Guide to Setting Up an Open Source Free Jellyfin Private Cinema Using an Idle Laptop
image.png

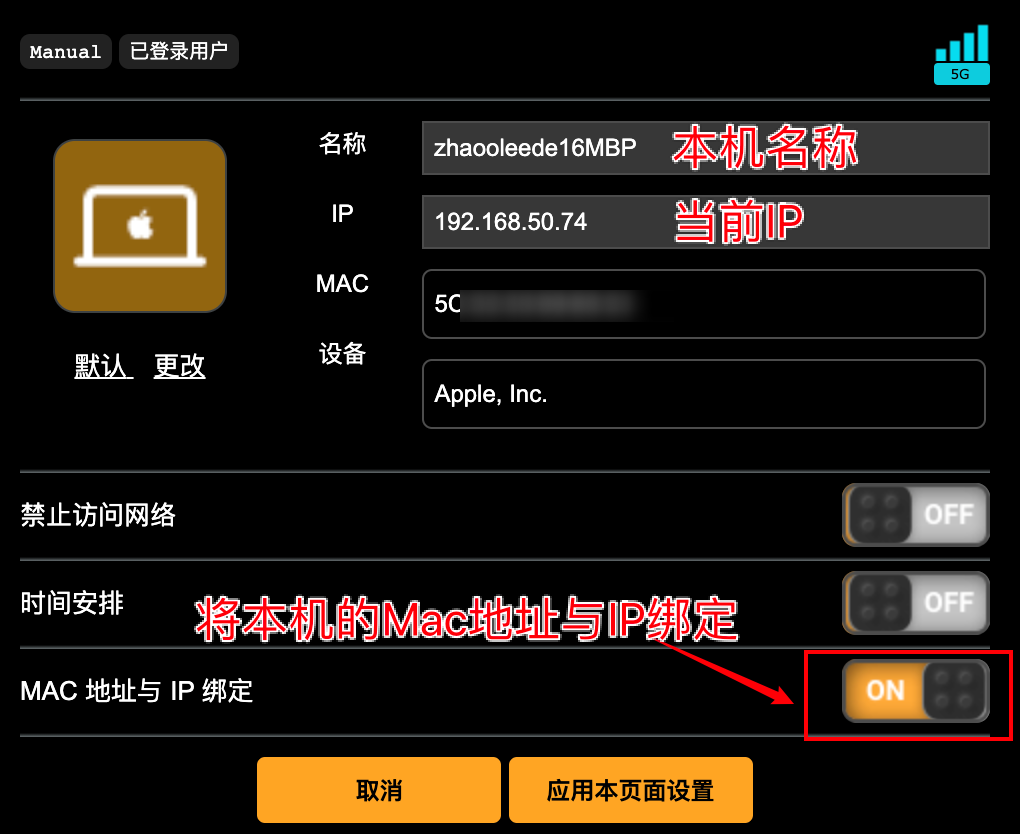
Assign a Fixed IP to the Laptop via Router
Building a Raspberry Pi 4B Home Server: A Guide to Setting Up an Open Source Free Jellyfin Private Cinema Using an Idle Laptop
image.png

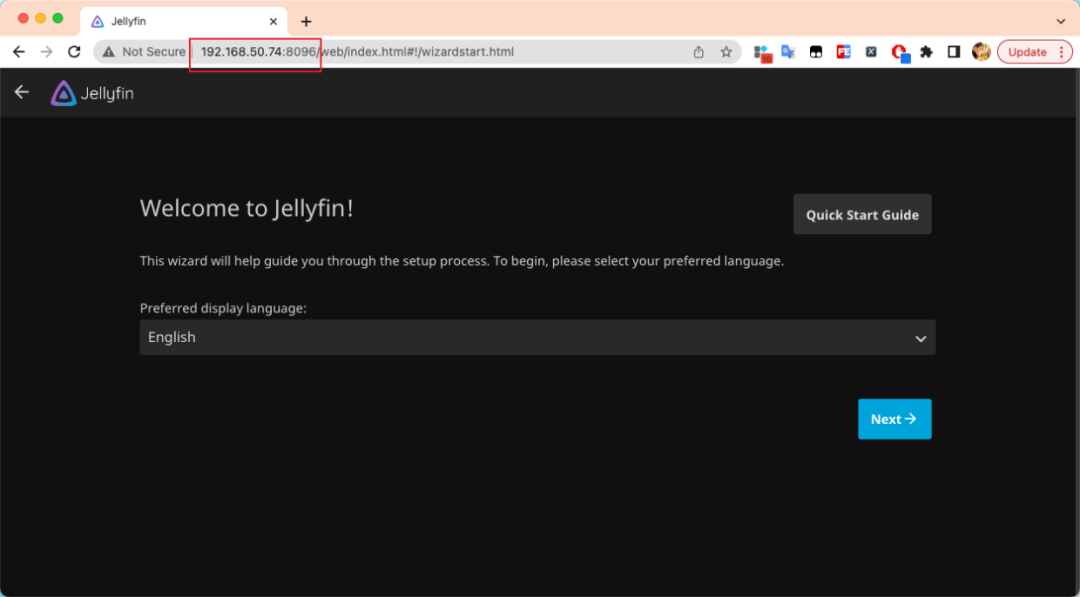
Then we can access Jellyfin from any device on the local network using the fixed IP and port. For example, if the fixed IP for the laptop is 192.168.50.74, then any device in the local network can access it via the browser at 192.168.50.74:8096.
Building a Raspberry Pi 4B Home Server: A Guide to Setting Up an Open Source Free Jellyfin Private Cinema Using an Idle Laptop
image.png

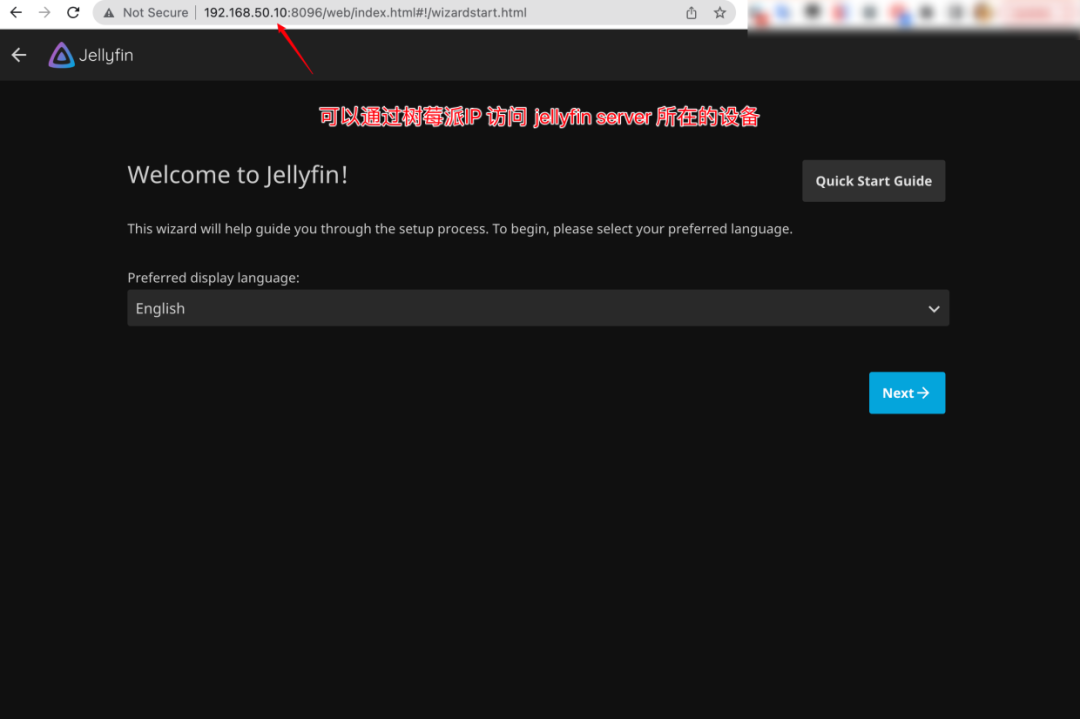
If 192.168.50.74 is hard to remember, we can use an easier-to-remember Raspberry Pi local IP 192.169.50.10:8096 to proxy 192.168.50.74:8096, thus the Raspberry Pi becomes the gateway for the entire home network, and the Raspberry Pi’s frpc can also map the Jellyfin service on port 8096 to the public network.

Log into the Raspberry Pi

On the Raspberry Pi (IP: 192.168.50.10), add a configuration in Nginx to forward requests from 192.169.50.10:8096 to 192.168.50.74:8096.

sudo bash -c 'cat > /etc/nginx/conf.d/192.168.50.74-8096.conf' <<-'EOF'
server {
    listen 8096;
    server_name 192.168.50.10;
    
    location / {
        proxy_pass http://192.168.50.74:8096;
        proxy_set_header Host $host;
        proxy_set_header X-Real-IP $remote_addr;
        proxy_set_header X-Forwarded-For $proxy_add_x_forwarded_for;
    }
}
EOF

Test the configuration file and restart Nginx.

sudo nginx -t
sudo nginx -s reload

Then open 192.168.50.10:8096 in the browser.
Building a Raspberry Pi 4B Home Server: A Guide to Setting Up an Open Source Free Jellyfin Private Cinema Using an Idle Laptop
image.png
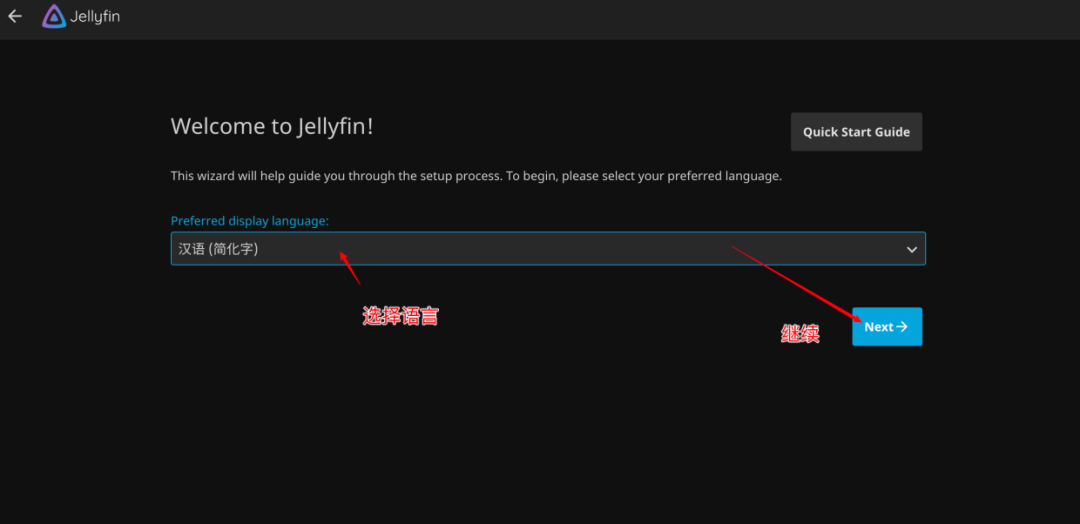
  • Select Language
Building a Raspberry Pi 4B Home Server: A Guide to Setting Up an Open Source Free Jellyfin Private Cinema Using an Idle Laptop
image.png
  • Set username and password.Building a Raspberry Pi 4B Home Server: A Guide to Setting Up an Open Source Free Jellyfin Private Cinema Using an Idle Laptop

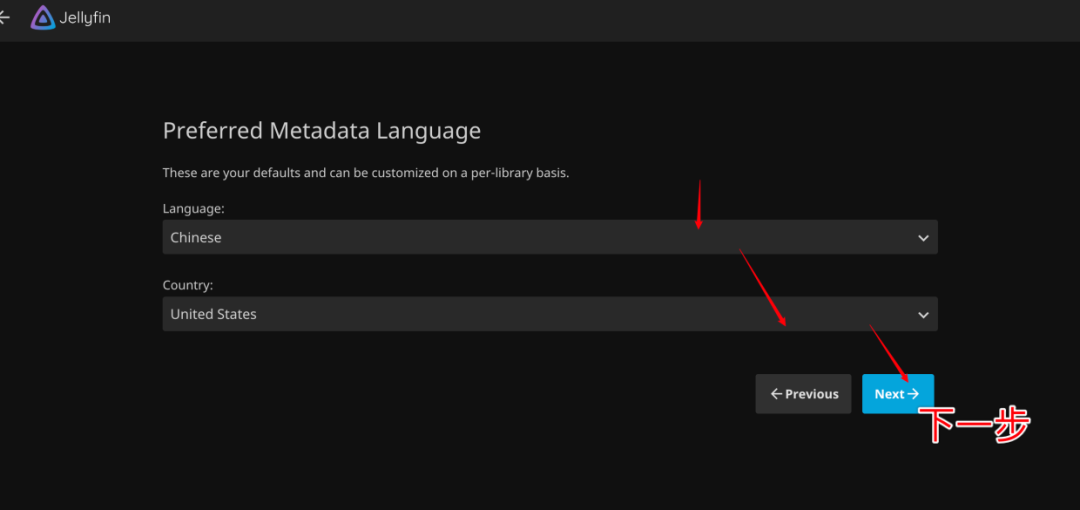
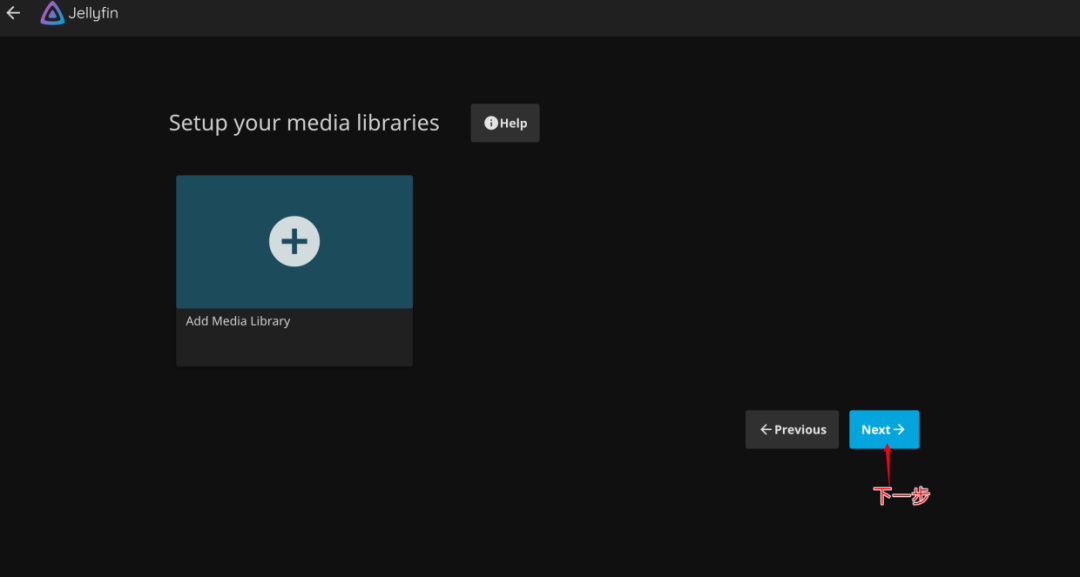
  • Reach the media library selection page; we can skip this step and proceed.
Building a Raspberry Pi 4B Home Server: A Guide to Setting Up an Open Source Free Jellyfin Private Cinema Using an Idle Laptop
image.png
  • Next Step
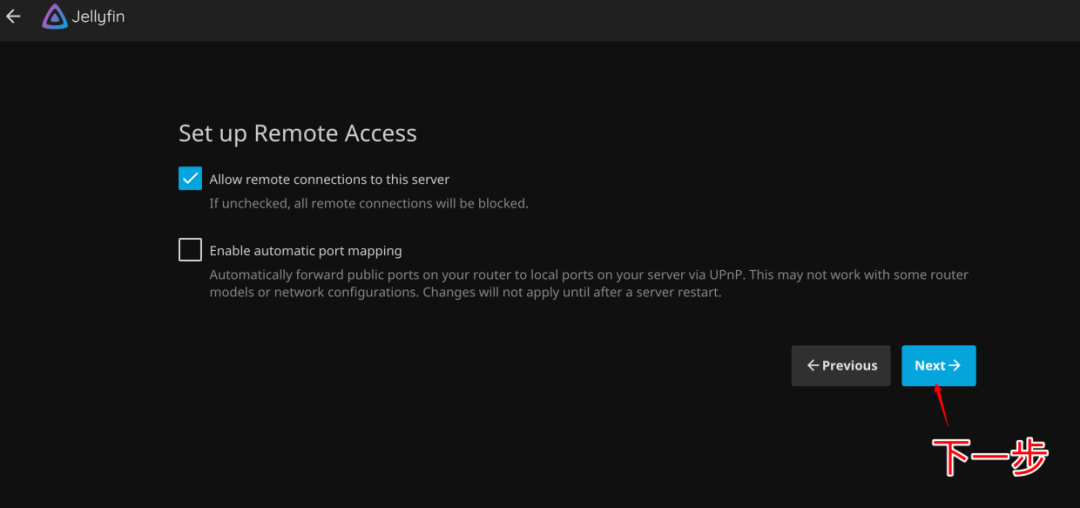
Building a Raspberry Pi 4B Home Server: A Guide to Setting Up an Open Source Free Jellyfin Private Cinema Using an Idle Laptop
image.png
  • Next Step
Building a Raspberry Pi 4B Home Server: A Guide to Setting Up an Open Source Free Jellyfin Private Cinema Using an Idle Laptop
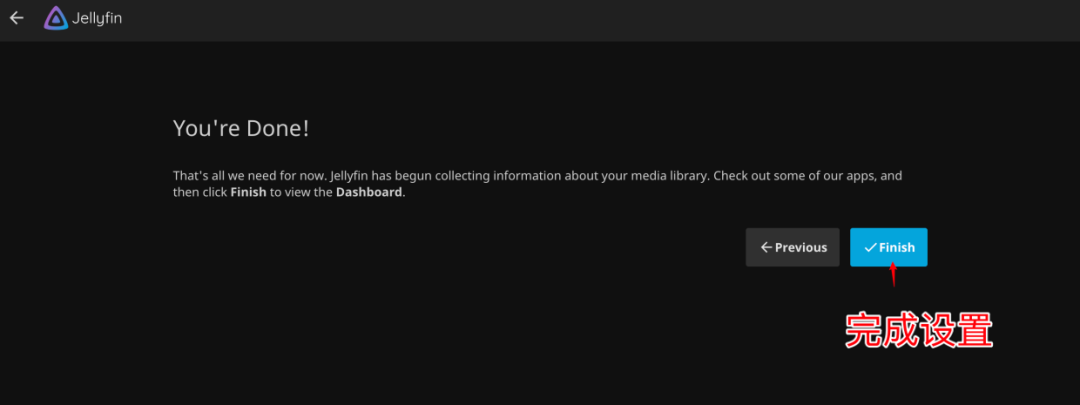
image.png
  • Complete Setup
Building a Raspberry Pi 4B Home Server: A Guide to Setting Up an Open Source Free Jellyfin Private Cinema Using an Idle Laptop
image.png
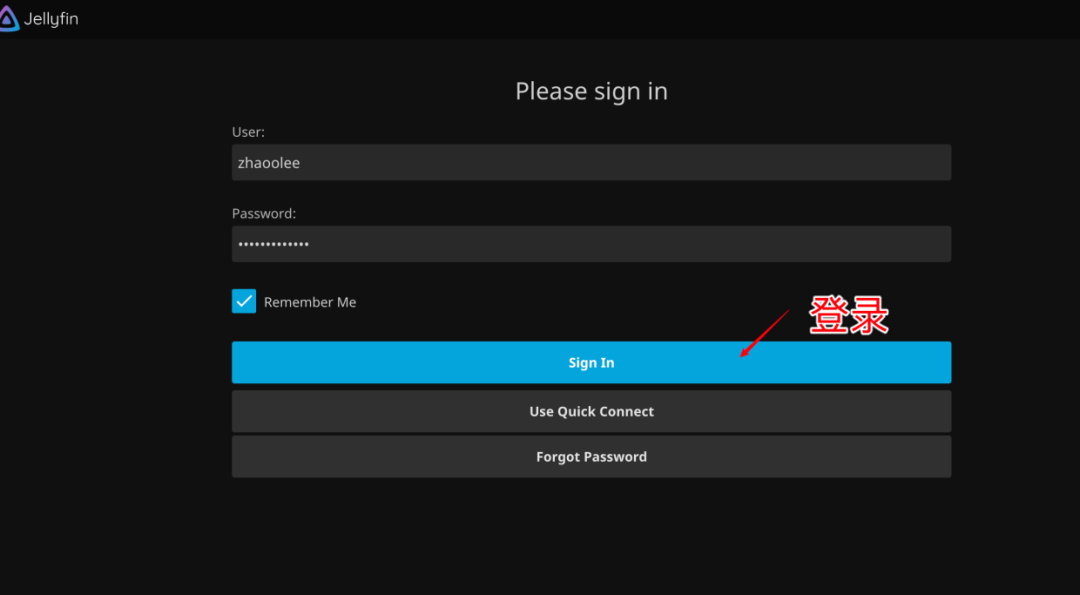
  • Then automatically redirect to the login page; enter username and password to log in.
Building a Raspberry Pi 4B Home Server: A Guide to Setting Up an Open Source Free Jellyfin Private Cinema Using an Idle Laptop
image.png
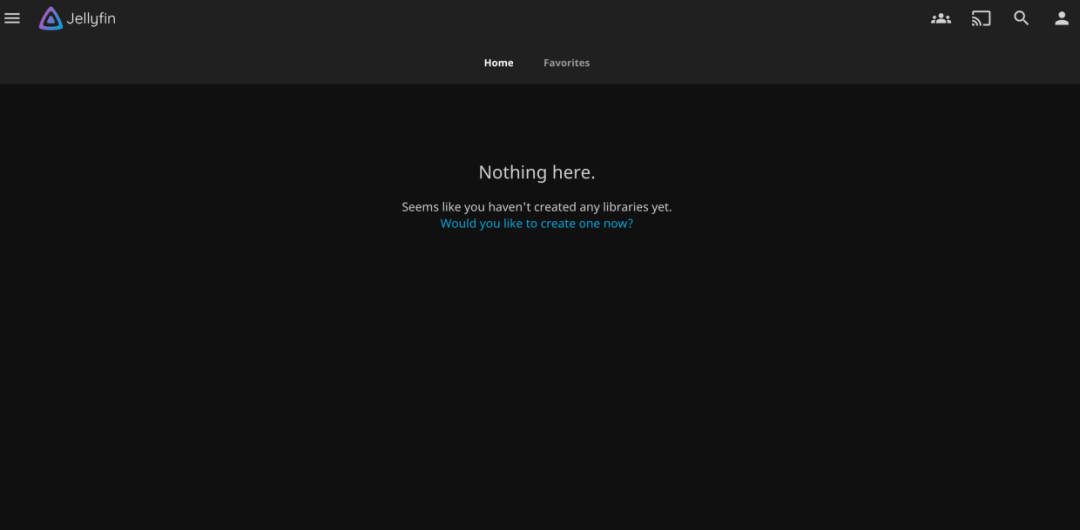
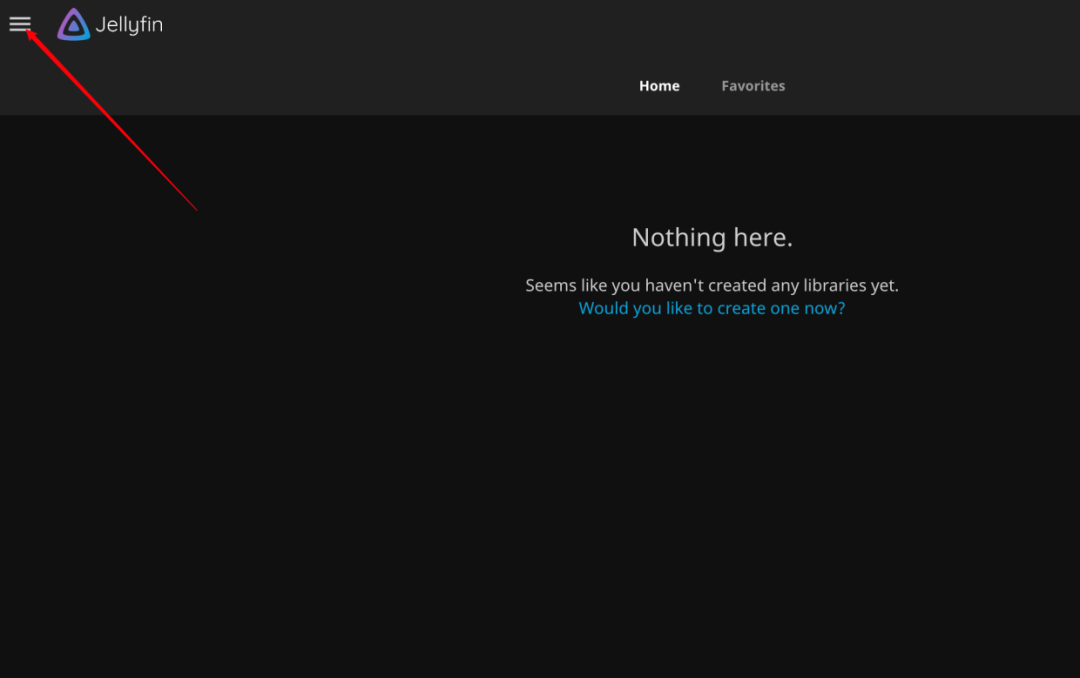
  • Login Successful
Building a Raspberry Pi 4B Home Server: A Guide to Setting Up an Open Source Free Jellyfin Private Cinema Using an Idle Laptop
image.png
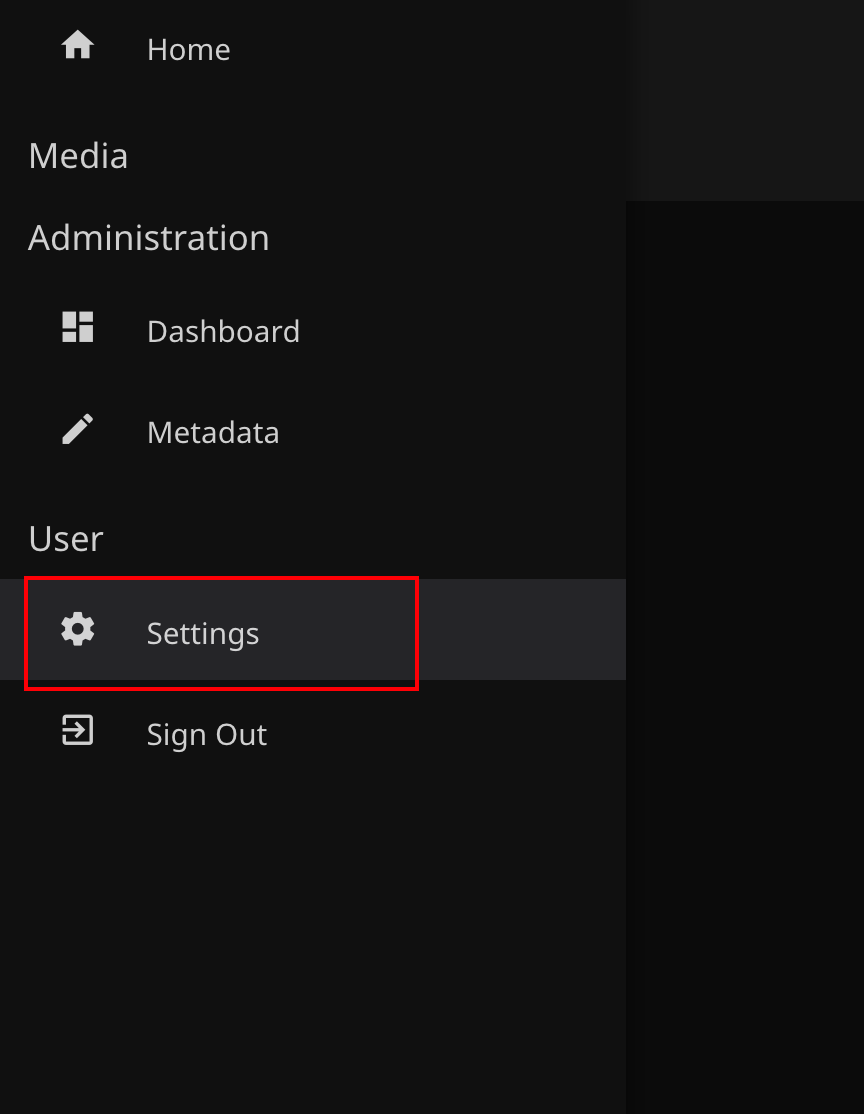
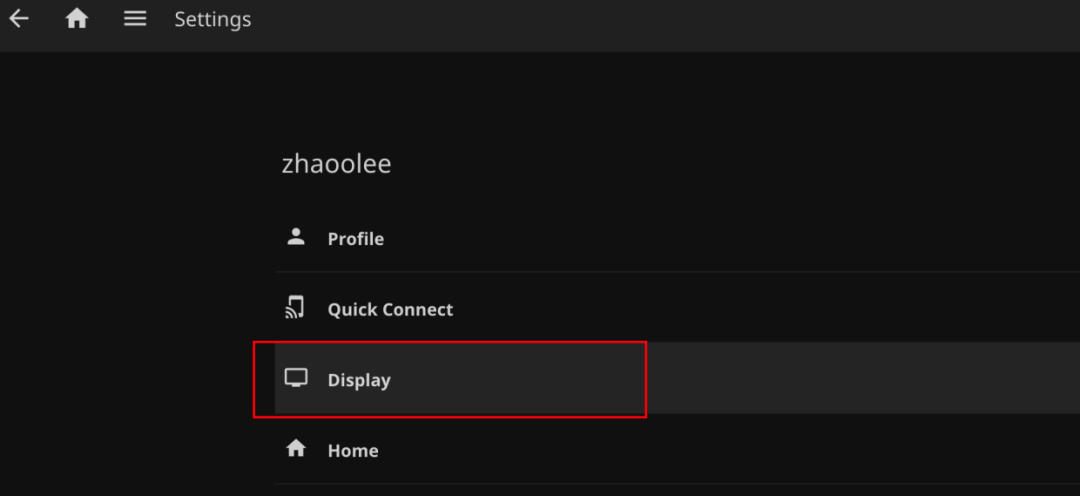
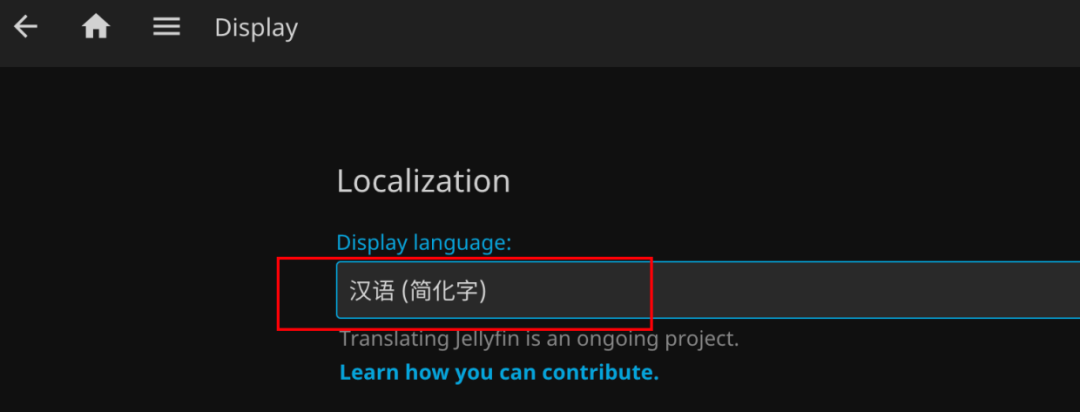
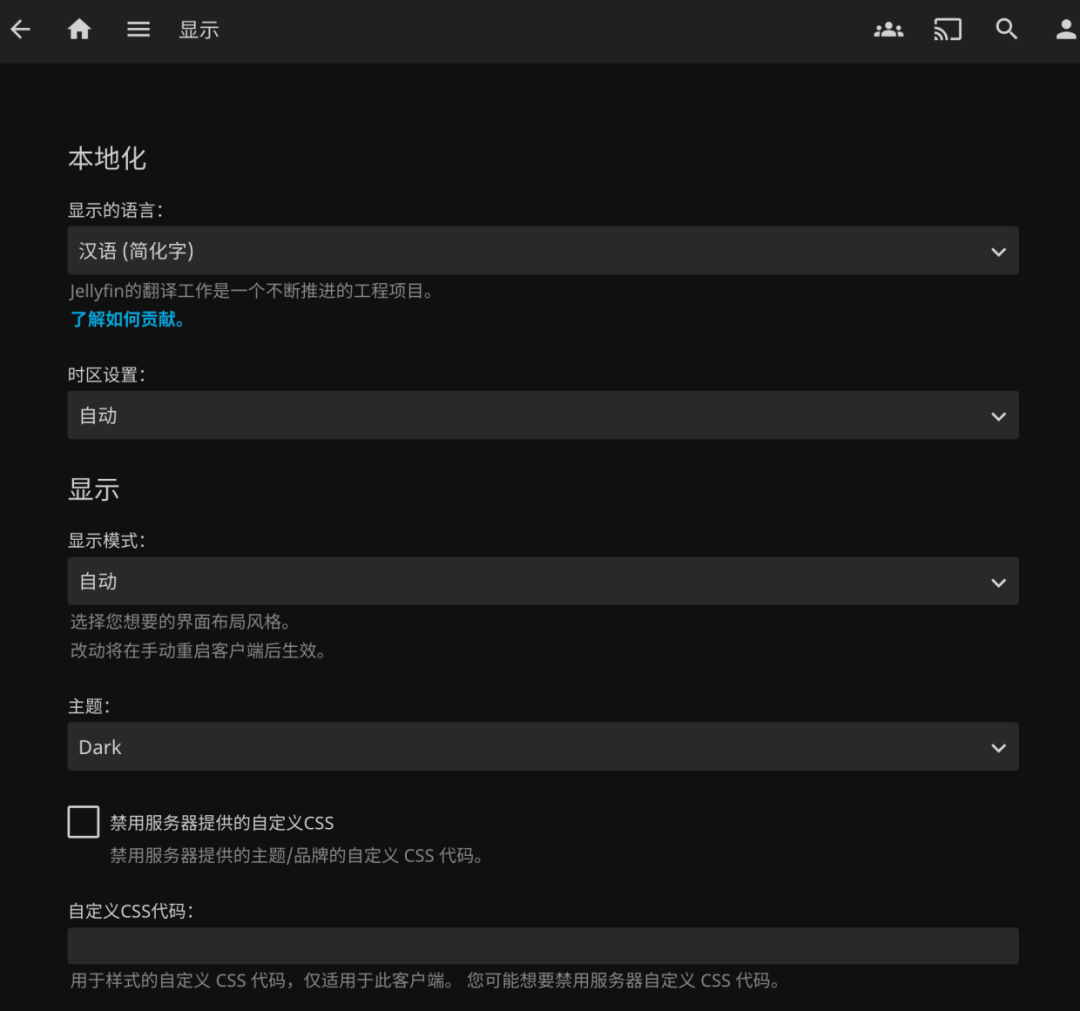
  • After logging in successfully, the displayed language is still English; we can change it to Chinese.
Building a Raspberry Pi 4B Home Server: A Guide to Setting Up an Open Source Free Jellyfin Private Cinema Using an Idle Laptop
image.png
Building a Raspberry Pi 4B Home Server: A Guide to Setting Up an Open Source Free Jellyfin Private Cinema Using an Idle Laptop
image.png
Building a Raspberry Pi 4B Home Server: A Guide to Setting Up an Open Source Free Jellyfin Private Cinema Using an Idle Laptop
image.png
  • Select Language
Building a Raspberry Pi 4B Home Server: A Guide to Setting Up an Open Source Free Jellyfin Private Cinema Using an Idle Laptop
image.png
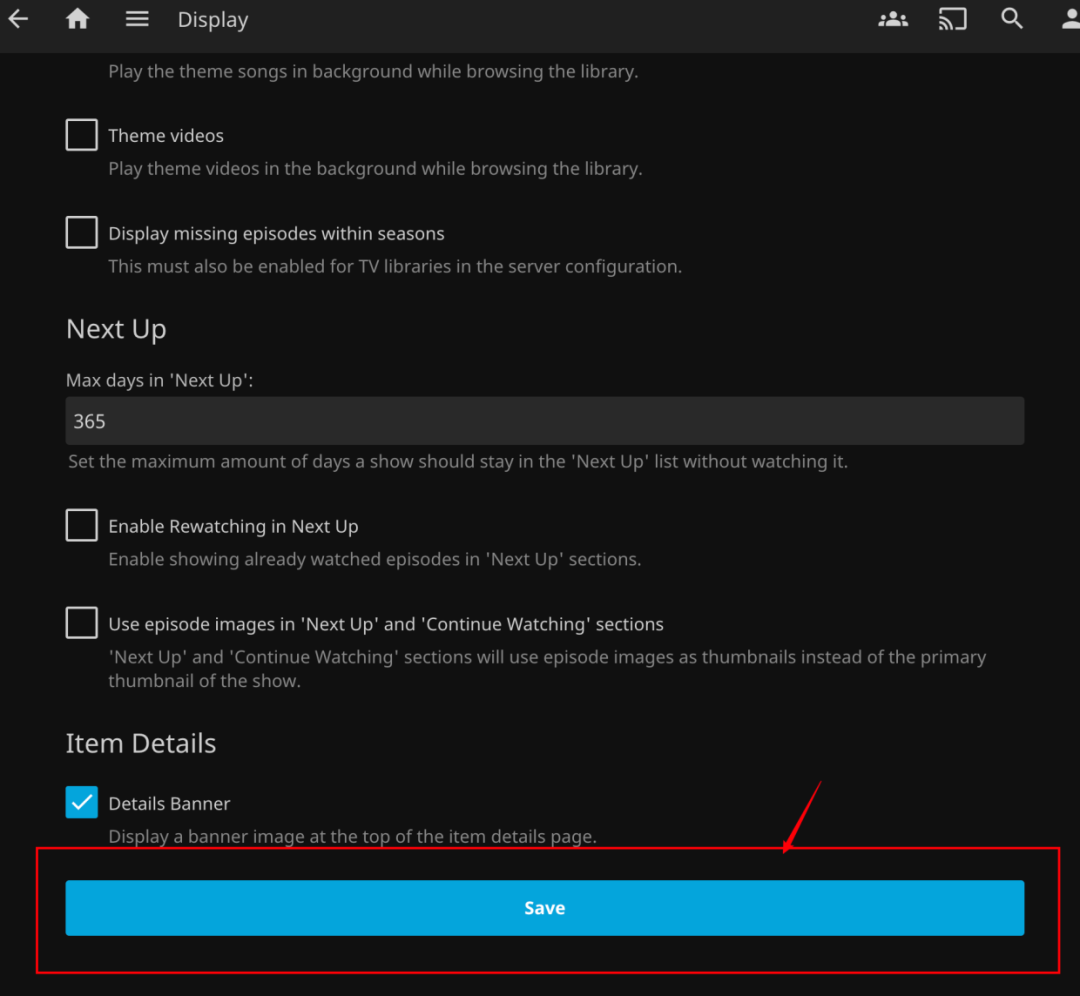
  • Save
Building a Raspberry Pi 4B Home Server: A Guide to Setting Up an Open Source Free Jellyfin Private Cinema Using an Idle Laptop
image.png
  • After saving successfully, refresh the page.
Building a Raspberry Pi 4B Home Server: A Guide to Setting Up an Open Source Free Jellyfin Private Cinema Using an Idle Laptop
image.png
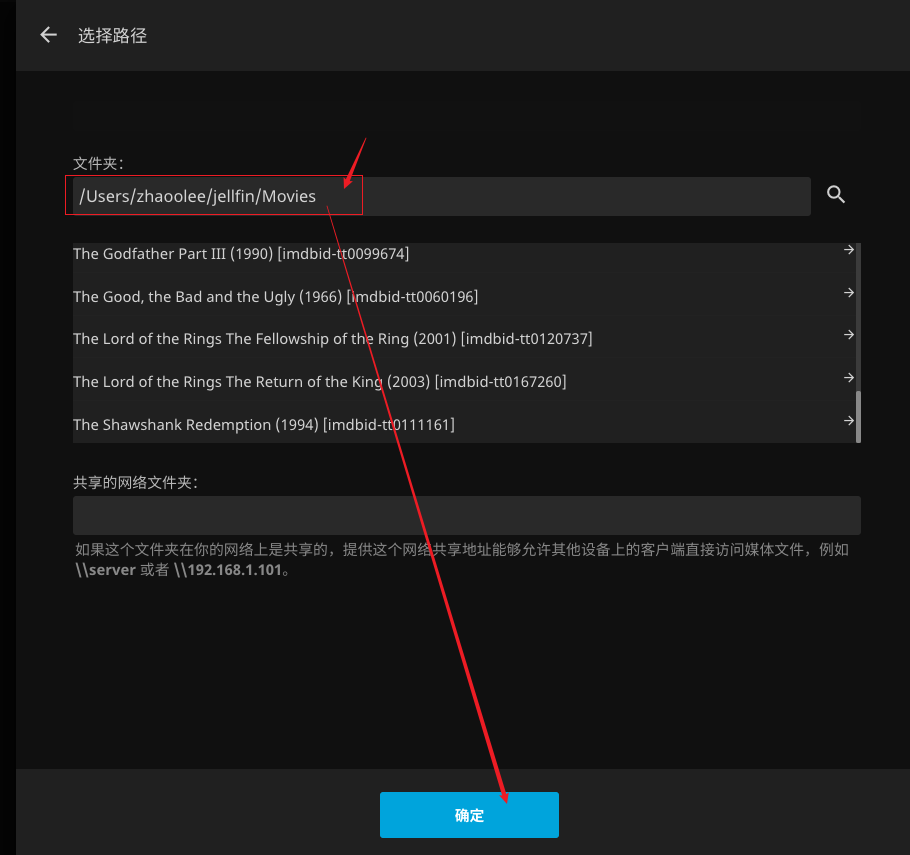
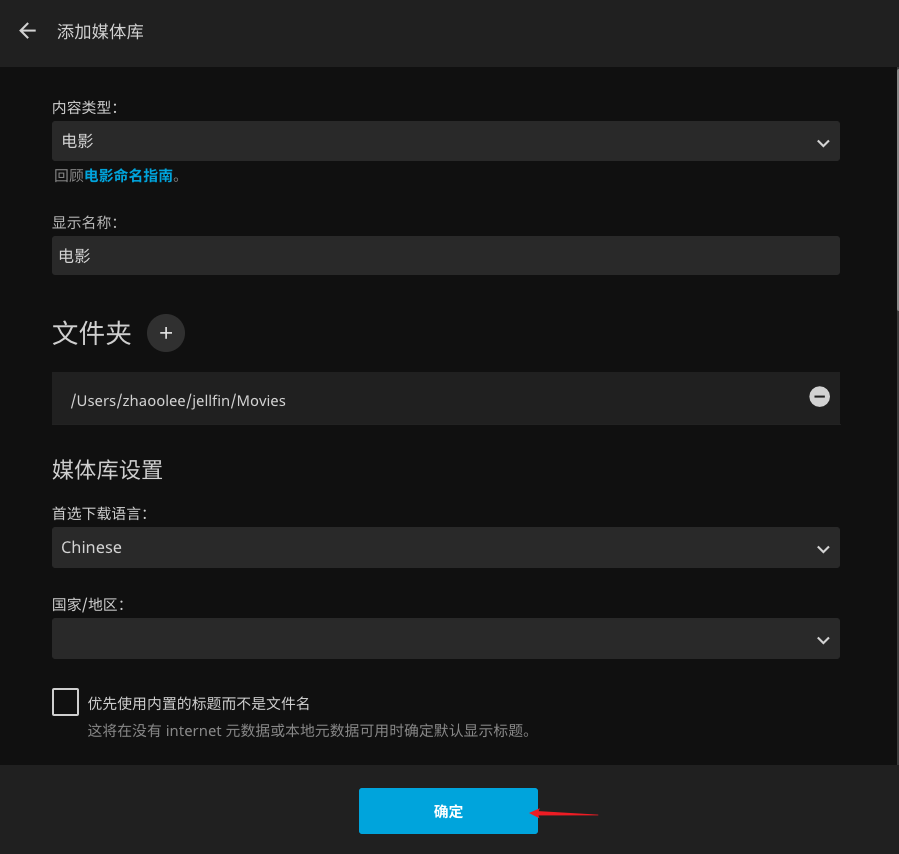
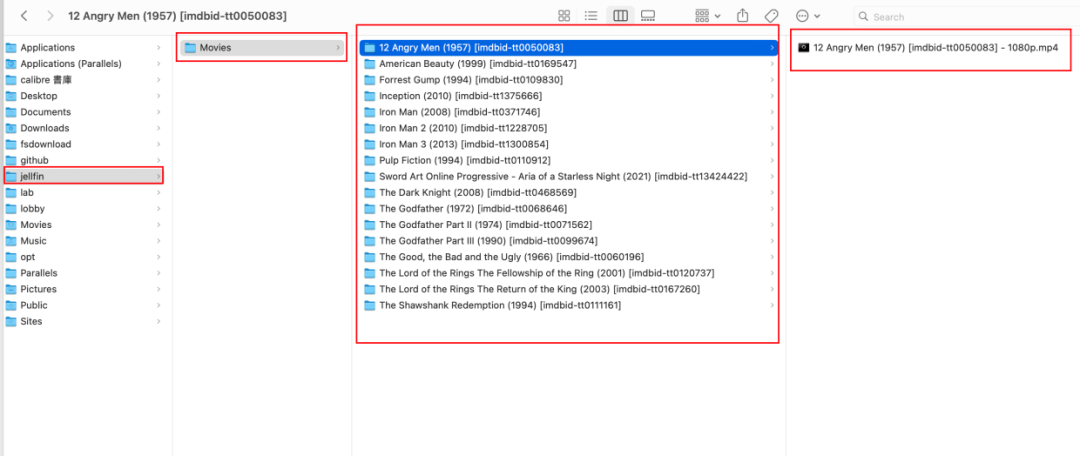
  • Create a Movies folder as the library.
Building a Raspberry Pi 4B Home Server: A Guide to Setting Up an Open Source Free Jellyfin Private Cinema Using an Idle Laptop
image.png

According to Jellyfin’s official documentation, name the movie files and their folders using IMDb IDs.

/Users/zhaoolee/jellfin/Movies/12 Angry Men (1957) [imdbid-tt0050083]/12 Angry Men (1957) [imdbid-tt0050083] - 1080p.mp4

Obtain the corresponding movie ID from the IMDb webpage URL Building a Raspberry Pi 4B Home Server: A Guide to Setting Up an Open Source Free Jellyfin Private Cinema Using an Idle Laptop

Jellyfin relies on properly named files to scrape movie posters and create a comfortable poster wall. For official documentation on file naming, visit: https://jellyfin.org/docs/general/server/media/movies

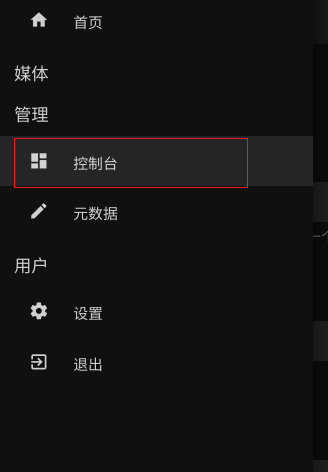
Back to the console
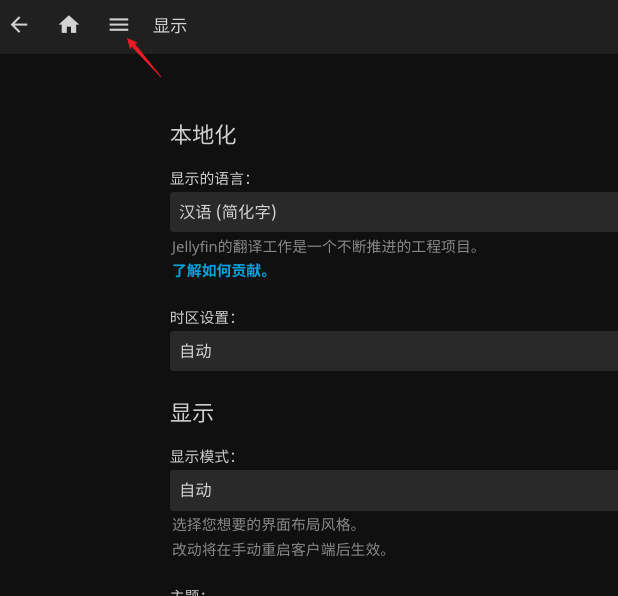
Building a Raspberry Pi 4B Home Server: A Guide to Setting Up an Open Source Free Jellyfin Private Cinema Using an Idle Laptop
image.png
Building a Raspberry Pi 4B Home Server: A Guide to Setting Up an Open Source Free Jellyfin Private Cinema Using an Idle Laptop
image.png

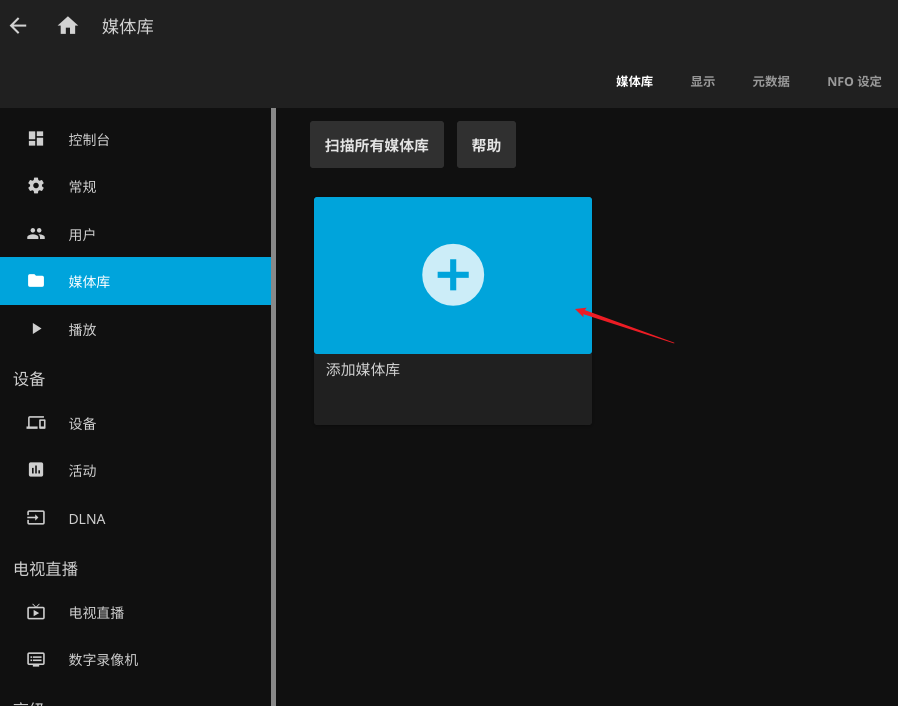
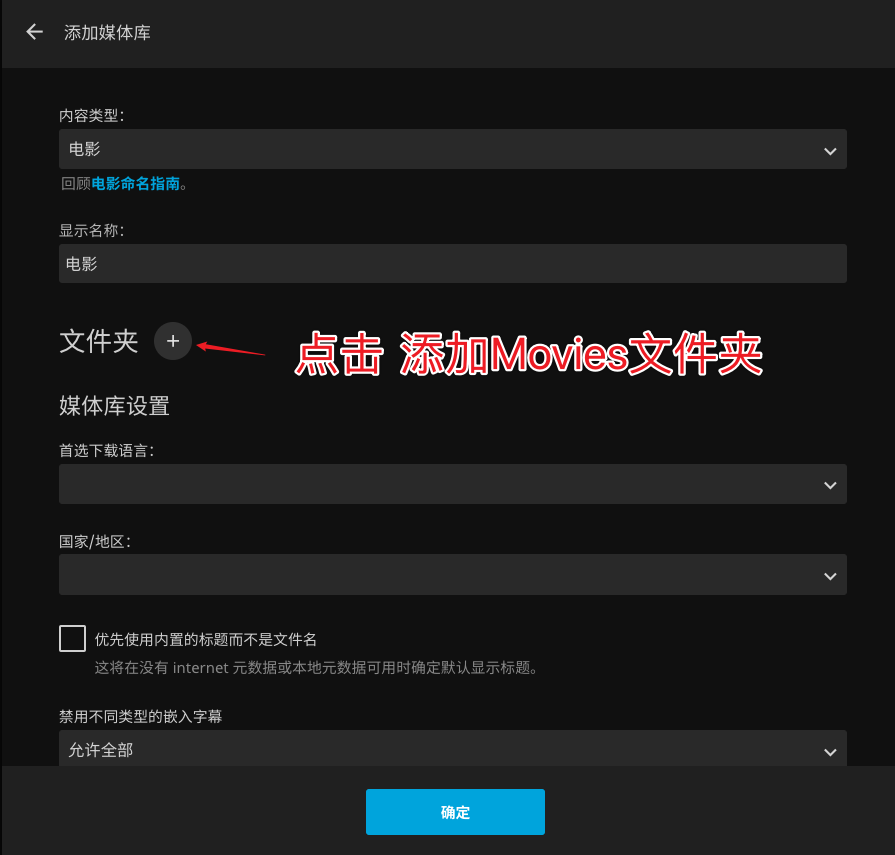
Enter the media library and add the Movies folder to the media library.
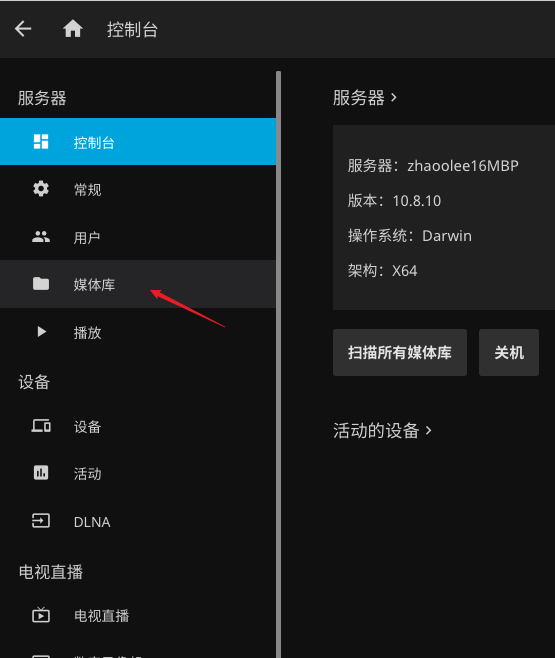
Building a Raspberry Pi 4B Home Server: A Guide to Setting Up an Open Source Free Jellyfin Private Cinema Using an Idle Laptop
image.png
Building a Raspberry Pi 4B Home Server: A Guide to Setting Up an Open Source Free Jellyfin Private Cinema Using an Idle Laptop
image.png
Building a Raspberry Pi 4B Home Server: A Guide to Setting Up an Open Source Free Jellyfin Private Cinema Using an Idle Laptop
image.png
Building a Raspberry Pi 4B Home Server: A Guide to Setting Up an Open Source Free Jellyfin Private Cinema Using an Idle Laptop
image.png
Building a Raspberry Pi 4B Home Server: A Guide to Setting Up an Open Source Free Jellyfin Private Cinema Using an Idle Laptop
image.png

Wait for the scan

Building a Raspberry Pi 4B Home Server: A Guide to Setting Up an Open Source Free Jellyfin Private Cinema Using an Idle LaptopIf the progress does not move during the scanning period, try refreshing the page.
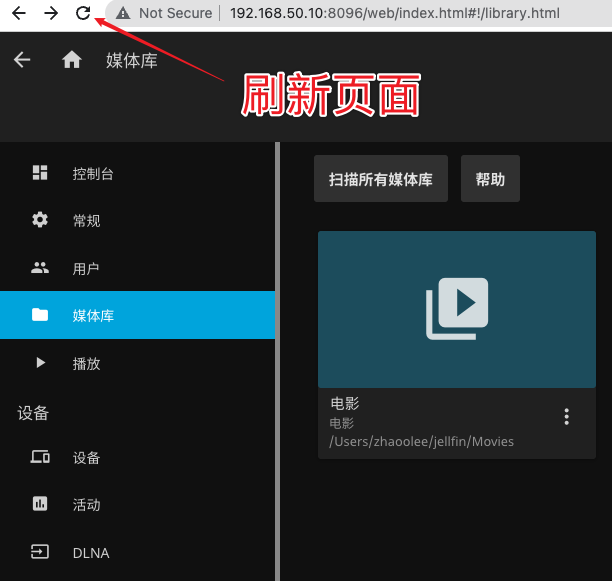
Building a Raspberry Pi 4B Home Server: A Guide to Setting Up an Open Source Free Jellyfin Private Cinema Using an Idle Laptop
image.png

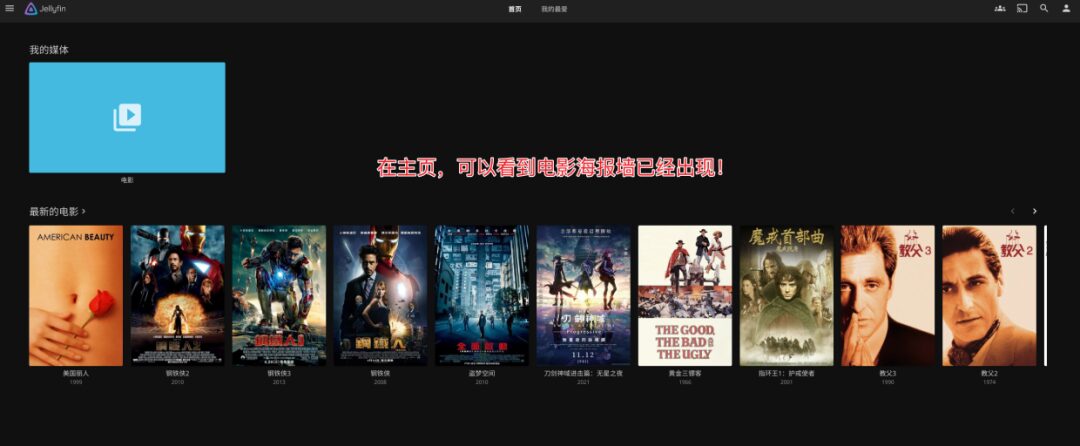
If the scanning progress ring disappears after refreshing the page, you can click the Home icon in the upper left corner to return to the homepage.
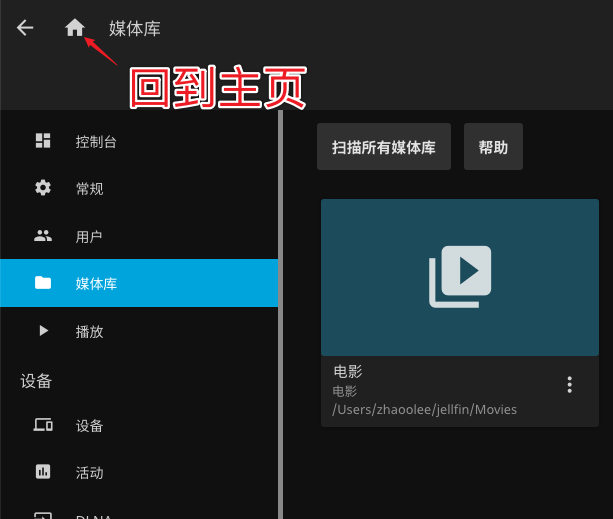
Building a Raspberry Pi 4B Home Server: A Guide to Setting Up an Open Source Free Jellyfin Private Cinema Using an Idle Laptop
image.png

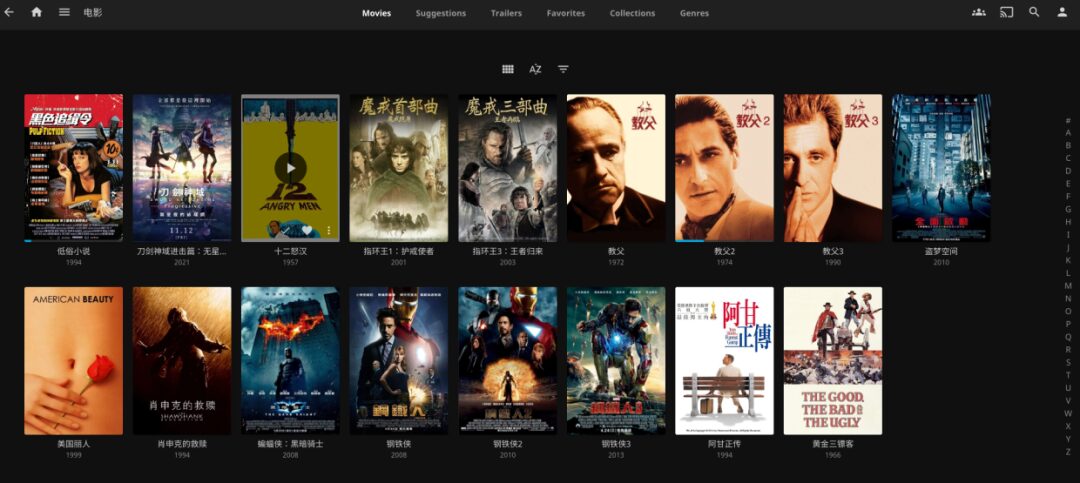
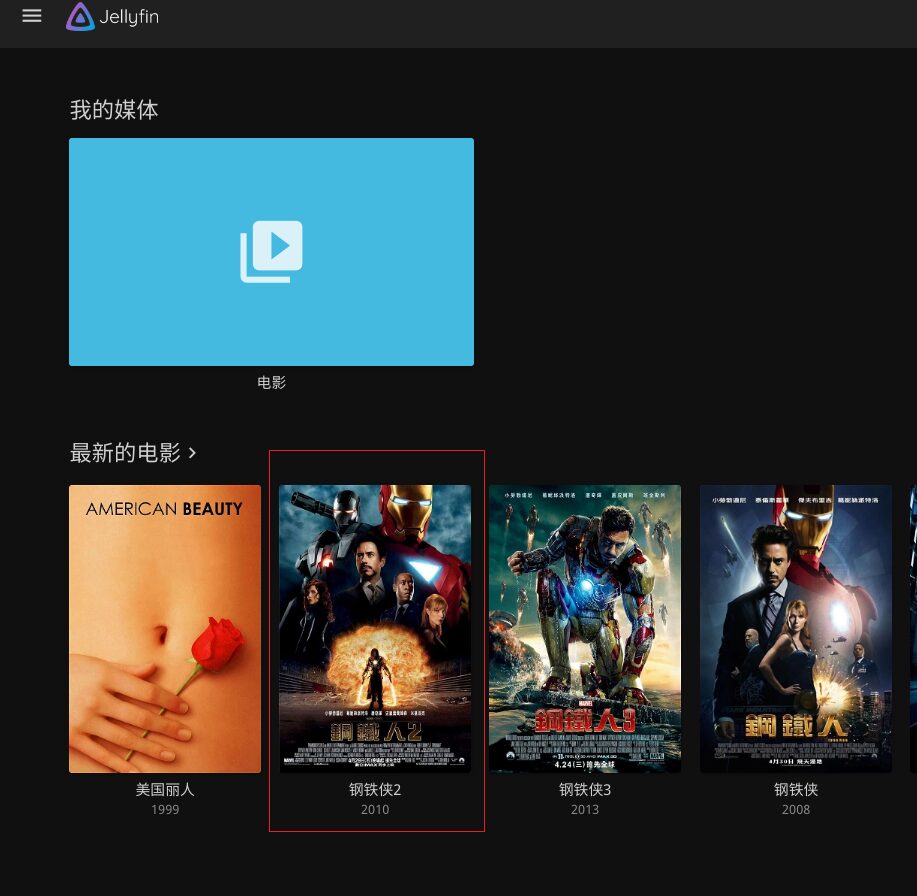
The poster wall appears.

Building a Raspberry Pi 4B Home Server: A Guide to Setting Up an Open Source Free Jellyfin Private Cinema Using an Idle Laptop
image.png

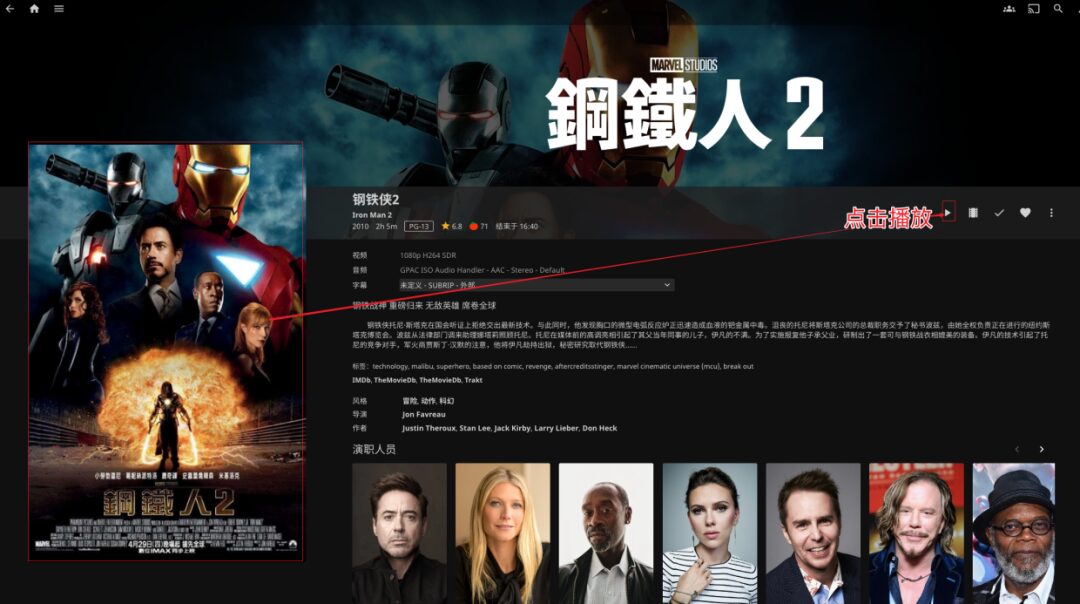
Clicking on the images in the poster wall allows you to see details such as the cast and crew.
Building a Raspberry Pi 4B Home Server: A Guide to Setting Up an Open Source Free Jellyfin Private Cinema Using an Idle Laptop
image.png
Building a Raspberry Pi 4B Home Server: A Guide to Setting Up an Open Source Free Jellyfin Private Cinema Using an Idle Laptop
image.png
  • Clicking on the cover and play icon will directly play the movie.
Building a Raspberry Pi 4B Home Server: A Guide to Setting Up an Open Source Free Jellyfin Private Cinema Using an Idle Laptop
image.png
  • Successfully playing.
Building a Raspberry Pi 4B Home Server: A Guide to Setting Up an Open Source Free Jellyfin Private Cinema Using an Idle Laptop
image.png

Support On-Demand Bitrate Switching

We store 1080p or 4K videos on the server. If we want to access them from the public network and save bandwidth, we need to play 720p videos. After configuring ffmpeg on the server, Jellyfin can convert videos directly on the server. However, real-time video bitrate conversion puts a high load on the CPU; configuring hardware decoding on the Jellyfin server can reduce CPU load.

ffmpeg can not only convert bitrates but also formats. For example, if we download a movie in mkv format, ordinary browsers cannot play mkv directly. ffmpeg can convert it to mp4 in real-time and push it to the browser at a low bitrate, allowing us to enjoy the ffmpeg private film library service using just a browser.

  • Install ffmpeg
brew install ffmpeg
which ffmpeg
Building a Raspberry Pi 4B Home Server: A Guide to Setting Up an Open Source Free Jellyfin Private Cinema Using an Idle Laptop
image.png

Building a Raspberry Pi 4B Home Server: A Guide to Setting Up an Open Source Free Jellyfin Private Cinema Using an Idle LaptopBuilding a Raspberry Pi 4B Home Server: A Guide to Setting Up an Open Source Free Jellyfin Private Cinema Using an Idle Laptop

Building a Raspberry Pi 4B Home Server: A Guide to Setting Up an Open Source Free Jellyfin Private Cinema Using an Idle LaptopBuilding a Raspberry Pi 4B Home Server: A Guide to Setting Up an Open Source Free Jellyfin Private Cinema Using an Idle Laptop

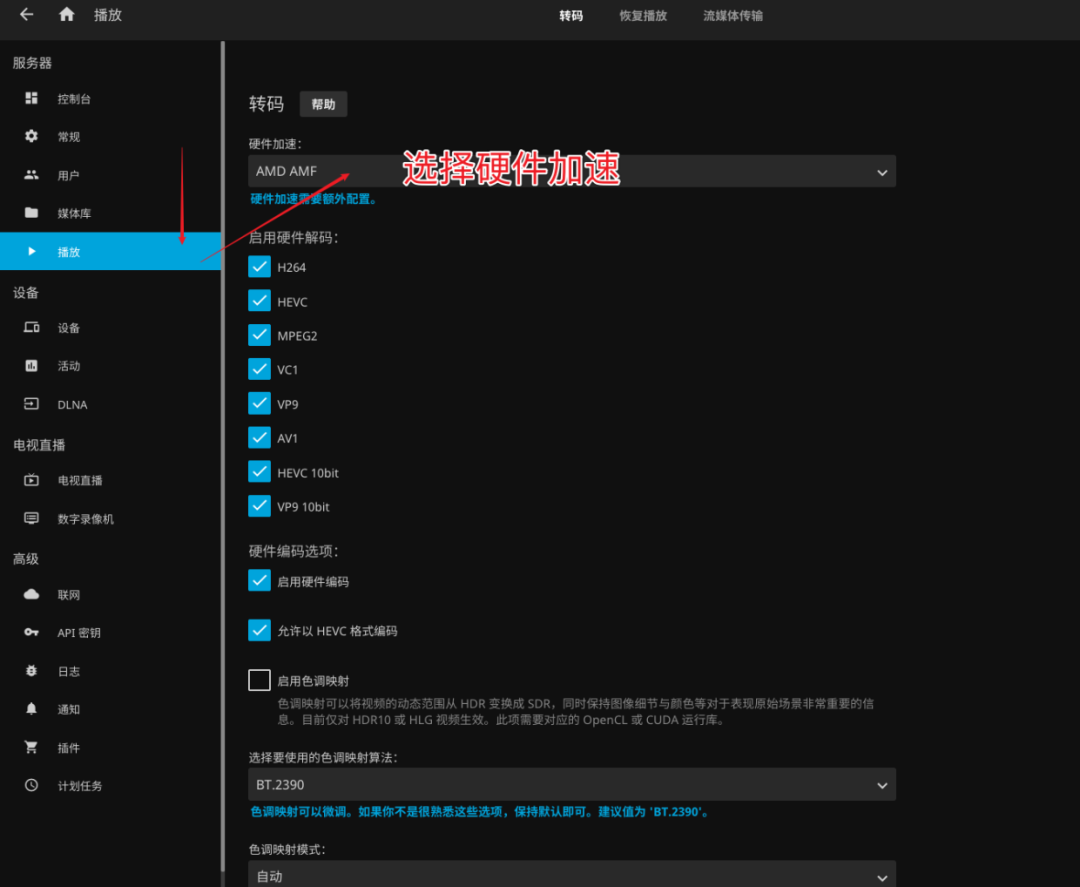
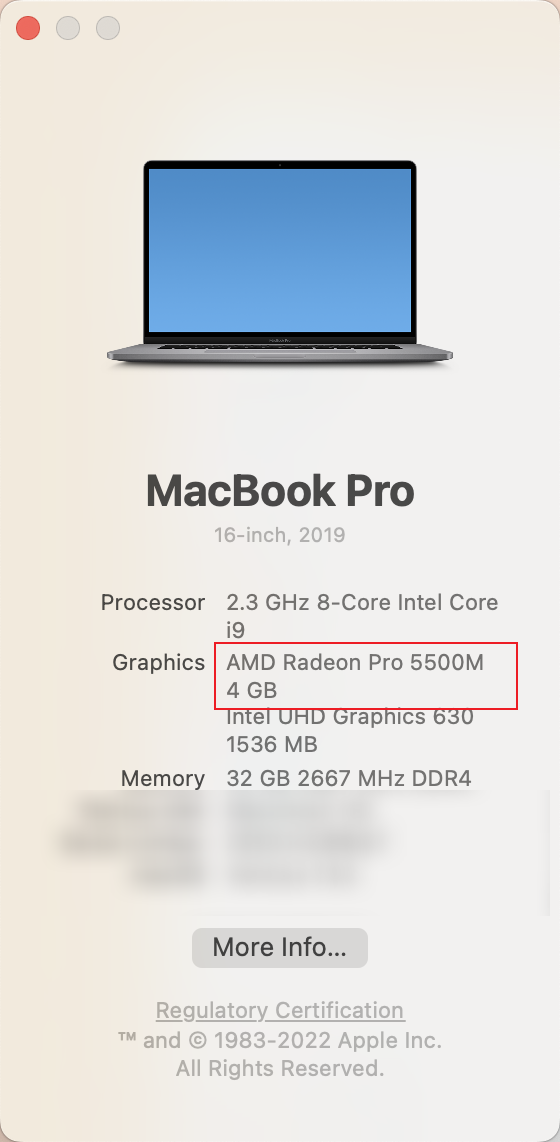
  • Check GPU hardware and enable hardware transcoding acceleration.
Building a Raspberry Pi 4B Home Server: A Guide to Setting Up an Open Source Free Jellyfin Private Cinema Using an Idle Laptop
image.png
Building a Raspberry Pi 4B Home Server: A Guide to Setting Up an Open Source Free Jellyfin Private Cinema Using an Idle Laptop
image.png

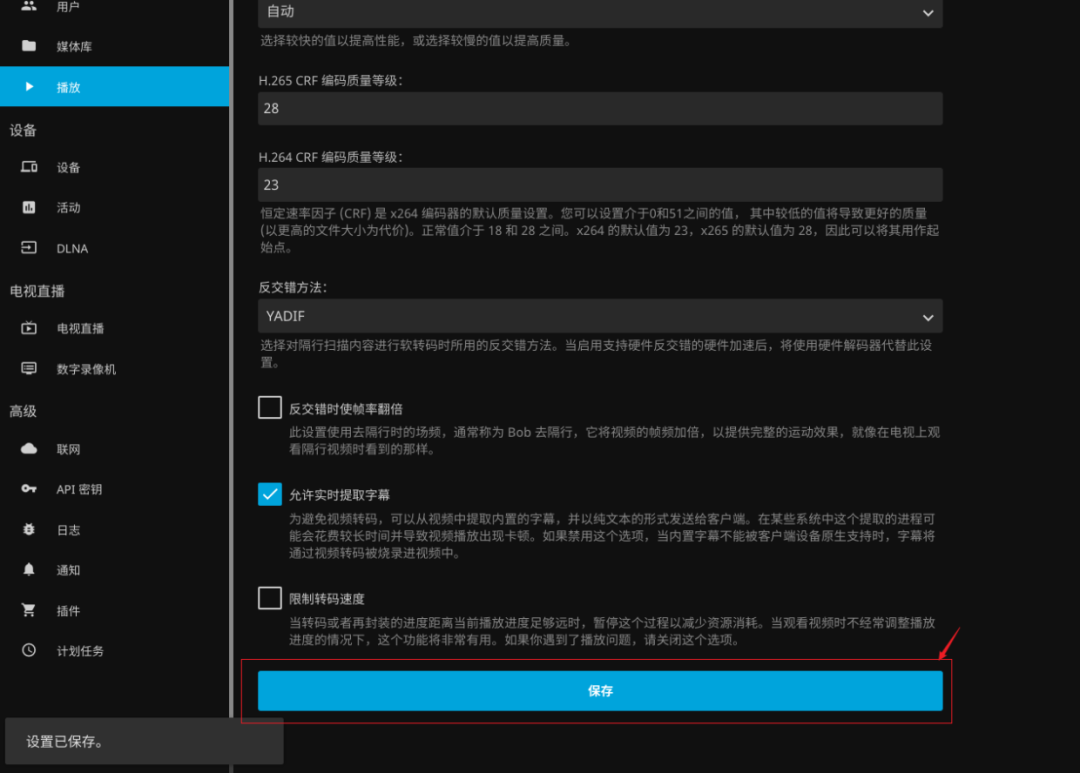
There is an option for Apple VideoToolBox for hardware acceleration, but there is a bug that prevents playback when converting to 360p low bitrate. Therefore, I finally chose AMD AMF.

Remember to save after configuring hardware acceleration.
Building a Raspberry Pi 4B Home Server: A Guide to Setting Up an Open Source Free Jellyfin Private Cinema Using an Idle Laptop
image.png

For more hardware decoding configuration, refer to the official documentation: https://jellyfin.org/docs/general/administration/hardware-acceleration/

Building a Raspberry Pi 4B Home Server: A Guide to Setting Up an Open Source Free Jellyfin Private Cinema Using an Idle Laptop
image.png
Building a Raspberry Pi 4B Home Server: A Guide to Setting Up an Open Source Free Jellyfin Private Cinema Using an Idle Laptop
image.png
Building a Raspberry Pi 4B Home Server: A Guide to Setting Up an Open Source Free Jellyfin Private Cinema Using an Idle Laptop
image.png
Building a Raspberry Pi 4B Home Server: A Guide to Setting Up an Open Source Free Jellyfin Private Cinema Using an Idle Laptop
image.png

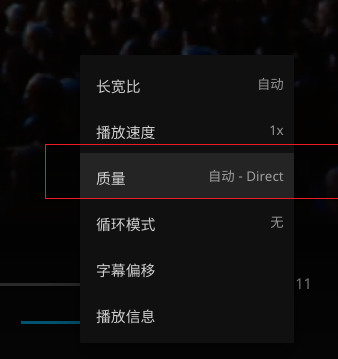
After completing the settings, you can play low-bitrate videos on devices that need to save bandwidth (mobile networks) or have weak decoding capabilities (old TV boxes).
Building a Raspberry Pi 4B Home Server: A Guide to Setting Up an Open Source Free Jellyfin Private Cinema Using an Idle Laptop
image.png

Adding TV Shows to Our Media Management Library

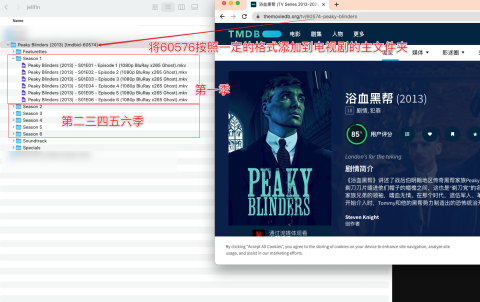
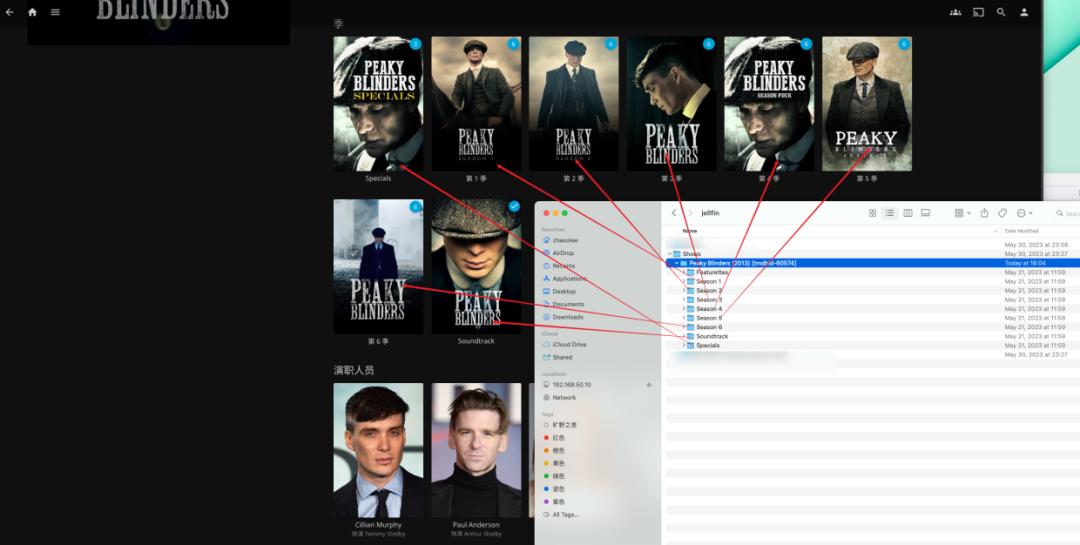
Taking the British drama Peaky Blinders as an example, we need to add the tmdb ID to the main folder of the TV show.

https://www.themoviedb.org/tv/60574-peaky-blinders

Building a Raspberry Pi 4B Home Server: A Guide to Setting Up an Open Source Free Jellyfin Private Cinema Using an Idle Laptop
image.png
Building a Raspberry Pi 4B Home Server: A Guide to Setting Up an Open Source Free Jellyfin Private Cinema Using an Idle Laptop
image.png

Display Effect

Building a Raspberry Pi 4B Home Server: A Guide to Setting Up an Open Source Free Jellyfin Private Cinema Using an Idle Laptop
image.png
Building a Raspberry Pi 4B Home Server: A Guide to Setting Up an Open Source Free Jellyfin Private Cinema Using an Idle Laptop
image.png

The official document for TV shows naming rules: https://jellyfin.org/docs/general/server/media/shows

Mapping Jellyfin to the Public Network

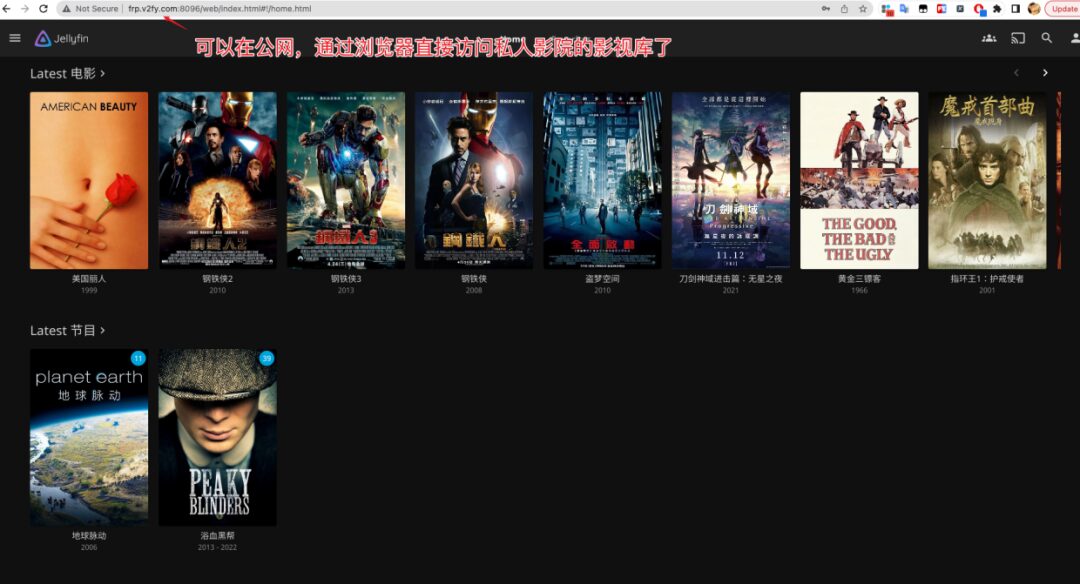
As the home gateway, the Raspberry Pi has already configured frpc. We just need to add the following configuration to frpc.ini and open port 8096 on the cloud server to expose Jellyfin to the public network.

[jellyfin-frp-v2fy-com-8096]
type = tcp
local_ip = 127.0.0.1
local_port = 8096
remote_port = 8096

If you have questions about the frp configuration, feel free to check out the open-source articles from the first and fourth issues at https://github.com/zhaoolee/pi.

  • After configuration is complete, you can access the private cinema’s film library directly through the browser on the public network!
Building a Raspberry Pi 4B Home Server: A Guide to Setting Up an Open Source Free Jellyfin Private Cinema Using an Idle Laptop
image.png

Conclusion

Currently, in the Chinese internet, we cannot access uncensored high-quality films even if we pay; Jellyfin can provide us with this, and it doesn’t require a membership. Jellyfin is free and ad-free, allowing us to watch high-quality resources over the local network at home, and when away, we can continue from the last progress and see the bandwidth-saving film versions.

Leave a Comment

Your email address will not be published. Required fields are marked *