Transform Raspberry Pi Into a Text Recognition Tool

Transform Raspberry Pi Into a Text Recognition Tool

In many projects, the Raspberry Pi is used as a monitoring camera or to perform machine learning tasks. In these scenarios, the images often contain text information of interest to the application. We want to extract this information and convert it for programmatic text analysis. The Raspberry Pi can achieve this text recognition, and it is not difficult. We can read text from static images or the real-time stream from a camera.
In this tutorial, we will explore how to implement text recognition using Raspberry Pi and what components are needed for this.

Necessary Components Before Getting Started

The main part of this application is purely software-based. Therefore, we only need a small amount of hardware to set up text recognition. We will need and use the following components:
  • Powerful Raspberry Pi (e.g., Model 4)

  • Official Raspberry Pi camera, or: USB webcam

  • Power connection: micro USB cable and USB adapter

A screen, keyboard, and mouse can be used, but since we operate the Raspberry Pi remotely, they are not necessary. Therefore, you should have set up the Raspberry Pi accordingly and enabled SSH, and also established a remote desktop connection. After that, we can get started directly.
Remote access to Raspberry Pi using SSH and Putty:
https://tutorials-raspberrypi.com/raspberry-pi-remote-access-by-using-ssh-and-putty/
How to establish a Raspberry Pi remote desktop connection:
https://tutorials-raspberrypi.com/raspberry-pi-remote-desktop-connection/

What is Text Recognition (OCR) and How Does it Work on Raspberry Pi?

In short, text recognition on images (Optical Character Recognition or OCR) is essentially about recognizing individual letters. If they are close enough, they form a word.
https://en.wikipedia.org/wiki/Optical_character_recognition
In previous tutorials, we have seen that a model can be trained to recognize objects in images. If we now train all (Latin) letters—rather than objects—we can also recognize them again through the model.
Theoretically, this is feasible, but it requires a lot of effort. Different fonts, colors, formats, etc., must be trained first. However, we want to save the time required for this.
Therefore, we use the Tesseract library from Google. It includes such models and has been optimized by many developers.
Tesseract library: https://github.com/tesseract-ocr/tesseract

Installing Tesseract OCR Library

We can compile Tesseract ourselves or simply install it via a package manager. The latter can be easily done with the following command:
sudo apt install tesseract-ocr
We can easily check if the installation was successful using tesseract -v.
Now we can perform our first small test. For this, we will use this image:

Transform Raspberry Pi Into a Text Recognition Tool

You can download it as follows:
wget https://tutorials-raspberrypi.de/wp-content/uploads/coffee-ocr.jpg
Then we execute the following command:
tesseract coffee-ocr.jpg stdout
The output is as follows:
Warning: Invalid resolution 0 dpi. Using 70 instead.Estimating resolution as 554COFFEE
Thus, the text “COFFEE” was recognized in our input image.
Since we want to use the entire functionality in a Python script, we need some libraries, such as OpenCV and the Python wrapper for Tesseract.
OpenCV: https://opencv.org/
We install them via the Python package manager:
pip3 install opencv-python pillow pytesseract imutils numpy
Testing Text Recognition on Raspberry Pi via Python Script

So far, we have only attempted to recognize words on unprocessed color images. Preprocessing steps can often improve results. For example, by converting the color image to a grayscale image. On the other hand, we can also try to detect edges in the image to better highlight letters/words.
Therefore, let’s first enable text recognition on Raspberry Pi via a Python script. For this, we create a folder and a file.
mkdir ocrcd ocrsudo nano example.py
We insert the following content:
import cv2
import pytesseract
import numpy as np
from pytesseract import Output

img_source = cv2.imread('images/coffee.jpg')

def get_grayscale(image):
    return cv2.cvtColor(image, cv2.COLOR_BGR2GRAY)

def thresholding(image):
    return cv2.threshold(image, 0, 255, cv2.THRESH_BINARY + cv2.THRESH_OTSU)[1]

def opening(image):
    kernel = np.ones((5, 5), np.uint8)
    return cv2.morphologyEx(image, cv2.MORPH_OPEN, kernel)

def canny(image):
    return cv2.Canny(image, 100, 200)

gray = get_grayscale(img_source)
thresh = thresholding(gray)
opening = opening(gray)
canny = canny(gray)

for img in [img_source, gray, thresh, opening, canny]:
    d = pytesseract.image_to_data(img, output_type=Output.DICT)
    n_boxes = len(d['text'])

    # back to RGB
    if len(img.shape) == 2:
        img = cv2.cvtColor(img, cv2.COLOR_GRAY2RGB)

    for i in range(n_boxes):
        if int(d['conf'][i]) > 60:
            (text, x, y, w, h) = (d['text'][i], d['left'][i], d['top'][i], d['width'][i], d['height'][i])
            # don't show empty text
            if text and text.strip() != "":
                img = cv2.rectangle(img, (x, y), (x + w, y + h), (0, 255, 0), 2)
                img = cv2.putText(img, text, (x, y - 10), cv2.FONT_HERSHEY_SIMPLEX, 1.2, (0, 255, 0), 3)

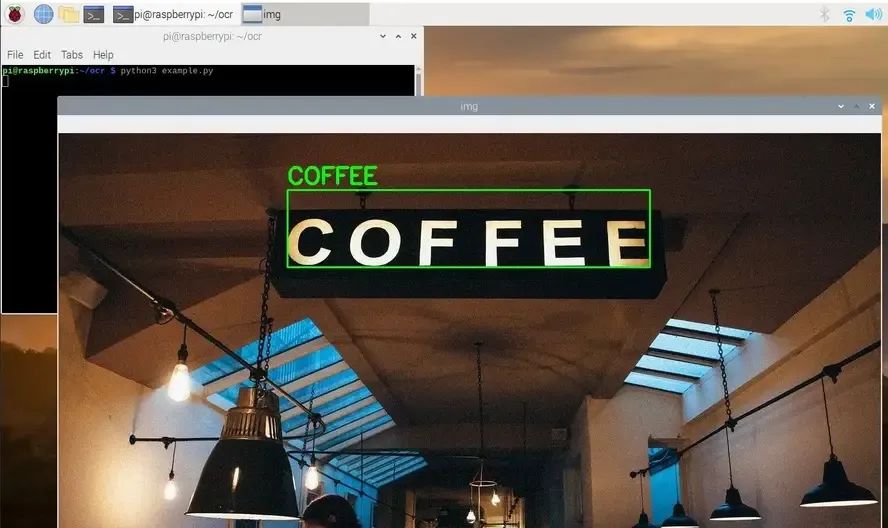
    cv2.imshow('img', img)
    cv2.waitKey(0)
Let’s look at some interesting lines:
  • Import libraries (lines 1-4)

  • Load image (line 5), adjust the path as needed!

  • Preprocessing functions to convert to grayscale (lines 9-23)

  • Line 32: Here we extract any data (text, coordinates, scores, etc.)

  • In order to color the boxes later if necessary, we convert the grayscale image back to an image with color channels (lines 36-37)

  • From line 39, we color the boxes for scores above 60.

  • For this, we extract text, starting coordinates, and box sizes in line 41.

  • We only draw boxes if non-empty text is detected (lines 43-45).

  • Then we run the script and wait for the escape key to be pressed (lines 47/48).

We now run the script:
python3 example.py
Then, 5 different images will appear one after another (press the ESC key to show the next image). The recognized text will be highlighted on the image. This way, you can determine which preprocessing step works best for you.

Recognizing Text in Real-Time Images with Raspberry Pi Camera

So far, we have only used static images as input for text recognition. Now, we also want to recognize text in the real-time stream from the connected camera. This only requires a few small changes to our previous script. We create a new file:
sudo nano ocr_camera.py
The contents of the file are as follows:
import cv2
import pytesseract
from pytesseract import Output

cap = cv2.VideoCapture(0)
cap.set(cv2.CAP_PROP_BUFFERSIZE, 1)

while True:
    # Capture frame-by-frame
    ret, frame = cap.read()
    d = pytesseract.image_to_data(frame, output_type=Output.DICT)
    n_boxes = len(d['text'])

    for i in range(n_boxes):
        if int(d['conf'][i]) > 60:
            (text, x, y, w, h) = (d['text'][i], d['left'][i], d['top'][i], d['width'][i], d['height'][i])
            # don't show empty text
            if text and text.strip() != "":
                frame = cv2.rectangle(frame, (x, y), (x + w, y + h), (0, 255, 0), 2)
                frame = cv2.putText(frame, text, (x, y - 10), cv2.FONT_HERSHEY_SIMPLEX, 1.0, (0, 0, 255), 3)

    # Display the resulting frame
    cv2.imshow('frame', frame)
    if cv2.waitKey(1) & 0xFF == ord('q'):
        break

# When everything done, release the capture
cap.release()
cv2.destroyAllWindows()
Our current changes are as follows:
  • In lines 5-6, we define the camera instead of a fixed image. The camera must be connected and recognized.

  • In line 10, we read the current frame.

  • Here we omit preprocessing steps, but these can easily be inserted (in line 11).

Last but not least, we also run the script:
python3 ocr_camera.py
Now point the camera at the text and observe how the words on the text are recognized:

Transform Raspberry Pi Into a Text Recognition Tool

In my example, you can clearly see that converting to a grayscale image makes sense, as the word “Tutorials” is too bright.

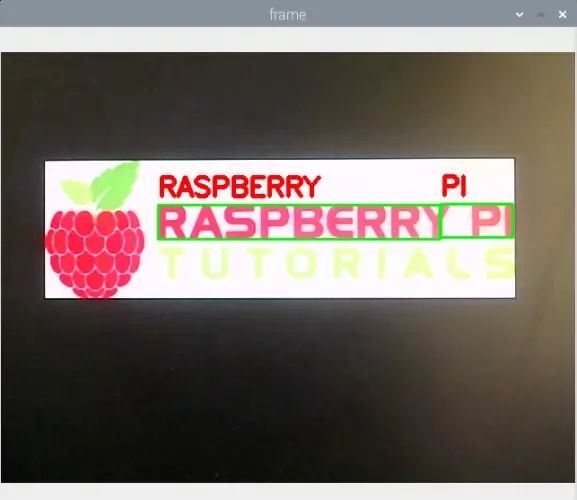
Text Recognition in Other Languages

Tesseract installs only English as the recognition language by default. We can check with the following command:
tesseract --list-langs
If you want to add more languages that should be recognized, you can do so as follows:
sudo apt-get install tesseract-ocr-[lang]
Replace [lang] with the abbreviation of the language (all means install all existing languages).
https://askubuntu.com/questions/793634/how-do-i-install-a-new-language-pack-for-tesseract-on-16-04/798492#798492
Then you can choose the language in the Python script. Add the parameter:
d = pytesseract.image_to_data(img, lang='eng')

Conclusion

Tesseract is a powerful tool that provides out-of-the-box text recognition capabilities for images or frames. This means we do not need to train and create our own machine learning models. Although the computation is relatively heavy, the text recognition on Raspberry Pi works very well. Results can be further improved with various processing steps. By the way, you can find these two scripts in the Github repository.

If you want to consult about Raspberry Pi standard products and industrial products, feel free to contact us~

1. Scan the code to add Engineer Yang for consultation.

Transform Raspberry Pi Into a Text Recognition Tool

2. Send us your contact information, and we will get back to you as soon as possible.
3. The official website of the Raspberry Pi distributor in Shanghai Jingheng: https://www.edatec.cn/cn
Transform Raspberry Pi Into a Text Recognition Tool
1
Transform Raspberry Pi Into a Text Recognition Tool

We will update regularly~

Follow Raspberry Pi developers~

Learn more about Raspberry Pi related content~

Leave a Comment