Part 1: Introduction to Arduino
1.1 Origin and Development of Arduino
1.1.1 Origin
The Arduino project began in 2005, created by Massimo Banzi, David Cuartielles, Tom Igoe, Gianluca Martino, and David Mellis at the Interaction Design Institute Ivrea (IDII) in Italy. Initially, the purpose of Arduino was to provide designers and artists with an easy-to-use, low-cost open-source hardware platform to facilitate the development of interactive projects.
1.1.2 Development
Over time, Arduino gained widespread attention and application, gradually becoming one of the most popular open-source hardware platforms globally. It has a large user base across various fields, including education, research, engineering, art, and maker culture. The Arduino ecosystem has gradually expanded, covering a wide range of hardware and software, such as development boards manufactured by official and third-party manufacturers, sensors, actuators, and rich programming libraries.
1.1.3 Features of Arduino
The success of Arduino can be attributed to several factors:
-
Open Source: The hardware design and software code of Arduino are open source, allowing users to modify, customize, and share freely, greatly promoting innovation and development.
-
Ease of Use: The design of the Arduino IDE and programming language is simple and easy to understand, enabling beginners to quickly get started with project development.
-
Community Support: Arduino has a large user community where users can share experiences, ask questions, provide answers, and gain inspiration.
-
Compatibility and Expandability: Various modules and accessories in the Arduino ecosystem are compatible with each other, making it easy for users to expand and combine.
-
Low Cost: Arduino development boards and their peripheral modules are relatively inexpensive, allowing more people to try and engage in project development.
1.1.4 Future Development of Arduino
With the rapid development of technologies such as the Internet of Things and artificial intelligence, the application prospects of Arduino are broad. The Arduino project will continue to release new development boards, modules, and programming libraries to meet the needs of various application scenarios. Meanwhile, the Arduino community will continue to grow, providing more resources and support to empower various projects globally.
1.2 Relationship between LY-F3 Development Board and Arduino
1.2.1 Firmware Based on Arduino Uno
The LY-F3 development board uses the same firmware as the Arduino Uno, featuring the same microcontroller (ATmega328P) and similar performance characteristics. This means users can program and develop the LY-F3 development board directly in the Arduino IDE without additional configuration and adjustments.
1.2.2 Redesigned Circuit Board Shape
Although the LY-F3 development board is based on the Arduino Uno, its circuit board shape has been redesigned. This makes the LY-F3 development board’s size and shape more suitable for specific application scenarios, such as compact projects or applications that need to integrate into other hardware.
1.2.3 Integrated Common External Devices
One important feature of the LY-F3 development board is that it integrates many commonly used external devices, such as LED lights, buttons, passive buzzers, light sensors, WS2812 RGB lights, etc. This allows users to learn and test code without additional wiring, significantly lowering the entry barrier and improving development efficiency.
1.2.4 User-Friendly Design for Beginners
With the above features, the LY-F3 development board, as an integrated development board that includes Arduino Uno firmware and common external devices, provides a very friendly learning and practice platform for beginners. Users can quickly master the basic skills of Arduino programming and electronics, laying a solid foundation for subsequent project development.
1.3 Installation and Configuration of Arduino IDE
1.3.1 Download Arduino IDE
First, visit the official Arduino website (https://www.arduino.cc/) download page and select the corresponding version of Arduino IDE based on your operating system (Windows, macOS, or Linux). Ensure you choose a version compatible with your computer system for the best user experience.
1.3.2 Install Arduino IDE
Follow the steps below to install Arduino IDE based on your operating system:
-
Windows: Run the downloaded installer and follow the prompts to complete the installation. It is recommended to use the default settings for compatibility.
-
macOS: Unzip the downloaded “.zip” file, then drag the “Arduino.app” file to the “Applications” folder.
-
Linux: Unzip the downloaded “.tar.xz” file, place the extracted folder in a suitable location. Enter the folder and run the “install.sh” script to complete the installation.

1.3.3 Configure Arduino IDE
After installing Arduino IDE, open the software. Next, follow these steps to configure Arduino IDE:
-
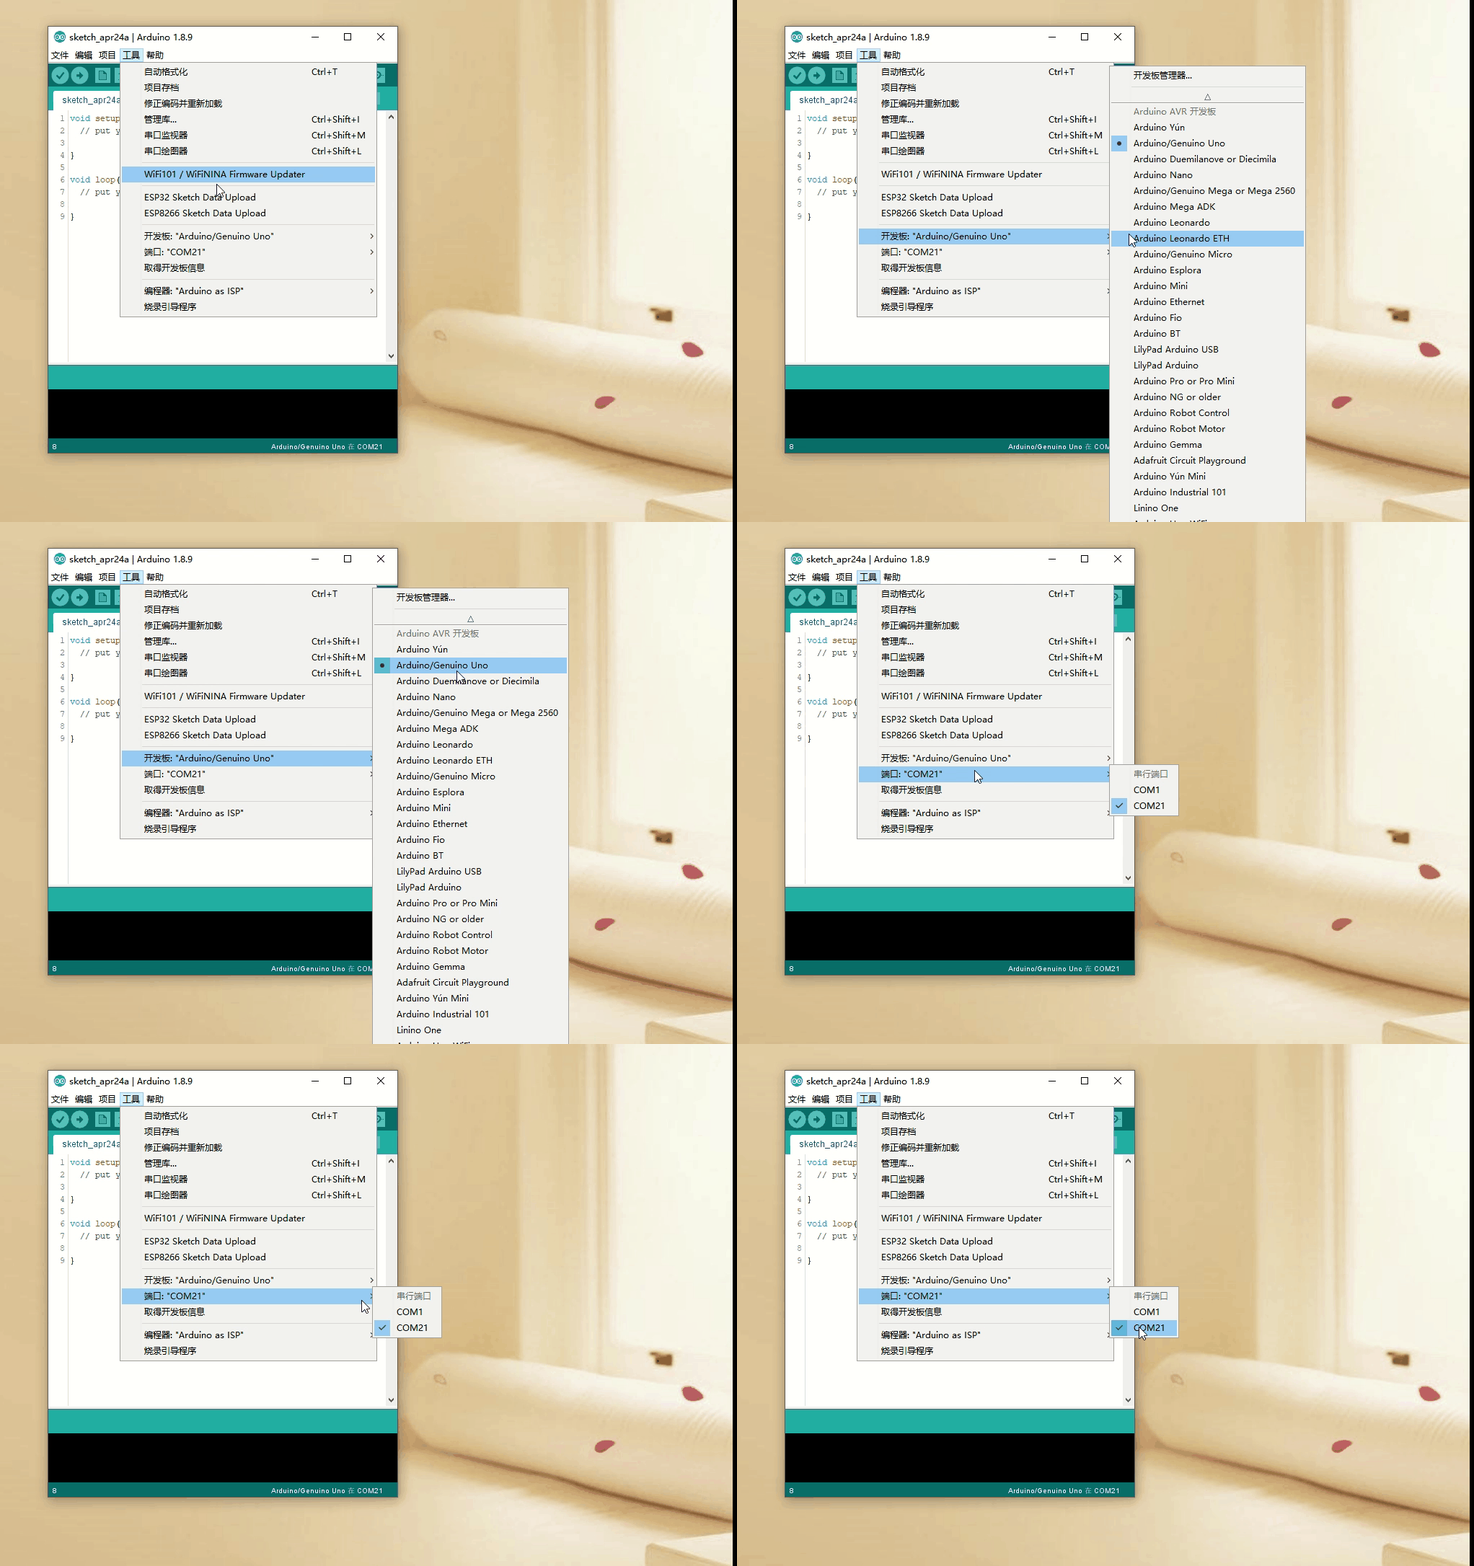
Select Board: Click on the “Tools” menu > “Board”, then select “Arduino Uno” from the pop-up submenu, as the LY-F3 development board uses the same firmware as the Arduino Uno.
-
Select Port: Connect the LY-F3 development board to the USB port of your computer, then click on the “Tools” menu > “Port”, and select the corresponding port for the LY-F3 development board from the pop-up submenu. For Windows users, the port usually appears as “COMx”; for macOS and Linux users, the port usually appears as “/dev/cu.xxx” or “/dev/tty.xxx”.
Note: The correct serial number will only appear if the USB device is properly connected.
1.3.4 Test Arduino IDE
To ensure that Arduino IDE is correctly installed and configured, try running a simple example program. Follow these steps:
-
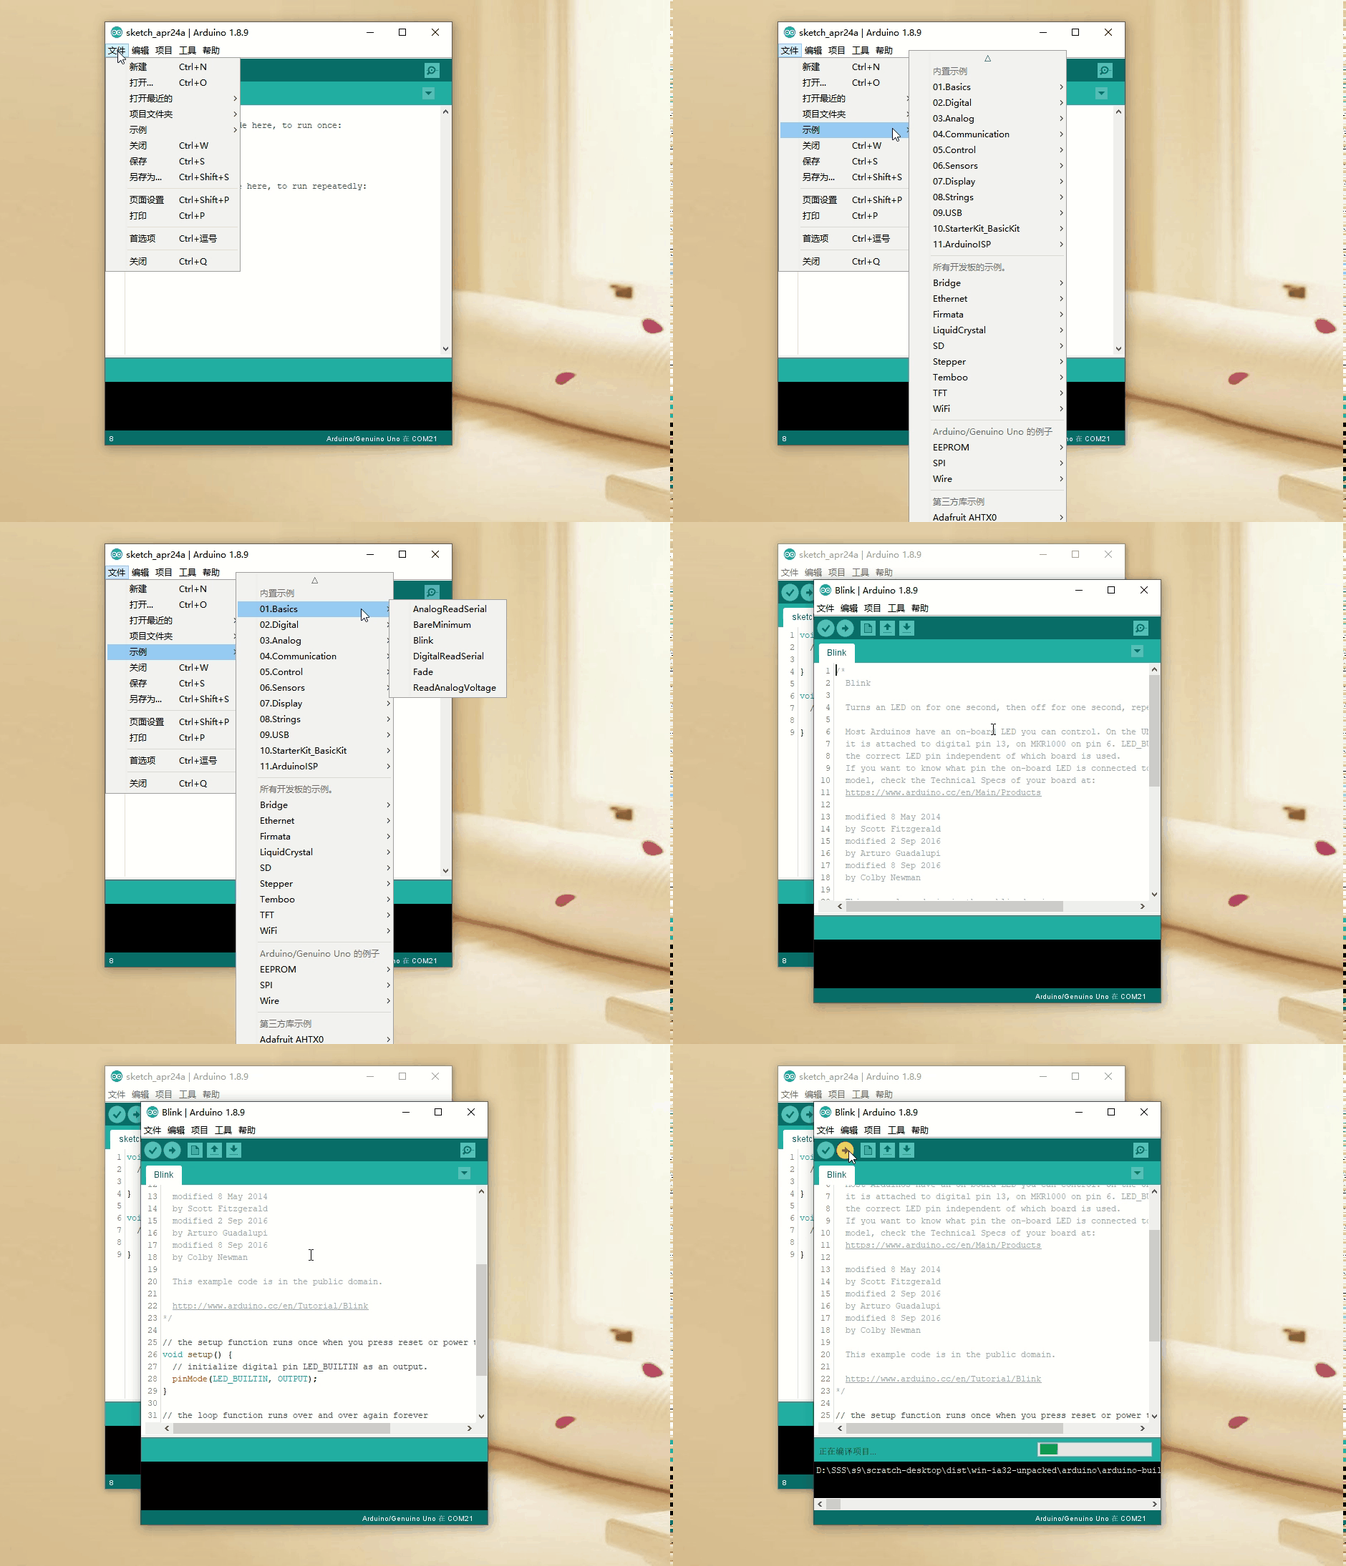
Open Example Program: Click on the “File” menu > “Examples” > “01.Basics” > “Blink”. This will open an example program named “Blink” to control the LED light on the LY-F3 development board to blink.
-
Upload Program: Click the “Upload” button (an icon with a right arrow) on the toolbar, and the Arduino IDE will automatically compile and upload the program to the LY-F3 development board.
-
Observe Results: If everything goes well, you will see the LED light on the LY-F3 development board start to blink, indicating that the program has been successfully uploaded and is running.

After the above steps, you have successfully installed and configured Arduino IDE and can start using the LY-F3 development board for project development.
1.4 Hardware Features of the LY-F3 Development Board
The LY-F3 development board has the following hardware features:
1.4.1 LED
The development board integrates an LED light connected to digital pin 13. By programming to control the high and low levels of pin 13, the LED can be turned on, off, and blinked.
1.4.2 Photoresistor
A photoresistor is connected to analog input pin A7. The photoresistor can convert light intensity information into a voltage signal, and by reading the analog value from pin A7, light intensity detection can be achieved.
1.4.3 Microphone
The microphone is used to capture environmental sounds, amplified through an operational amplifier and connected to analog input pin A6. By reading the analog value from pin A6, sound signal acquisition and analysis can be performed.
1.4.4 Low-Level Active Button
The development board has a low-level active button connected to digital pin 2. There is no external pull-up resistor, and generally, the internal pull-up needs to be enabled. When the button is pressed, pin 2 is low; when released, it is high. By programming to monitor the state of pin 2, button functionality can be achieved.
1.4.5 Passive Buzzer
The passive buzzer is connected to digital pin 8 and amplified through a transistor. By programming to control the high and low levels of pin 8, the buzzer’s sound and tone can be controlled.
1.4.6 Integrated Infrared Receiver
The integrated infrared receiver is connected to digital pin 11. By programming to decode the signals from the infrared receiver, communication between the remote control and the LY-F3 development board can be achieved, allowing for learning functions similar to household appliance remote controls.
1.4.7 WS2812 RGB Lights
The development board integrates 8 WS2812 RGB lights, connected in series to digital pin 10. By programming to control pin 10, the color, brightness, and animation effects of the lights can be achieved.
1.4.8 USB to Serial Converter
The development board integrates a CH340N USB to serial converter chip for connection to the computer. Through USB connection, program downloading and serial communication can be achieved.
1.4.9 Reset Button
The development board integrates a reset button to restart the board. Pressing the reset button will restart the board and run the currently uploaded program.
1.5 Interfaces and Peripherals of the LY-F3 Development Board
1.5.1 Reserved Pin Locations for Ports
To facilitate users in expanding external modules, each port of the LY-F3 development board has reserved pin locations. Users can choose to solder pin headers to connect external modules with Dupont wires or directly solder modules using wires to save installation space.
1.5.2 I2C Interface Terminals
The LY-F3 development board reserves I2C interface terminals, allowing users to communicate with I2C devices by soldering the corresponding interfaces. The I2C interface is widely used in various sensors, displays, and other peripherals, providing rich expansion possibilities.
1.5.3 Identifiers
To help users identify and use each reserved terminal, the LY-F3 development board has clear identifiers next to each reserved terminal. This helps users quickly find the required interfaces and reduces the possibility of wiring errors.
Through the above interfaces and peripherals, the LY-F3 development board provides users with rich expansion and application scenarios. Users can freely choose external modules based on project needs and utilize the LY-F3 development board to achieve various innovative applications.


