As front-end projects continue to iterate, some CSS code may become unused. This unused code can affect application performance.
So, how can we effectively remove unused CSS code? This article will introduce a powerful tool – PurgeCSS, which can automatically detect and remove unused CSS code. Whether in Vue, React, or other front-end frameworks, PurgeCSS can be easily integrated.
Next, let’s explore how to configure and use PurgeCSS, as well as some advanced configuration options to help us customize the process of removing unused CSS code based on project needs!
Unused CSS
Using the Coverage panel in the Chrome browser, you can see the usage of all CSS files on the current page (how to open the Coverage panel: Ctrl+Shift+P, search for Coverage):
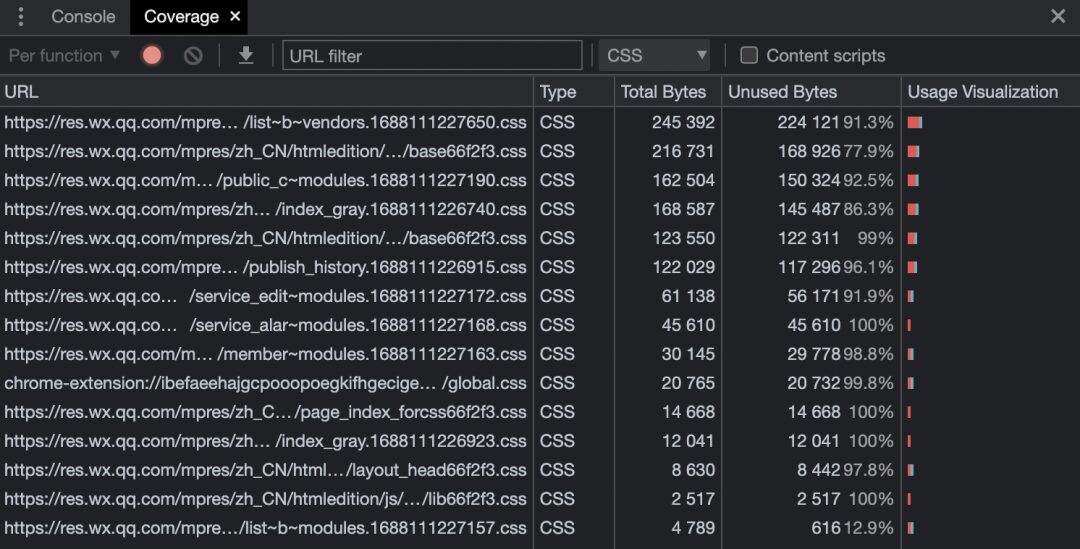
This shows the total size of each file, the size of the unused CSS, and the proportion of unused CSS. It can be seen that unused CSS occupies the majority of the file.
Clicking on a file will show which styles are used (in blue) and which styles are unused (in red):

By default, the browser must download, parse, and process all external stylesheets it encounters before rendering content to the user’s screen. Each external stylesheet must be downloaded from the network. These additional network tasks can significantly increase the time users have to wait before seeing any content on their screens.
Unused CSS can also slow down the browser’s construction of the render tree. The render tree is similar to the DOM tree, except that it also contains the styles for each node. To build the render tree, the browser must traverse the entire DOM tree and check which CSS rules apply to each node. The more unused CSS there is, the more time the browser may need to spend calculating the styles for each node.
What is PurgeCSS?
PurgeCSS is a tool for removing unused CSS. It is very useful for optimizing applications. When using CSS frameworks such as Bulma, Bootstrap, or Tailwind, there will be a lot of unused CSS. This is where PurgeCSS comes in. It analyzes content and CSS files to determine which styles are unused and removes them. PurgeCSS can be used with the most common JavaScript libraries/frameworks, such as Vue.js, React, Gatsby, etc.
Although PurgeCSS is not the only tool for removing unused CSS, it stands out for its modularity, ease of use, and extensive customization options. Modularity allows developers to create module extractors for specific use cases and frameworks. Extractors are functions that read file contents and extract a list of used CSS selectors.
PurgeCSS provides a very reliable default extractor that can handle multiple file types. However, by default, PurgeCSS ignores unused CSS code containing special characters such as @, :, and /. Therefore, PurgeCSS may not fully adapt to the file types or CSS frameworks you are using.
In addition, PurgeCSS has many configuration options that can customize its behavior according to needs. For example, PurgeCSS includes options for fontFace, keyframes, extractors, CSS, etc. Customization can improve the performance and efficiency of PurgeCSS. PurgeCSS is easy to get started with and provides detailed documentation. As of the writing of this article, PurgeCSS has over 900,000 weekly downloads on npm, and has received 7.4k+ stars on GitHub[1].
How Does PurgeCSS Work?
PurgeCSS is suitable for use in production environments, analyzing content and CSS and removing unused styles. It is unnecessary to run PurgeCSS during development, as unused styles may often be created, meaning it must be run each time.
Instead, it can be run only for production builds. This way, there is no need to recreate deleted styles. Therefore, when the application is ready for production, PurgeCSS can be run once. Before starting to use PurgeCSS with popular libraries/frameworks, let’s see how it works with plain JavaScript. The code is as follows:
(async () => {
  const purgecss = await new PurgeCSS().purge({
    content: ['index.html'],
    css: ['style.css'],
  });

  console.log(purgecss);
})();
Here, index.html is specified as one of the contents, and style.css is specified as one of the CSS files. More content and CSS files can be included, and the content is not limited to HTML files. The above code will return an array of cleared styles.
In addition to content and css, there are more configuration options to specify exactly what you want it to do and how to do it. The above example can be used for any plain JavaScript project. To use PurgeCSS, a separate JavaScript file is needed, which will run once to remove unused styles.
The cleared styles can replace the current styles with the following code:
const { PurgeCSS } = require('purgecss');
const fs = require('fs');

(async () => {
  const purgecss = await new PurgeCSS().purge({
    content: ['index.html'],
    css: ['style.css'],
  });

  fs.writeFileSync('style.css', purgecss[0].css);
})();
Using with JS Libraries/Frameworks
PurgeCSS is compatible with popular JavaScript libraries/frameworks, such as React, Vue, Gatsby, Next.js, Nuxt.js, etc. Let’s take a look at how to use PurgeCSS with React and Vue.
React + PurgeCSS
First, you need to install PurgeCSS and its dependencies:
npm i --save-dev @fullhuman/postcss-purgecss
Open the App.js file and paste the following code:
import "./App.css";

function App() {
  return <div classname="App"></div>;
}

export default App;
In the above code, we create a function component named App, which returns a div with the class name App. App.css remains unchanged, so it contains the following unused CSS code:
.App {
  text-align: center;
}

.App-logo {
  height: 40vmin;
  pointer-events: none;
}

@media (prefers-reduced-motion: no-preference) {
  .App-logo {
    animation: App-logo-spin infinite 20s linear;
  }
}

.App-header {
  background-color: #282c34;
  min-height: 100vh;
  display: flex;
  flex-direction: column;
  align-items: center;
  justify-content: center;
  font-size: calc(10px + 2vmin);
  color: white;
}

.App-link {
  color: #61dafb;
}

@keyframes App-logo-spin {
  from {
    transform: rotate(0deg);
  }
  to {
    transform: rotate(360deg);
  }
}
Open the package.json file and add the following code under script:
"postbuild": "purgecss --css build/static/css/*.css --content build/index.html build/static/js/*.js --output build/static/css"
post is a prefix that can be added to any npm script and will automatically run when the main script runs. In this example, postbuild runs after executing the build script. The command executed by postbuild contains three options.
-
--cssoption: specifies the CSS files that PurgeCSS should process, which can be an array of file names or a global variable. -
--contentoption: specifies which content PurgeCSS should analyze. -
--outputoption: specifies which directory the purified CSS file should be written to. By default, it places the results in the console.
Essentially, the command executed by postbuild performs the following actions:
-
Checks each CSS file in build/static/css -
Matches the selectors used in the file and removes any unused CSS -
Outputs the new CSS file in build/static/css
Now, just run npm run build to build the React application. To confirm success, you can open the CSS files in build/static/css. The output looks similar to the code below, containing only the used CSS:
body {
  -webkit-font-smoothing: antialiased;
  -moz-osx-font-smoothing: grayscale;
  font-family: -apple-system, BlinkMacSystemFont, Segoe UI, Roboto, Oxygen,
    Ubuntu, Cantarell, Fira Sans, Droid Sans, Helvetica Neue, sans-serif;
  margin: 0;
}
code {
  font-family: source-code-pro, Menlo, Monaco, Consolas, Courier New, monospace;
}
.App {
  text-align: center;
}
@-webkit-keyframes App-logo-spin {
  0% {
    -webkit-transform: rotate(0deg);
    transform: rotate(0deg);
  }
  to {
    -webkit-transform: rotate(1turn);
    transform: rotate(1turn);
  }
}
@keyframes App-logo-spin {
  0% {
    -webkit-transform: rotate(0deg);
    transform: rotate(0deg);
  }
  to {
    -webkit-transform: rotate(1turn);
    transform: rotate(1turn);
  }
}
Vue + PurgeCSS
PurgeCSS can be installed in Vue as follows:
vue add @fullhuman/purgecss
This will generate a postcss.config.js file, in which the PurgeCSS configuration suitable for Vue applications has already been set up. These configurations can be changed as needed.
Next, let’s update some content of the application and see how PurgeCSS works in Vue. Go to HelloWorld.vue and replace its code with the following:
<template>
  <a href="#">Hello world</a>
</template>
<script>
export default {
  name: 'HelloWorld',
  props: {
    msg: String,
  },
};
</script>

<style scoped>
h3 {
  margin: 40px 0 0;
}
ul {
  list-style-type: none;
  padding: 0;
}
li {
  display: inline-block;
  margin: 0 10px;
}
a {
  color: #42b983;
}
span {
  color: red;
}
</style>
Here, the content is reduced, and some unused styles are added. Now, run npm run build in the terminal to build the application and check the final built CSS. Finally, open the CSS file in the dist/css directory, and you will find the CSS output containing only the used styles:
a[data-v-70cf4e96] {
  color: #42b983;
}

#app {
  font-family: Avenir, Helvetica, Arial, sans-serif;
  -webkit-font-smoothing: antialiased;
  -moz-osx-font-smoothing: grayscale;
  text-align: center;
  color: #2c3e50;
  margin-top: 60px;
}
Advanced Configuration Options
We have only seen three configuration options: content, css, and outline. Now let’s see how to customize PurgeCSS through other configuration options.
Keyframes and Fontfaces
Before PurgeCSS v2.0, unused font and keyframe code were deleted by default. However, when these features are misused, the code can crash. Unused font and keyframe code are now kept by default. You can change this default behavior by setting the keyframes and fontfaces options to true:
(async () => {
  const purgecss = await new PurgeCSS().purge({
    content: ['index.html'],
    css: ['style.css'],
    keyframes: true,
    fontFaces: true,
  });

  console.log(purgecss);
})();
You can also modify these configuration items in the purgecss.config.js configuration file:
// purgecss.config.js
module.exports = {
  content: ['index.html'],
  css: ['style.css'],
  keyframes: true,
  fontFaces: true,
}


(async () => {
  const purgecss = await new PurgeCSS().purge('./purgecss.config.js');
  console.log(purgecss);
})();
Content and CSS
You can directly pass the values of content and css without linking a file:
// purgecss.config.js
module.exports = {
  content: [
    {
      raw: '<html><body><p>Hello world</p></body></html>',
      extension: 'html',
    },
  ],
  css: [
    {
      raw: 'p { color: red }',
    },
  ],
};
Extractors
In rare cases, PurgeCSS may fail to remove unused CSS or remove used CSS. In this case, a custom extractor must be used. PurgeCSS relies on extractors to obtain the list of selectors used in the file.
Some packages provide extractors for specific extensions. For example, purgecss-from-js is specific to the .js extension. Using specific extractors for extensions can provide the best accuracy:
// purgecss.config.js
import purgeJs from 'purgecss-from-js'
import purgeHtml from 'purgecss-from-html'

const options = {
  content: ['index.html'],
  css: ['style.css'],
  extractors: [
    {
      extractor: purgeJs,
      extensions: ['js']
    },
    {
      extractor: purgeHtml,
      extensions: ['html']
    }
  ]
}
export default options
Variables
By default, unused CSS variables are not deleted. If you want to remove them, you must specify variables as true in the purgecss.config.js file:
module.exports = {
    content: ['index.html'],
    css: ['style.css'],
    variables: true,
}
Safelist and Comments
PurgeCSS supports specifying which selectors can safely remain in the final CSS. This can be done in two ways: using PurgeCSS’s safelist option or special CSS comments. Using safelist:
module.exports = {
    content: ['index.html'],
    css: ['style.css'],
    safelist: ['random', 'button'],
}
In this case, .random, #random, button, .button, and #button will all be ignored and not deleted by PurgeCSS. Regular expressions are supported:
module.exports = {
    content: ['index.html'],
    css: ['style.css'],
    safelist: [/red$/, /^bg/],
}
In this case, any selector ending with red (e.g., bg-red, btn-red) or starting with bg (e.g., bg-blue, bg-red) will not be deleted. By default, PurgeCSS does not delete comments; it only removes special comments intended to customize PurgeCSS behavior.
A common set of special comments is used to specify which selectors can safely remain in the final CSS:
/* purgecss start ignore */
h1 {
  color: pink;
  font-size: 2rem;
}
/* purgecss end ignore */
Related Links
GitHub: https://github.com/FullHuman/purgecss