In the previous section (HG533 Router Analysis Tutorial: Finding Hardware Debug Interface), we analyzed the hardware structure of the PCB and discovered a UART interface. Through this interface, we achieved a Linux shell management interface. In this section, we will use the methods proposed in the last section to access the device and further debug and control it.
The method proposed in the last section is easy to access, does not require expensive tools, and will yield interesting results. If you want to do some hardware analysis but are unwilling to disassemble the device, it may prevent you from delving into hardware vulnerabilities, limiting your analysis to network vulnerabilities and high-level interface security analysis such as ISP configuration protocols.
In this section, we will access and collect some random data blocks using the methods proposed in the last section, which will help us understand the entire system.
1. Review of the Previous Section
Figure 1 is the UART pin diagram, and Figure 2 shows the serial communication data.
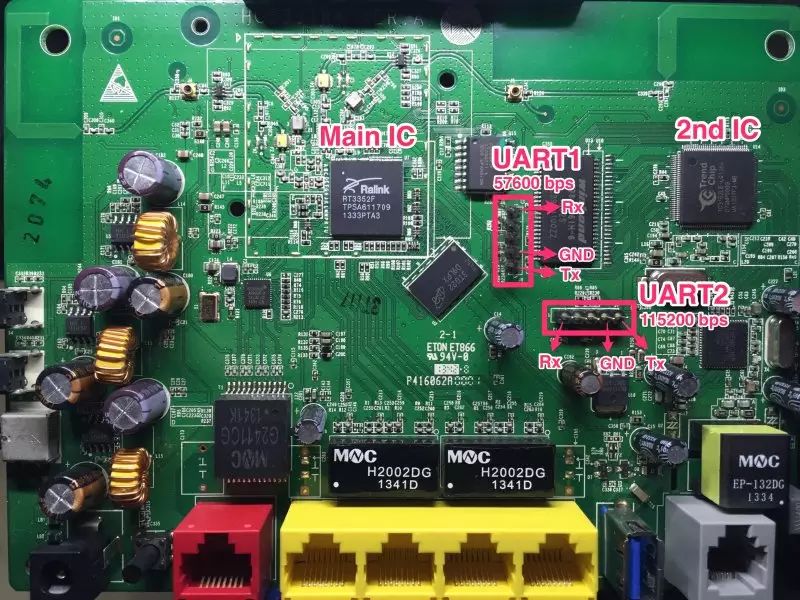 Figure 1: UART Pin Diagram
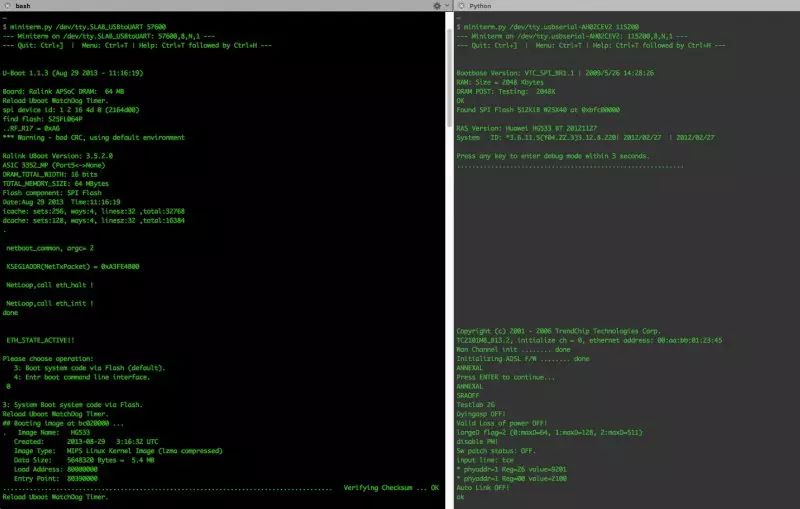 Figure 2: Serial Communication Data
The serial interaction runs a shell, which is provided by BusyBox in the router, as follows:
————————————Welcome to ATP Cli————————————-Login: adminPassword: #Password is ‘admin’ATP>shellBusyBox vv1.9.1 (2013-08-29 11:15:00 CST) built-in shell (ash)Enter ‘help’ for a list of built-in commands.# lsvar usr tmp sbin proc mnt lib init etc dev bin
There are three levels of firmware:
1. U-boot, which is the device’s bootloader, responsible for the lowest level of hardware management, such as watchdog, and also for starting the subsequent main functional firmware.
2. Linux, which allows the router to achieve overall control of the hardware, coordinating parallel processing. The subsequent BusyBox runs on top of this Linux.
3. BusyBox, a toolkit that combines multiple Linux commands.
Low-level interfaces are often unintuitive, cannot access all data, and may brick the device. Starting analysis from BusyBox is a good approach.
Typically, developers add some debugging information during the boot process. Next, we will look for useful information in the debugging information.
2. Boot Debugging Information
In the series of information during startup, we can obtain the compression algorithm of the flash segment, as shown in Figure 3, which uses LZMA compression and employs the Mips Linux kernel.
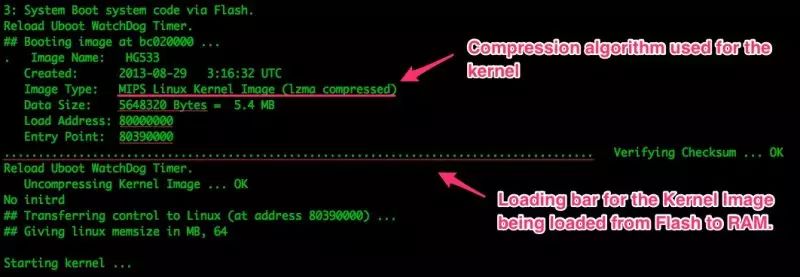 Figure 3: Kernel Compression Algorithm Information
When we think about extracting flash memory data, the external flash structure of Intel in this router is very important, as shown in Figures 4, 5, and 6.
 Figure 4: Memory Mapping Diagram
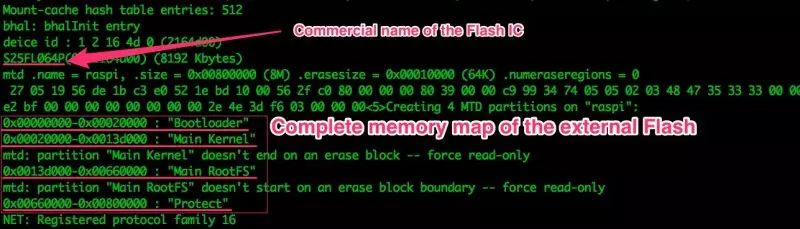 Figure 5: Flash Chip Name and Complete Memory Mapping Table
 Figure 6: File System Compression Format
3. ATP and BusyBox
The Ralink IC in this router achieves memory management, parallel processing, and overall system control by running a Linux kernel. The product specification of the Ralink chip indicates that it uses the Linux 2.6.21 kernel, while the ATP CLI runs on top of Linux or as part of the Linux kernel, providing only the first layer of system authentication, with limited other functionalities, as shown below:
ATP>helpWelcome to the ATP command line tool. If any question, please input “?” at the end of the command.ATP>?clsdebughelpsave?exitATP>
The above help does not mention shell or sh commands; typically, running shell or sh directly would suffice. It provides fewer than 10 commands, while more functionalities are implemented through BusyBox.
BusyBox is a toolkit that combines multiple common Unix commands, making it very convenient. With commands ranging from ls to cd and top, BusyBox allows us to use the Ralink IC as if it were Linux.
The following are the commands supported by BusyBox in this router:
ATP>shellBusyBox vv1.9.1 (2013-08-29 11:15:00 CST) built-in shell (ash)Enter ‘help’ for a list of built-in commands.# lsvar usr tmp sbin proc mnt lib init etc dev bin## ls /binzebra swapdev printserver ln ebtables catwpsd startbsp pppc klog dns busyboxwlancmd sntp ping kill dms brctlweb smbpasswd ntfs-3g iwpriv dhcps atserverusbserver smbd nmbd iwconfig dhcpc atmcmdusbmount sleep netstat iptables ddnsc atcmdupnp siproxd mount ipp date atupg sh mldproxy ipcheck cwmp ashumount scanner mknod ip cp adslcmdtr111 rm mkdir igmpproxy console acltr064 ripd mii_mgr hw_nat cms actelnetd reg mic ethcmd clitc radvdump ls equipcmd chownswitch ps log echo chmod#
Simply analyzing the above is not enough; sensitive data will not be stored in BusyBox.
4. Exploring the File System
Now that we are logged into the system and know which commands are available, this section is only meant to provide an overview of the entire system without detailed analysis of each piece of data.
The top command can help us determine the resource consumption of processes. Since the router is currently idle, the top command does not return much useful information, as shown in Figure 7.
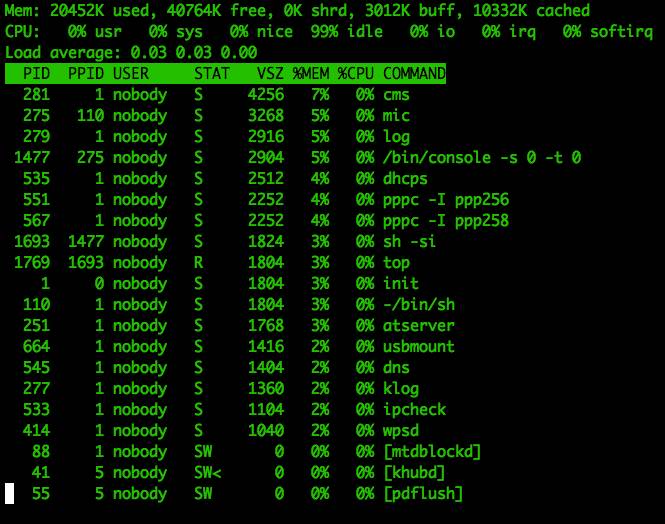 Figure 7: Top Command Result
From the above process list, we can see that there is a usbmount process, indicating that the router supports USB interfaces. When a flash USB drive is inserted, the following information is displayed:
usb 1-1: new high-speed USB device using rt3xxx-ehci and address 2[…]++++++sambacms.c 2374 renice=renice -n +10 -p 1423
The USB drive is recognized and mounted to /mnt/usb1_1/, while a Samba server is started. The directories of these files are located in /etc/samba:
# ls -l /etc/samba/-rw-r–r– 1 0 0 103 smbpasswd-rw-r–r– 1 0 0 0 smbusers-rw-r–r– 1 0 0 480 smb.conf-rw——- 1 0 0 8192 secrets.tdb# cat /etc/samba/smbpasswdnobody:0:XXXXXXXXXXXXXXXXXXX:564E923F5AF30J373F7C8_______4D2A:[U ]:LCT-1ED36884:
Of course, there are other commands:
Netstat –a: information about the device’s communication ports. Iptables –list: sets up the network, allowing telnet access, while we still remain in bare-metal state. Wlancmd help: rich Wi-Fi control functionalities.
/etc/profile/etc/inetd/etc/services/var/: files used during system operation. /etc/: system configuration files.
Among them, the /var/ and /etc/ directories will contain a lot of useful information, many of which are quite obvious, such as /etc/serverkey.pem. As shown in Figure 8.
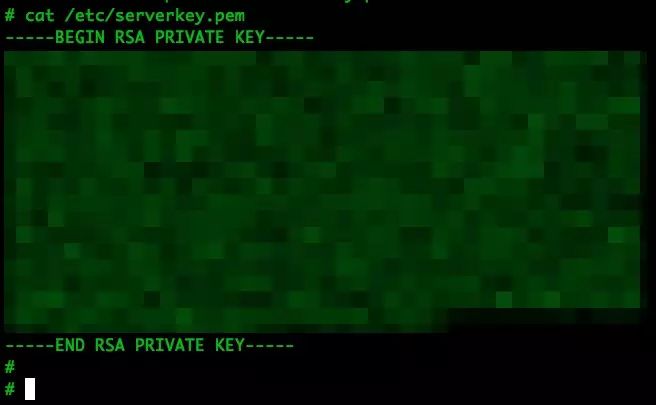 Figure 8: Contents of /etc/serverkey.pem
Finding the TLS communication private key in embedded devices is quite common. By attacking a device to obtain the private key, one can subsequently target other devices of the same model.
This private key is used for communication with Huawei or ISP servers; however, more importantly, it is used to obtain public certificates for communication with remote servers. Here, we found two certificates, both signed by “the same person.”
-
/etc/servercert.pem: most likely the server key
-
/etc/root.pem: likely used for communication with Huawei or ISP servers (uncertain…)
More sensitive data can be found in the /etc/ppp256/config and /etc/ppp258/config files, as shown in Figure 9.
This authentication information is also valid for the HTTP interface, which is why I mention it here. Of course, this may not be valid for many other router devices.
Analyzing so many different files can be very time-consuming without good tools, so we will try to copy this data to a USB drive for analysis on a computer.
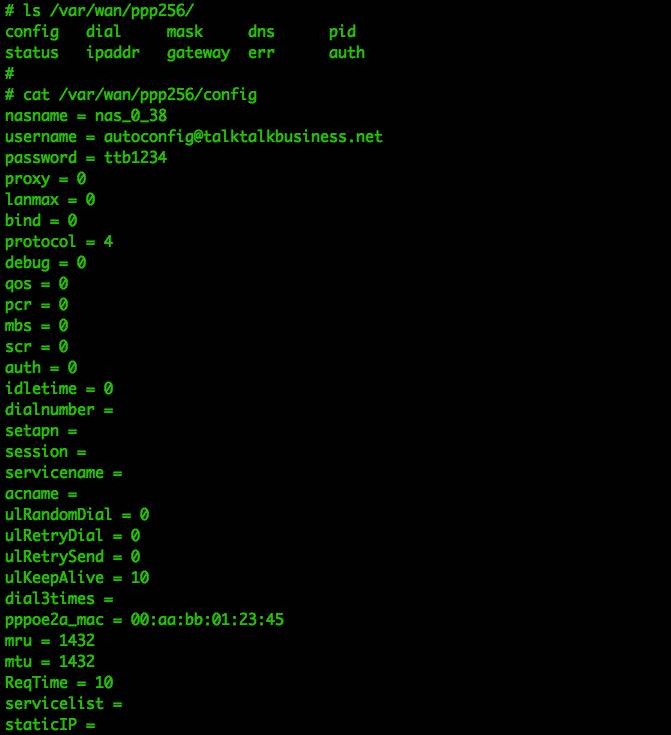 Figure 9: Contents of config file
5. Information Collection
After collecting the files, we can use find . –name *.pem to search for other TLS certificates. Running grep -i –r password will search for the password field in all files, resulting in the information shown in Figure 10.
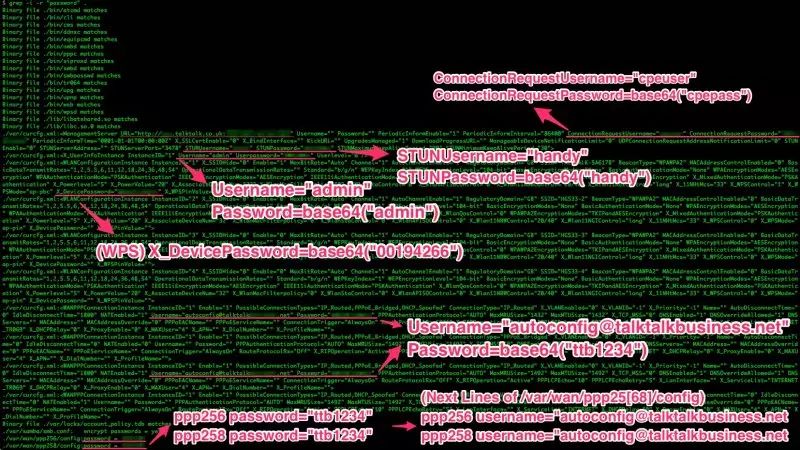 Figure 10: Password Information in All Files
There is a lot of certificate information here, mainly for STUN, TR-069, and local services. It is displayed here because this information is transmitted via HTTP, but is usually hidden. These certificates are either stored in plaintext or base64 encoded; of course, encoding does not protect the data. Figure 11 shows the base64 value of the current Wi-Fi password.
$ echo “QUJCNFVCTU4=” | base64 -DABB4UBMN
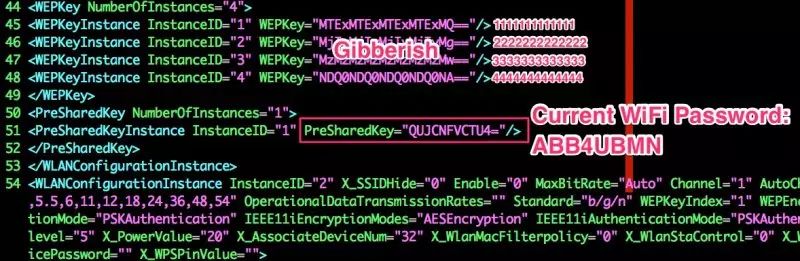 Figure 11: Current Wi-Fi Password
In the process of analyzing the above password, we obtained two important files.
-
/var/curcfg.xml: the current configuration file, including the base64 encoded Wi-Fi password, etc.
-
/etc/defaultcfg.xml: the default configuration file used to restore factory settings, but does not include the router’s Wi-Fi password, primarily because the password information needs to be configured during the first use.
6. Exploring ATP’s CLI
Since the ATP CLI contains very few commands, one of the important commands is debug. The debug display will show the usage of igmpproxy, cwmp, sysuptime, or atpversion, most of which are not useful. It is unclear whether cwmp is related to the router’s remote configuration, as shown in Figure 12.
 Figure 12: CWMP Command Information
Once again, these CWMP (TR-069) certificates are used as credentials for remote router configuration, and this time there is no encoding; they are stored in plaintext.
Other ATP command functions are very limited, such as clearing the screen, help, saving to flash, or exiting.
7. Exploring Uboot’s CLI
The bootloader’s command line interface provides access to certain memory areas, but it does not offer direct access to the flash chip functionality, as shown below:
Please choose operation: 3: Boot system code via Flash (default). 4: Enter boot command line interface. You chose 4. Stopped Uboot WatchDog Timer. 4: System Enter Boot Command Line Interface. U-Boot 1.1.3 (Aug 29 2013 – 11:16:19) RT3352 # help? – alias for ‘help’ bootm – boot application image from memory cp – memory copy erase – erase SPI FLASH memory go – start application at address ‘addr’ help – print online help md – memory display mdio – Ralink PHY register R/W command !! mm – memory modify (auto-incrementing) mw – memory write (fill) nm – memory modify (constant address) printenv – print environment variables reset – Perform RESET of the CPU rf – read/write rf register saveenv – save environment variables to persistent storage setenv – set environment variables uip – uip command version – print monitor version RT3352 #
Do not casually use erase, mm, mw, or nm commands unless absolutely necessary, as incorrect usage may restart the device and brick it. At this point, the memory display md and printenv caught my attention.
RT3352 # printenv bootcmd=tftpboot delay=2 baudrate=57600 ethaddr=”00:AA:BB:CC:DD:10″ ipaddr=192.168.1.1 serverip=192.168.1.2 ramargs=setenv bootargs root=/dev/ram rw addip=setenv bootargs $(bootargs) ip=$(ipaddr):$(serverip):$(gatewayip):$(netmask):$(hostname):$(netdev):off addmisc=setenv bootargs $(bootargs) console=ttyS0,$(baudrate) ethaddr=$(ethaddr) panic=1 flash_self=run ramargs addip addmisc;bootm $(kernel_addr) $(ramdisk_addr) kernel_addr=BFC40000 u-boot=u-boot.bin load=tftp 8A100000 $(u-boot) u_b=protect off 1:0-1; era 1:0-1; cp.b 8A100000 BC400000 $(filesize) loadfs=tftp 8A100000 root.cramfs u_fs=era bc540000 bc83ffff; cp.b 8A100000 BC540000 $(filesize) test_tftp=tftp 8A100000 root.cramfs; run test_tftp stdin=serial stdout=serial stderr=serial ethact=Eth0 (10/100-M) Environment size: 765/4092 bytes
We can see settings like UART serial port baud rate and some interesting memory locations. These memory addresses are not in the flash IC address space; the flash address space is 0x00000000—0x00FFFFFF.
Let us use md to view part of the memory, such as kernel_addr=0xBFC40000, as shown in Figure 13.
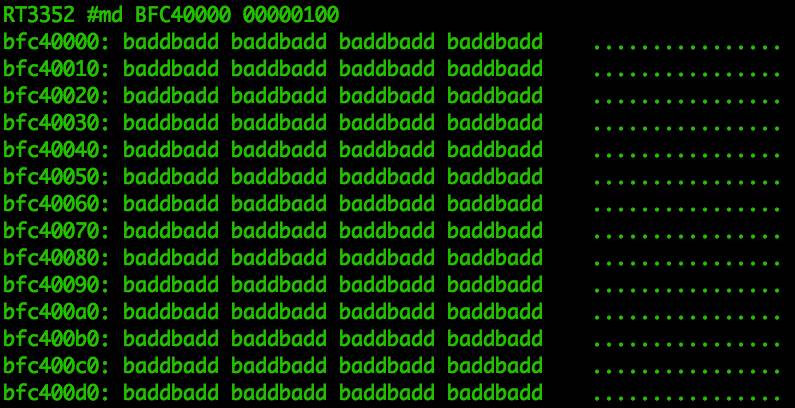 Figure 13: Memory Data at BFC40000
The badd information indicates this is an invalid address. When using md to access an invalid memory address, it will return a hard-coded badd prompt indicating the memory address is invalid. These addresses are valid addresses but are inaccessible during the u-boot phase.
It is important to note that accessing the uboot command line interface will cause the router to stop loading the Linux kernel into memory, so memory access will be a very limited subset. The valid address space is illustrated in Figure 14.
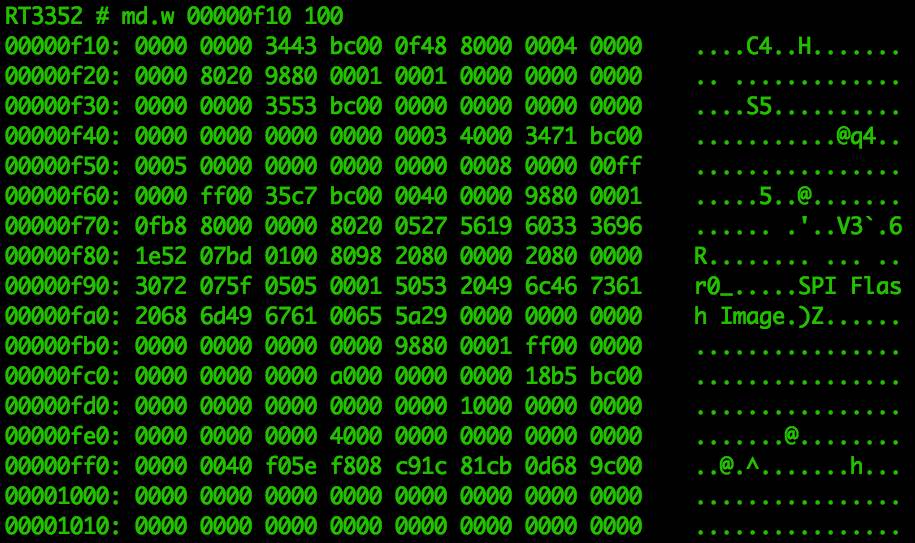 Figure 14: Example of Limited Accessible Memory Space Data
This method of searching memory is quite limited, only able to view data in restricted areas. However, it can be used to analyze the storage structure of memory, such as the noticeable changes in memory content at address 0x000d0000, as shown in Figure 15.
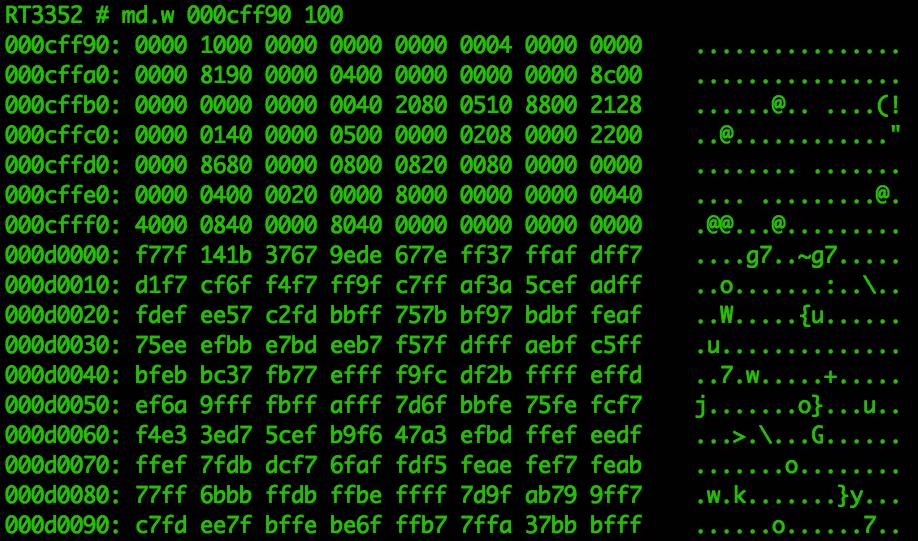 Figure 15: Noticeable Changes in Memory at 0x000d0000
Finally, here is a video tutorial of the experiment: http://static.video.qq.com/TPout.swf?vid=w01991tmnia&auto=0
This article is compiled by the KanXue Android Security Team on Singles’ Day, sourced from Juan Carlos Jiménez @ The World.
❤ Previous Popular Content Recommendations
-
Registration | “Getting Close to Enterprise Security” Station 10: Zhidao Chuangyu
-
Using Hostapd-WPE to Penetrate Enterprise Wireless Networks
-
Invisible Thermal Attacks on Mobile Lock Screen Passwords (3)
-
Invisible Thermal Attacks on Mobile Lock Screen Passwords (2)
-
Invisible Thermal Attacks on Mobile Lock Screen Passwords (1)
-
……
For more excellent articles, long press the QR code below, “Follow the KanXue Academy WeChat Official Account” to view!

KanXue Forum: http://bbs.pediy.com/
WeChat Official Account ID: ikanxue
Weibo: KanXue Security
Submissions, Cooperation: www.kanxue.com