Introduction
This article will explain the task states in FreeRTOS. In FreeRTOS, tasks can be in various states, and understanding these states helps us comprehend how tasks run and stop.
1. Simple Experiment
Before we proceed, let’s conduct an experiment to observe how tasks run:
Code:
The code below defines three flags, indicating which task is currently running.
static int Task1Flag = 0;
static int Task2Flag = 0;
static int Task3Flag = 0;


// Task execution function
void Task1(void * param)
{
  static int i = 0;    while (1)    {      Task1Flag = 1;        Task2Flag = 0;        Task3Flag = 0;    }
}


// Task execution function
void Task2(void * param)
{
  while (1)    {      Task1Flag = 0;        Task2Flag = 1;        Task3Flag = 0;    }
}


// Task execution function
void Task3(void * param)
{
  while (1)    {      Task1Flag = 0;        Task2Flag = 0;        Task3Flag = 1;    }
}
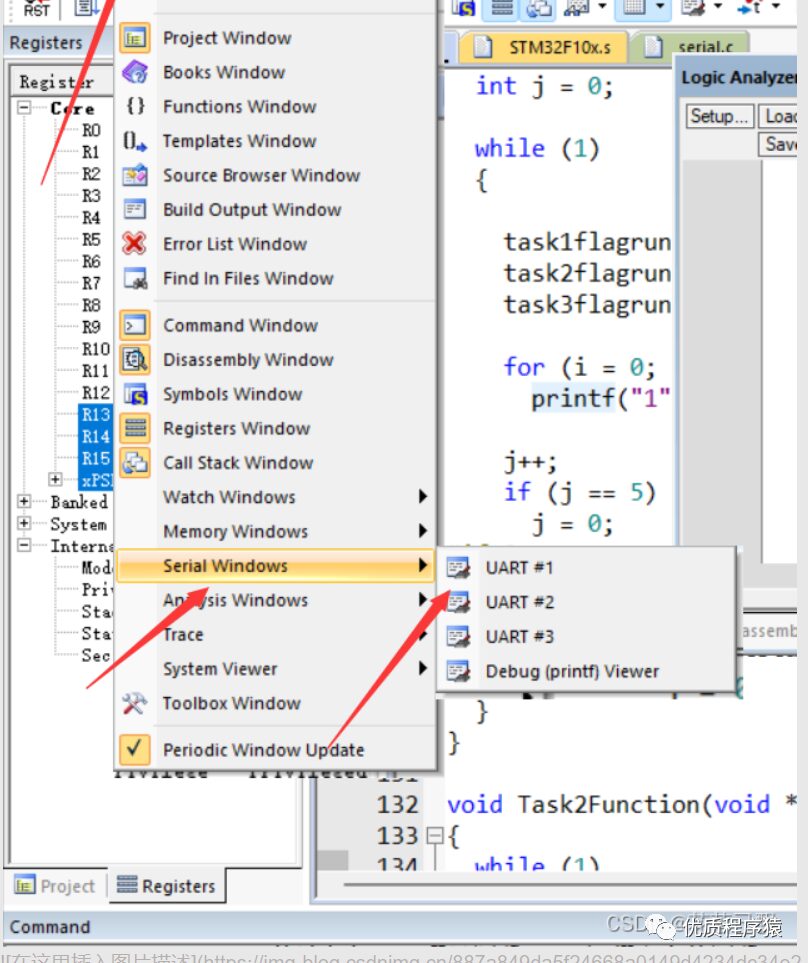
Open the simulated serial port in Keil:
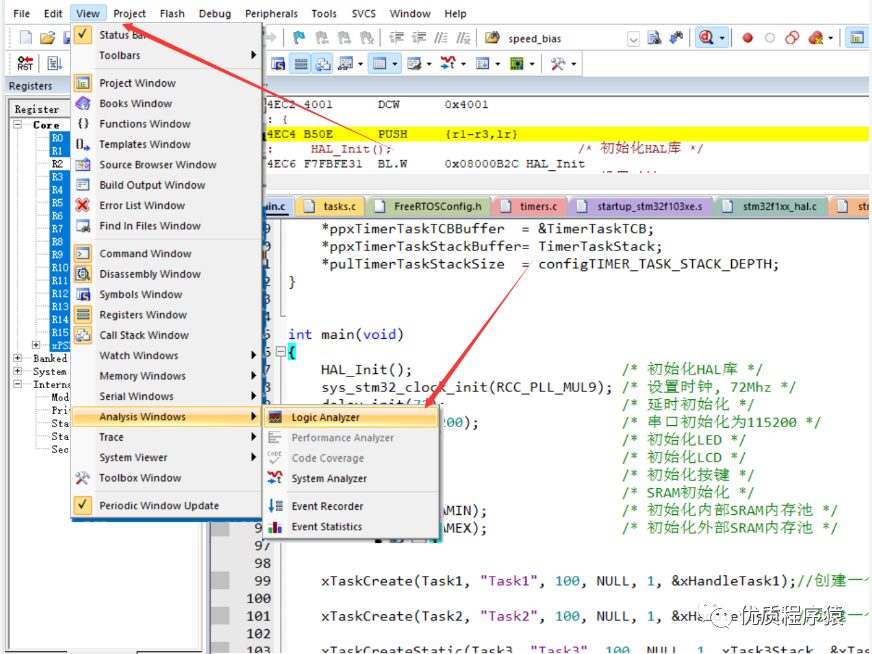
Open the logic analyzer in Keil:
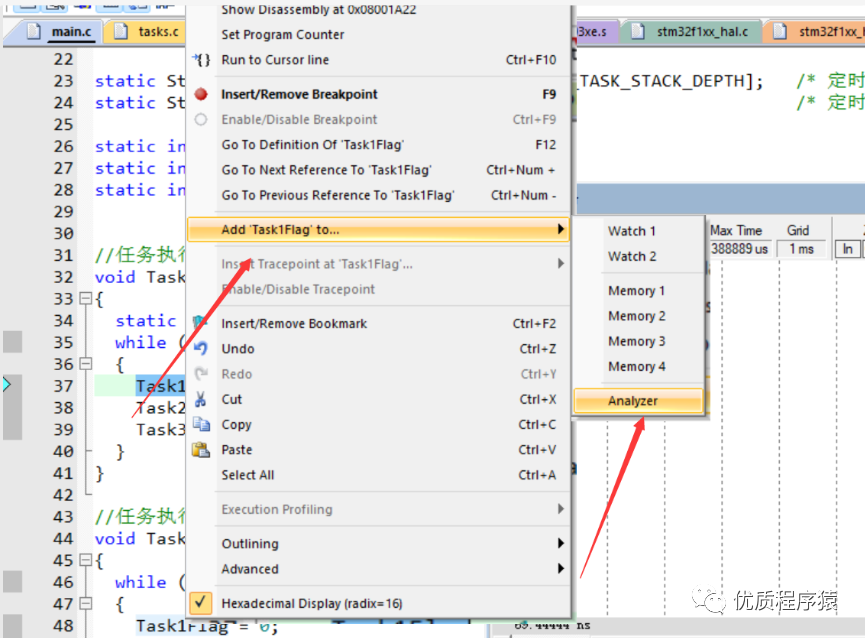
Add the defined three variables to the logic analyzer:
Set all states to bits:
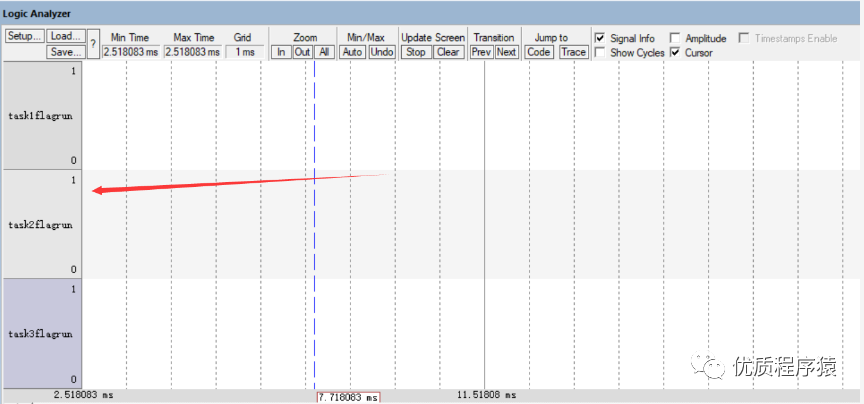
After setting up, run the code at full speed:
We can observe that these three tasks are not executed at the same time; they are executed separately, and the execution time is so short that we cannot discern which one is executing.
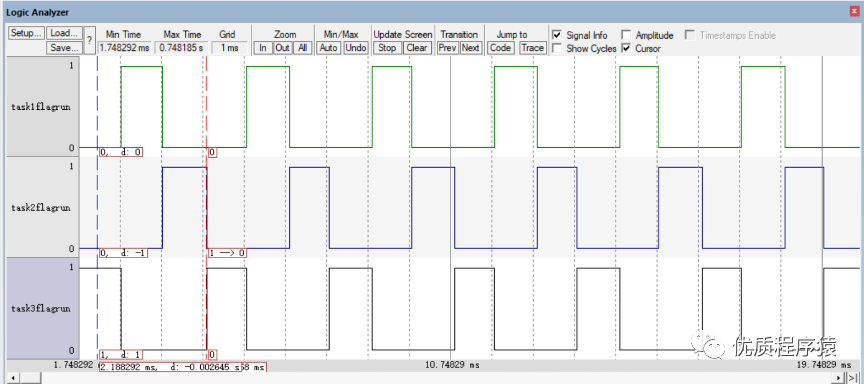
By observing the execution time of each task, we can deduce that the running time of each task is approximately 1ms. What is the reason for this?
In FreeRTOS, there exists a Tick interrupt that checks whether a task switch is needed every time an interrupt occurs. So how often does this Tick interrupt occur?
We can find the answer in the FreeRTOSConfig file:
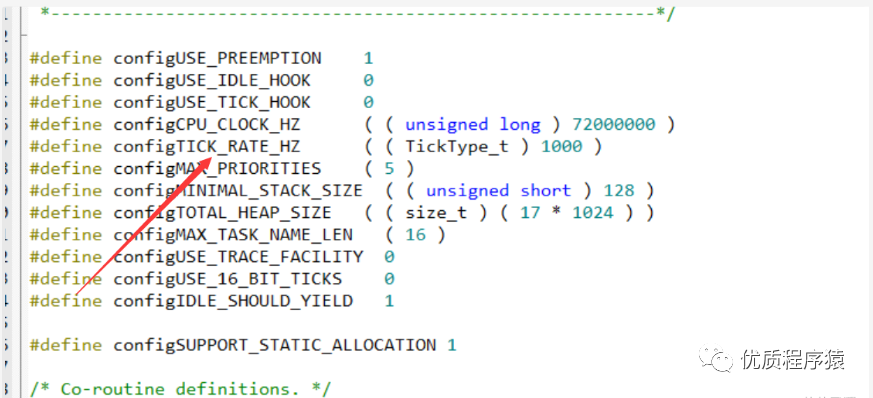
configTICK_RATE_HZ specifies the frequency of the kernel clock tick in Hertz (Hz).
In FreeRTOS, the kernel clock tick serves as a time standard for measuring task run time, wait time, timer, and other functionalities. The frequency of the kernel clock tick can be set via configTICK_RATE_HZ, with a default value of 1000, indicating that there are 1000 clock ticks per second, meaning the clock tick period is 1 millisecond.
Another question is why does Task 3 execute first?
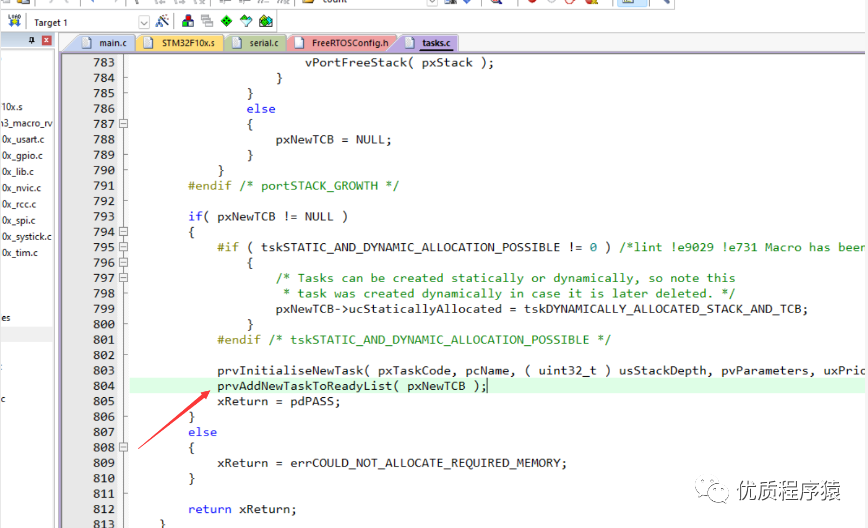
Inside the task creation function, there is a function that adds the created task to the ready list. The later created task will be at the front of the list, so the later created task will be executed first.
2. Explanation of Task States
Here we use an image from Baiwen Network to explain task transitions:
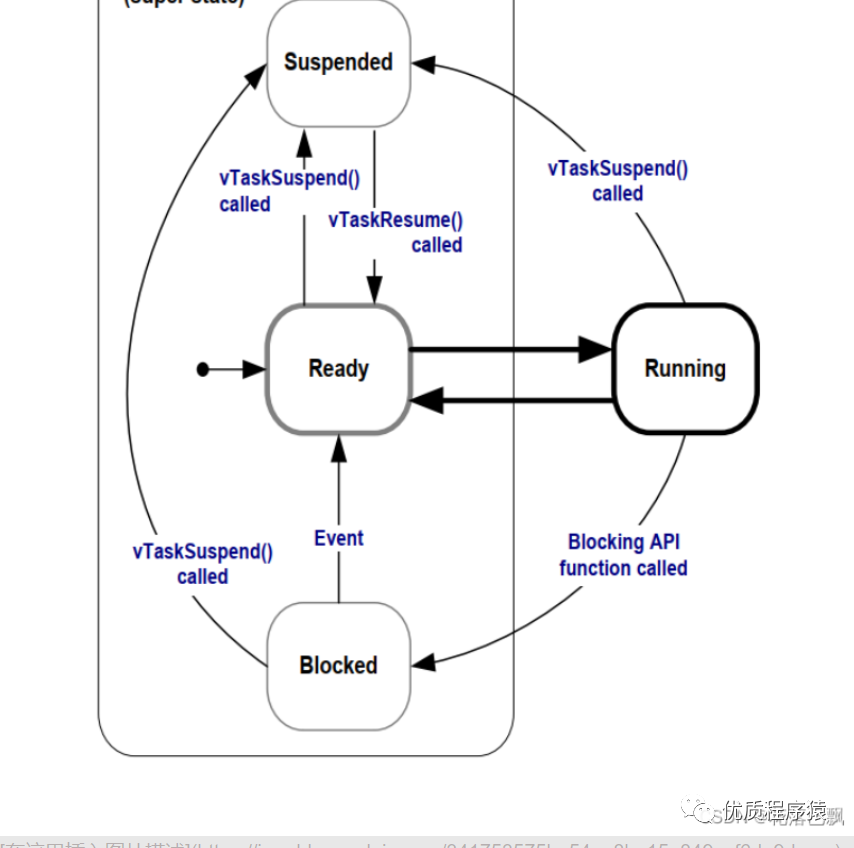
In FreeRTOS, each task has a state that indicates the current status of the task. FreeRTOS uses specific macro definitions to represent different task states, including:
eRunning: Indicates that the task is currently running.
eReady: Indicates that the task is in a ready state, waiting for the scheduler to execute it.
eBlocked: Indicates that the task is in a blocked state, waiting for certain events to occur, such as waiting for semaphores, message queues, timer timeouts, etc.
eSuspended: Indicates that the task is in a suspended state, meaning that the task has been suspended and does not participate in scheduling, but its state and resources are retained, allowing it to resume when needed.
eDeleted: Indicates that the task has been deleted, and the corresponding control block and stack space have been released.
The transitions between task states are automatically managed by the FreeRTOS kernel. Tasks often undergo state changes in the following situations:
When a task is created, its state changes from “not started” to “ready”.
The scheduler selects the task based on priority, changing its state to “running”.
When a task waits for an event (like a semaphore), its state changes to “blocked”.
When a task waits for other tasks to release resources, its state may change to “suspended”.
When a task calls a delete function to delete itself, its state changes to “deleted”.
3. vTaskDelay and vTaskDelayUntil
1. vTaskDelay
The vTaskDelay function is used to pause the current task for a period before continuing execution. Its parameter is an integer representing the number of system ticks to delay. For example, with the default configuration where the kernel tick period is 1 millisecond, vTaskDelay(100) means to pause the current task for 100 milliseconds.
Note that vTaskDelay will cause task blocking, and the delay time is not absolutely accurate. During the wait, FreeRTOS will attempt to schedule other tasks, so the actual delay time may be longer than specified.
Code example:
void Task1(void * param){
  static int i = 0;
  while (1)    {      printf("Task1\r\n");        vTaskDelay(1000);    }
}


// Task execution function
void Task2(void * param){
  while (1)  {      printf("Task2\r\n");        vTaskDelay(2000);    }
}


// Task execution function
void Task3(void * param){
  while (1)    {      printf("Task3\r\n");        vTaskDelay(3000);    }
}
Observe the output results on the serial port:
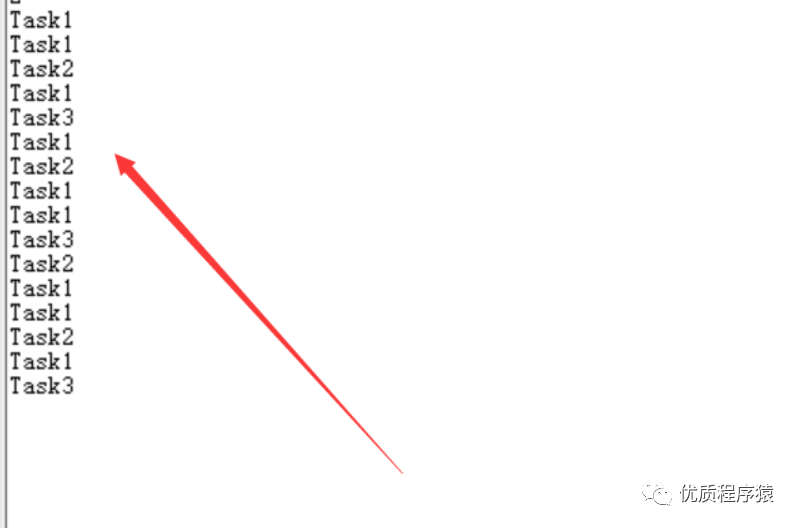
2. vTaskDelayUntill
vTaskDelayUntil is a precise timing function that makes the task wait until a specific time point before becoming ready again.
When calling vTaskDelayUntil, a timestamp (represented as TickType_t) must be provided, and the task will sleep until the system clock reaches or exceeds that timestamp.
This allows the task to execute at precise time intervals, making it very suitable for applications with high real-time requirements.
// Define a task that outputs a message every second
void Task1(void* pvParameters){
    TickType_t xLastWakeTime;
    const TickType_t xFrequency = pdMS_TO_TICKS(1000); // 1 second interval


    // Get the current time as the initial time
    xLastWakeTime = xTaskGetTickCount();


    while (1)
    {
        // Perform Task1 operations, such as outputting messages
        printf("Task1 is running...\n");


        // Wait until the next time interval
        vTaskDelayUntil(&xLastWakeTime, xFrequency);
    }
}


int main(void){
    // Initialize FreeRTOS kernel and hardware


    // Create Task1
    xTaskCreate(Task1, "Task1", configMINIMAL_STACK_SIZE, NULL, tskIDLE_PRIORITY + 1, NULL);


    // Start the scheduler
    vTaskStartScheduler();


    // This will not execute, as the scheduler takes control
    return 0;
}
3. Differences between vTaskDelay and vTaskDelayUntil
The vTaskDelay function and vTaskDelayUntil function are both used to implement task delays in FreeRTOS, but they work differently.
The vTaskDelay function works by passing a number of relative ticks to delay. The task blocks for the specified number of ticks and then continues execution. This means that the delay time for vTaskDelay is relative to the execution time of the current task, and the actual delay time may be affected by task switching and system load. Therefore, precise delay times cannot be guaranteed, and there may be some error.
The vTaskDelayUntil function works by passing an absolute time point (in ticks). The task waits until the current time reaches or exceeds the passed absolute time point before continuing execution. This means that vTaskDelayUntil provides more precise delay control, allowing accurate timing tasks. You can calculate the next execution time point as needed and pass it to the vTaskDelayUntil function, ensuring precise delay times.
vTaskDelay is for relative delays, while vTaskDelayUntil is for absolute time delays, making it more convenient and precise for implementing timing tasks.
A highly recommended book for learning FreeRTOS: