In this article, we will learn how to use OpenCV and YOLO object detector to capture/save and detect objects in images every five seconds. We will then convert the image into a byte array and publish it via MQTT, which will be received on another remote device and saved as JPG.
We will use the YoloV3 algorithm and a free MQTT broker.
YoloV3 Algorithm: https://viso.ai/deep-learning/yolov3-overview/#:~:text=What’s%20Next%3F-,What%20is%20YOLOv3%3F,Joseph%20Redmon%20and%20Ali%20Farhadi.
MQTT Broker: https://www.emqx.com/
Before we proceed, I assume you have the following basic knowledge:
· OpenCV: https://opencv.org/about/#:~:text=OpenCV%20(Open%20Source%20Computer%20Vision,perception%20in%20the%20commercial%20products.
· NumPy: https://numpy.org/doc/stable/user/whatisnumpy.html
· MQTT: https://mqtt.org/getting-started/
Section 1 — Publishing
Let’s first write a Python script on our first device, which will act as the monitoring system.
· pip install opencv-python
If you encounter issues while installing OpenCV, please follow the articles below:
· Installing on Windows: https://docs.opencv.org/3.4/d5/de5/tutorial_py_setup_in_windows.html
· Installing on Ubuntu: https://docs.opencv.org/3.4/d2/de6/tutorial_py_setup_in_ubuntu.html
We also need to download some files (YoloV3 pre-trained weights, configuration file, and names file).
Download them from the links below:
-
Yolov3.weights: https://pjreddie.com/media/files/yolov3.weights
-
Yolov3.cfg: https://github.com/pjreddie/darknet/blob/master/cfg/yolov3.cfg
-
coco.names: https://github.com/pjreddie/darknet/blob/master/data/coco.names
(Make sure the above 3 downloaded files are saved in the same directory as sendImage.py)
Create a new file in your IDE and save it as sendImage.py
Start by importing the required modules
import paho.mqtt.client as mqtt
import paho.mqtt.publish as publish
import cv2
import numpy as np
import time
Now we will initialize variables for the broker and image
broker = "broker.emqx.io"
port = 1883
timelive=60
image_name="capture.jpg"
Our first function will capture/save the image and call the process_image() function
def save_image():
    #cv2.VideoCapture(0) this can be 0, 1, 2 depending on your device id
    videoCaptureObject = cv2.VideoCapture(0)
    ret, frame = videoCaptureObject.read()
    cv2.imwrite(image_name, frame)
    videoCaptureObject.release()
    process_image()
process_image() function is where all the magic happens.
def process_image():
    boxes = []
    confs = []
    class_ids = []

    #loading the YoloV3 weights and configuration file using the open-cv dnn module
    net = cv2.dnn.readNet("yolov3.weights", "yolov3.cfg")

    #storing all the trained object names from the coco.names file in the list names[]
    names = []
    with open("coco.names", "r") as n:
        names = [line.strip() for line in n.readlines()]

    #running a forward pass by passing the names of layers of the output to be computed by net.getUnconnectedOutLayersNames()
    output_layers = [layer_name for layer_name in net.getUnconnectedOutLayersNames()]
    colors = np.random.uniform(0, 255, size=(len(names), 3))

    #reading the image from the image_name variable (Same image which was saved by the save_image function)
    image = cv2.imread(image_name)
    height, width, channels = image.shape

    #using blobFromImage function to preprocess the data
    blob = cv2.dnn.blobFromImage(image, scalefactor=0.00392, size=(160, 160), mean=(0, 0, 0))
    net.setInput(blob)

    #getting X/Y coordinates of the object detected, scores for all the classes of objects in coco.names where the predicted object is class with the highest score, height/width of bounding box
    outputs = net.forward(output_layers)
    for output in outputs:
        for check in output:
            #this list scores stores confidence for each corresponding object
            scores = check[5:]

            #np.argmax() gets the class index with highest score which will help us get the name of the class for the index from the names list
            class_id = np.argmax(scores)
            conf = scores[class_id]
            #predicting with a confidence value of more than 40%
            if conf > 0.4:
                center_x = int(check[0] * width)
                center_y = int(check[1] * height)
                w = int(check[2] * width)
                h = int(check[3] * height)
                x = int(center_x - w / 2)
                y = int(center_y - h / 2)
                boxes.append([x, y, w, h])
                confs.append(float(conf))
                class_ids.append(class_id)

    #drawing bounding boxes and adding labels while removing duplicate detection for same object using non-maxima suppression
    indexes = cv2.dnn.NMSBoxes(boxes, confs, 0.5, 0.5)
    font = cv2.FONT_HERSHEY_PLAIN
    for i in range(len(boxes)):
        if i in indexes:
            x, y, w, h = boxes[i]
            label = str(names[class_ids[i]])
            color = colors[i]
            cv2.rectangle(image, (x, y), (x + w, y + h), color, 2)
            cv2.putText(image, label, (x, y - 5), font, 1, color, 1)

    #resizing and saving the the image
    width = int(image.shape[1] * 220 / 100)
    height = int(image.shape[0] * 220 / 100)
    dim = (width, height)
    resized = cv2.resize(image, dim, interpolation=cv2.INTER_AREA)
    cv2.imwrite('processed.jpg', resized)

    #reading the image and converting it to bytearray
    f = open("processed.jpg", "rb")
    fileContent = f.read()
    byteArr = bytes(fileContent)

    #topic to publish for our MQTT
    TOPIC = "IMAGE"
    client = mqtt.Client()

    #connecting to the MQTT broker
    client.connect(broker, port, timelive)

    #publishing the message with bytearr as the payload and IMAGE as topic
    publish.single(TOPIC, byteArr, hostname=broker)
    print("Published")
Last few lines of code to start save_image function and call it every 5 seconds
while True:
    save_image()
    time.sleep(5)
Section 2 — Subscribing
Now let’s write a second script on the second device, which will be used to download and view the detected object files received via MQTT.
Create a new file in your IDE and save it as receiveImage.py
Start by importing the required modules
import paho.mqtt.client as mqtt
Initialize variables for the broker
broker = "broker.emqx.io"
port = 1883
timelive = 60
Use the on_connect() function to connect to the broker and subscribe to the topic IMAGE
def on_connect(client, userdata, flags, rc):
    print("Connected with result code " + str(rc))
    #subscribe to the topic IMAGE, this is the same topic which was used to publish the image on the previous device
    client.subscribe("IMAGE")
Write the on_message() function to save the file immediately upon receiving the payload
def on_message(client, userdata, msg):
    #create/open jpg file [detected_objects.jpg] to write the received payload
    f = open('detected_objects.jpg', "wb")
    f.write(msg.payload)
    f.close()
Connect to the broker and start listening for incoming messages in an infinite loop
def mqtt_sub():
    client = mqtt.Client()
    client.connect(broker, port, timelive)
    client.on_connect = on_connect
    client.on_message = on_message
    client.loop_forever()
Last line of code to start the script
mqtt_sub()
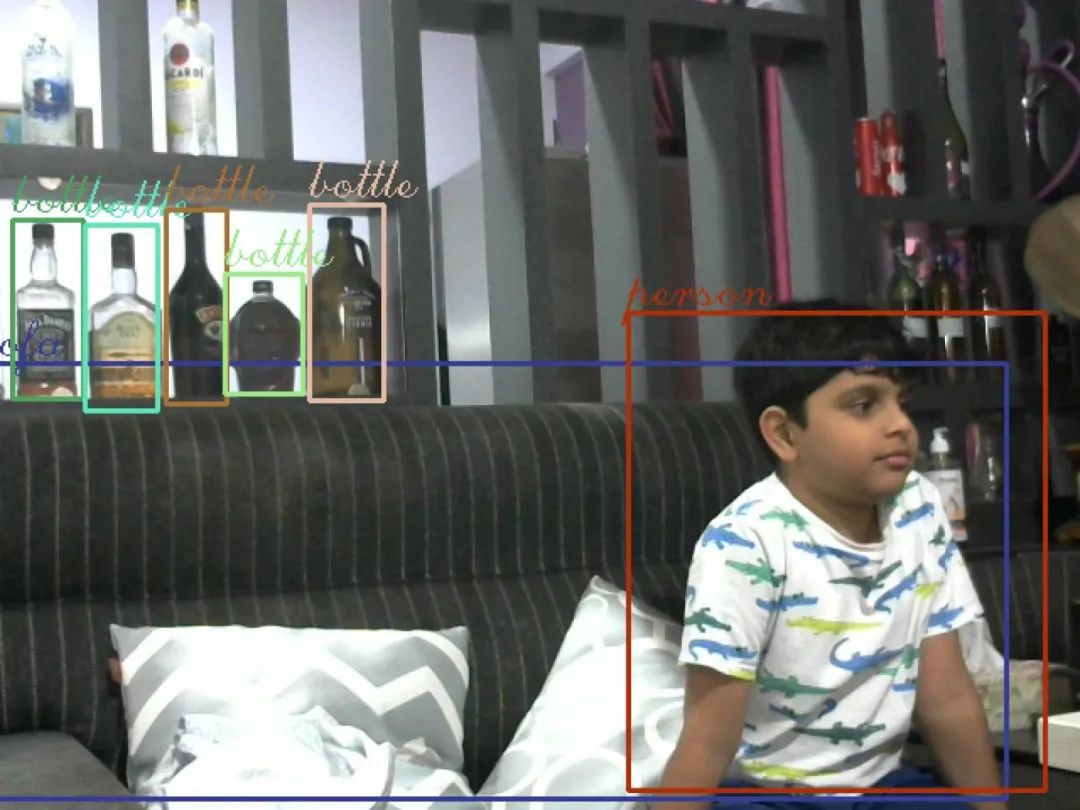
Every 5 seconds, you will refresh a JPG image named ‘detected_objects.jpg’ in the directory where the script file is located.
That’s it. We have created a monitoring system that captures images every 5 seconds, detects objects within them, and sends the images over the internet using MQTT.