Introduction to Ansible Playbook
A Playbook is a component of Ansible used for configuration management. While Ansible’s AD-Hoc command functionality is powerful and can accomplish some basic configuration management tasks, AD-Hoc commands cannot support the configuration management of complex environments. In our practical use of Ansible, most of the time is spent writing Playbooks.
In simple terms, a Playbook is the foundation of a very simple configuration management and multi-machine deployment system, making it very suitable for deploying complex applications.
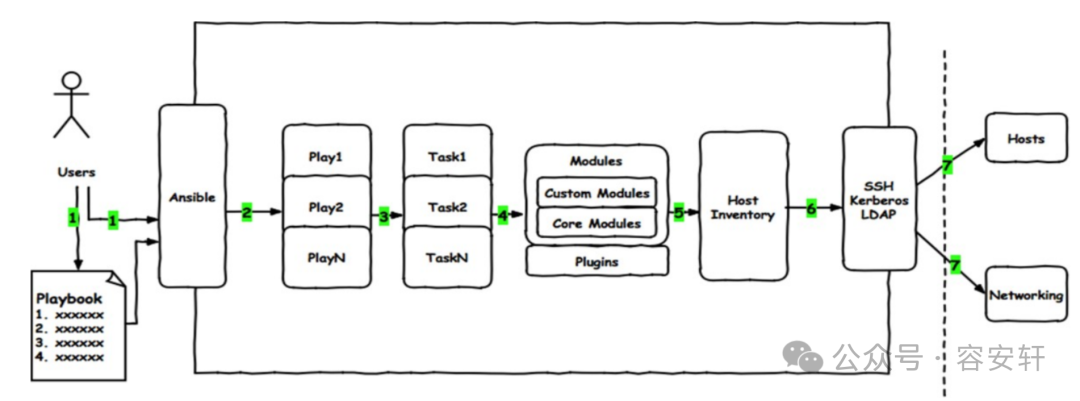
A Playbook script consists of a list of one or more “plays”.
The main function of a play is to dress a predefined set of hosts in roles defined in advance through tasks in Ansible. A task is essentially a call to an Ansible module, and by organizing multiple plays in a Playbook, they can work together to execute predefined actions according to a pre-arranged mechanism.
Core Components of a Playbook
A Playbook consists of multiple components, with common component types as follows:
-
Hosts: List of remote hosts on which to execute.
-
Tasks: A list of tasks, each task is a dictionary, and a complete code block must include at least the elements name and task; one name can only include one task.
-
Variables: Built-in or custom variables called within the Playbook.
-
Templates: Files that can replace variables in template files and implement some simple logic.
-
Handlers and notify: Operations triggered by specific conditions, executed only if conditions are met.
-
Tags: Specify which task to execute, used to select parts of the code to run in the Playbook. Ansible has idempotency, so it will automatically skip unchanged parts; however, some code may still take a long time to test for changes. If you are sure there are no changes, you can skip this code segment using tags.
--- - name: Playbook # Name of the Playbook hosts: webservers # Host group to execute the Playbook become: yes # Whether to execute sudo become_user: root # User after executing sudo tasks: # List of tasks included in this Playbook - name: ensure apache is at the latest version # Task 1: Install the latest version of httpd yum: name: httpd state: latest - name: ensure apache is running # Task 2: Start the httpd service service: name: httpd state: startedHosts Component
The purpose of each play in a Playbook is to allow specific hosts to execute tasks as a specified user. Hosts are used to specify which hosts to execute the specified tasks, which must be defined in the inventory beforehand.
web-01.example.comweb-01.example.com:web-02.example.com192.168.11.10192.168.11.* web_srvs:db_srvs # or Union of two groupsweb_srvs:&db_srvs # and Intersection of two groupsweb_srvs:!db_srvs # In web_srvs group, but not in db_srvs groupRemote User Component
This can be used in either the Host or task. By default, Ansible uses the user executing the tasks on the control node to connect to the managed node. If you need to change this, you can use remote_user to specify the user, and you can also use become_user to switch users when executing specific tasks.
- hosts: web_srvs
  remote_user: root  # Log in as root user via SSH
  become: yes        # Enable privilege escalation
  become_user: chijinjing  # Switch to chijinjing user to execute tasks

  tasks:
    - name: Create a file
      file:
        path: /home/chijinjing/testfile.txt
        state: touch
        owner: chijinjing
        group: chijinjing
        mode: '0644'
Task List and Action Component
The main part of a play is the task list, which contains one or more tasks. Each task is executed sequentially on all hosts specified in the hosts, meaning that after completing the first task on all hosts, it will start the second task.
The purpose of a task is to execute a module with specified parameters, and variables can be used in the module parameters. Module execution is idempotent, meaning that multiple executions are safe as the results are consistent.
Each task should have its name for outputting the execution results of the Playbook, and it is recommended that the content clearly describes the steps of the task execution.
Tasks support two formats:
action: module args       # Example: action: shell echo hello
module: args          # Example: shell: echo hello Recommended to use
Usage examples:
- hosts: web
  remote_user: root
  gather_facts: no

  tasks:
  - name: test network connection
    ping:
  - name: execute demo command
    command: echo "hello world!"
- hosts: web
  remote_user: root
  gather_facts: no

  tasks:
  - name: install httpd
    yum: name=httpd
  - name: start httpd
    service: name=httpd state=started enabled=yes
Ansible-Playbook Command
ansible-playbook [options] playbook.yaml
Common parameters:
--list-hosts           # List the hosts running the tasks
--list-tags            # List the tags included in the Playbook
--list-tasks           # List the tasks included in the Playbook
--syntax-check         # Syntax check of the Playbook
-C, --check            # Simulate execution
-t TAGS, --tags TAGS   # Only run specified tags
-v  -vv  -vvv          # Show detailed information, debug
Playbook Examples
Example-1: Install a Single Software Package
---
 - hosts: web
   # Switch to root user
   become: yes

   # Task list
   tasks:
     - yum:  # Module name
         name: wget     # Package name
         state: absent  # Installation state
Example-2: Install Multiple Software Packages on Different Managed Nodes
---
- hosts: db
  become: yes
  tasks:
  - yum:
      name: wget
      state: latest
  - yum:
      name: vim
      state: latest

- hosts: web
  become: yes
  tasks:
  - yum:
      name: httpd
      state: latest
Example-3: Do Not Gather Facts from Managed Nodes
---
- hosts: web
  become: yes
  gather_facts: false
  tasks:
  - yum:
      name: wget
      state: absent
Example-4: Assign Unique Names to Plays and Tasks
---
 - name: Hello Playbook
   hosts: web
   gather_facts: false
   tasks:
   - name: Copy file to web group
     copy:
       src: /tmp/demo.txt
       dest: ~/
   - name: Create an empty file on web group
     file:
       path: /tmp/src_file.txt
       state: touch
Example-5: Print Debug Information from Playbooks
---
 - name: debug demo
   hosts: web
   tasks:
   - debug:
       msg: "Hello World"
Output multiple lines of information
---
- name: debug demo
  hosts: web
  tasks:
  - debug:
      msg:
       - "This is first line"
       - "This is second line"
       - "This is third line"
Example-6: Increase the Log Level of Playbooks
---
 - hosts: web
   tasks:
   - name: default verbose
     debug:
       msg:
       - This is a test message without verbosity
   - name: verbosity level 2
     debug:
       msg:
       - This is a test message with verbosity level 2
       verbosity: 2
To execute, add the -vv parameter
Example-7: Execute Syntax Check:
--- - hosts: all tasks: - debug: msg: "Hello World"Executing the Playbook may show the following error
[root@jenkins hello-playbook]# ansible-playbook 07-example.yaml --syntax-checkERROR! We were unable to read either as JSON nor YAML, these are the errors we got from each:JSON: No JSON object could be decodedSyntax Error while loading YAML. did not find expected '-' indicatorThe error appears to be in '/etc/ansible/playbooks/hello-playbook/07-example.yaml': line 5, column 7, but maybe elsewhere in the file depending on the exact syntax problem.The offending line appears to be: - debug: msg: "Hello World" ^ hereExample-8: Simulate Testing Playbooks
---
- hosts: web
  tasks:
  - name: Install telnet
    yum: name=telnet state=latest
[root@jenkins hello-playbook]# ansible-playbook 08-example.yaml  --check
[WARNING]: Could not match supplied host pattern, ignoring: web

PLAY [demo playbook] ****************************************************************************************************************************************
skipping: no hosts matched

PLAY RECAP **************************************************************************************************************************************************
Not all modules support check mode, but all major modules do, and more modules are added with each version. It is particularly important to note that the command module and shell module do not support check mode because these modules cannot determine which commands will cause changes and which will not. Therefore, these modules always return changed when run outside of check mode, as they assume changes have already been made.
Examples of Using Playbooks
Using Playbook to Install Nginx
-
Add Nginx yum repository
-
Install Nginx
-
Start Nginx
---- name: Install and configure Nginx hosts: nginx become: yes tasks: - name: Add Nginx official repository yum_repository: name: nginx stable repo description: Nginx Official Repository baseurl: http://nginx.org/packages/centos/$releasever/$basearch/ gpgcheck: yes gpgkey: https://nginx.org/keys/nginx_signing.key enabled: yes - name: Install Nginx package: name: nginx state: present - name: Start Nginx service service: name: nginx state: started enabled: yesUsing Playbook to Install MySQL
---- name: Install and configure MySQL 8 hosts: mysql become: yes vars: new_mysql_root_password: jIJQiP$iSiralimofpiw+oS0rJa tasks: - name: Copy yum repo rpm copy: src: mysql84-community-release-el7-1.noarch.rpm dest: /tmp/mysql84-community-release-el7-1.noarch.rpm - name: Install repo rpm package: name: /tmp/mysql84-community-release-el7-1.noarch.rpm state: present - name: Install MySQL package: name: "{{item}}" state: present loop: - mysql-community-server-8.4.4 - mysql-community-client-8.4.4 - name: Create directory file: path: /data/mysql/ state: directory mode: '0755' owner: mysql group: mysql - name: copy config file copy: src: my.cnf dest: /etc/my.cnf - name: start and enable mysql service service: name: mysqld state: started enabled: yes