Arduino Programming· Lesson One
Hello World

1
Introduction to Arduino Open Source Hardware
2024
Arduino, originating from Italy, is a convenient, flexible, and easy-to-use hardware development platform. Household appliances like TVs, air conditioners, washing machines, vacuum robots, and air purifiers are all controlled by microcontrollers, and Arduino can handle these tasks. It can also be used to create many interesting electronic projects, such as smart robots, smart home systems, farm irrigation, weather monitoring, and smart transportation. As a result, more and more software developers are entering hardware and IoT development fields using Arduino. University projects, automation, software, and even art majors are increasingly offering Arduino-related courses. Due to its simplicity and highly intelligent modularity, it is widely used for beginner-level learning.


2
Introduction to Arduino UNO Development Board
2024
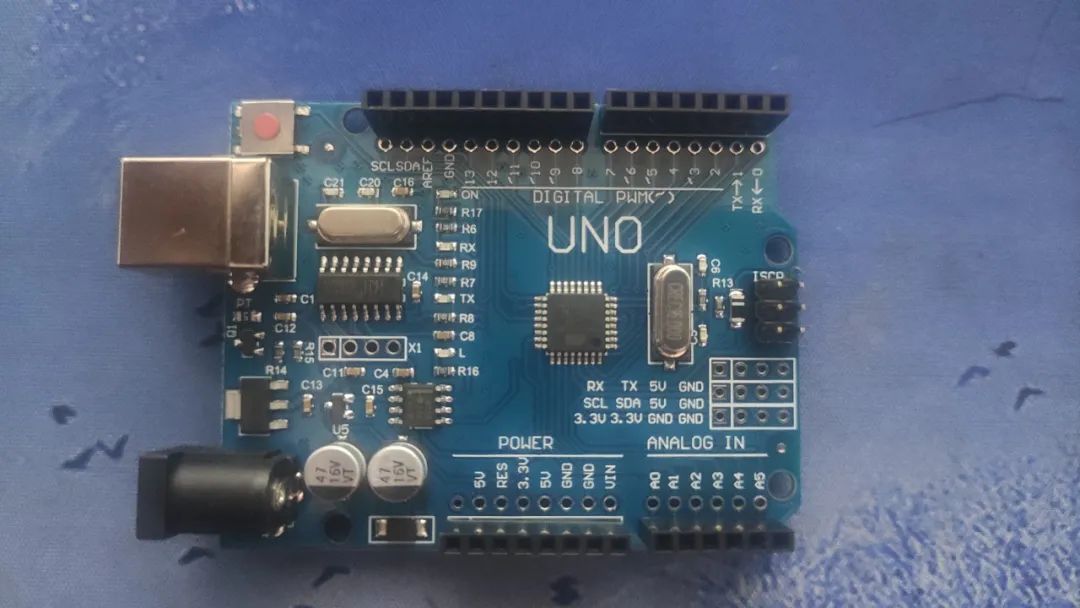
Arduino UNO is a microcontroller development board based on the Atmega328P. It has 14 digital input/output pins (6 of which can be used as PWM outputs), 6 analog inputs, a 16MHz crystal oscillator, USB connection, power jack, ICSP header, and reset button. It can be powered, programmed, and communicate with the computer simply by connecting via a USB data cable. The price of the original Arduino Uno, excluding tax, is $23, while the domestic Uno R3 development board uses a cheaper CH340 serial driver chip to reduce overall costs, making it more accessible to more makers. The only downside is that before uploading programs, you need to ensure that the computer has the CH340 serial driver installed; other functionalities remain unchanged.

3
Introduction to Important Pins on the Development Board
2024
Power Pins: The development board can provide 3.3V and 5V voltage outputs, and the Vin pin can be used to power the board from an external source.
Analog Input Pins: The board can read external analog signals, with A0~A5 as analog input pins. Digital Pins: The UNO R3 has 14 digital input/output pins, 6 of which can be used for PWM (Pulse Width Modulation) output (digital 3, 5, 6, 9, 10, 11). Digital pins are used to read logic values (0 or 1) or as digital output pins to drive external modules. Pins marked with “~” can produce PWM.
TX and RX Pins: The two pins marked TX (Transmit) and RX (Receive) are used for serial communication. The LEDs marked TX and RX connect to the corresponding pins and will blink at different speeds during serial communication.
Pin 13: The board marks pin 13, which connects to the onboard LED. By controlling pin 13, you can turn the LED on and off. When uploading the test program, the onboard light will blink, which helps to check if the development board is functioning properly.

4
Hello World
2024
1. Material Preparation
UNO mainboard and data cable.
2. Install the driver and Arduino IDE software.
3. A small test.
4. Apply what you have learned.

5
Programming Code
2024
Class code:
void setup() {Serial.begin(9600); // Set baud rate for easy viewing of program execution results
}
void loop() {Serial.println(“Hello World”); // Input the content to be displayed
Serial.println(“I love programming”); // Input the content to be displayed
delay(1000); // Delay for 1 second
Serial.println(“Today is the first lesson”); // Input the content to be displayed
delay(1000); // Delay for 1 second
Serial.println(“Let’s feel the effect of the program running”); // Input the content to be displayed
delay(1000); // Delay for 1 second
}
Assignment code:
void setup() {Serial.begin(9600); // Set baud rate for easy viewing of program execution results
}
void loop() {Serial.println(“Look at the waterfall on Mount Lu”); // Input the content to be displayed
Serial.println(” Li Bai”); // Input the content to be displayed
Serial.println(“The sun shines on the incense burner and creates purple smoke”); // Input the content to be displayed
Serial.println(“Looking at the waterfall hanging in the front river”); // Input the content to be displayed
Serial.println(“The waterfall flows straight down three thousand feet”); // Input the content to be displayed
Serial.println(“It seems to be the Milky Way falling from the sky”); // Input the content to be displayed
Serial.println(); // Input the content to be displayed, this is an empty line
delay(5000); // Delay for 5 seconds
}
Driver programs, Arduino IDE installation programs, and other materials can be obtained from Alibaba Cloud Disk.
https://www.alipan.com/s/rDCtt4j8Csg


Programming
Code
WeChat ID|szw9298
February 19, 2024