Lifetime Technical Support:186 3636 9649
Author Introduction: Fan Shengmin (186 3636 9649), Member of the Science Writers Association of Yuncheng City, Member of the Science Writers Association of Shanxi Province. Author of maker education. Published “Playing with Electronics” in 2016, “Super Fun Electronic Production” in 2017, “Electrical Experiments in Life” in 2018, “Arduino Programming and Hardware Implementation” in 2019, “Introduction to Electronic Production” in 2021, “From Beginner to Pro in Network Operations” in 2022, and “Arduino Programming and Hardware Setup” in 2023.

1. Basic Knowledge
In C and C++ programming, the #ifndef directive is commonly used to prevent the contents of header files from being included multiple times (also known as “multiple inclusion”), thus avoiding compilation errors. This technique is often referred to as “include guards” or “header guards”.
The following is a typical format using #ifndef :
#ifndef HEADER_FILE_NAME_H
#define HEADER_FILE_NAME_H
// Contents of the header file
// For example, function declarations, class definitions, macro definitions, etc.
#endif // HEADER_FILE_NAME_H
Explanation
- #ifndef HEADER_FILE_NAME_H:
- ifndef is an abbreviation for “If Not DEFined”.
- HEADER_FILE_NAME_H is a macro definition (usually a unique identifier composed of uppercase letters), used to identify this header file. It is typically part of the file name, with uppercase letter H as a suffix to ensure uniqueness.
- If HEADER_FILE_NAME_H is not defined, then define it.
- The code between these two directives is the actual content of the header file.
- Ends the #ifndef conditional compilation block.
2. This time we will preprocess the delay function to simplify program readability. (Two LEDs blinking alternately)
Write the delay function in Delay.h and Delay.c files.
1. Write the Delay.h file
#ifndef __DELAY_H
#define __DELAY_H
void Delay(unsigned int count);
#endif
2. Write the Delay.c file
#include “Delay.h”
void Delay(unsigned int count) //Delay function
{
unsigned int i;
for(;count!=0;count–)
{
i=5000;
while(i–);
}
}
3. Configure related settings in Keil
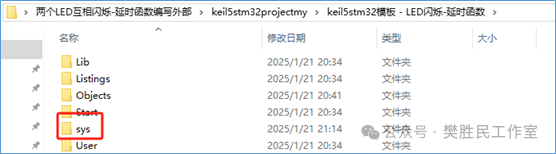
1. Create a sys folder
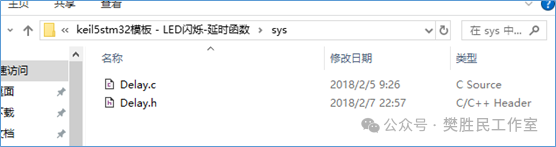
2. Save the two files just created in the sys folder
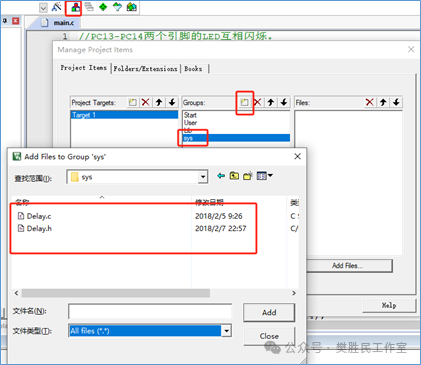
3 Copy the files
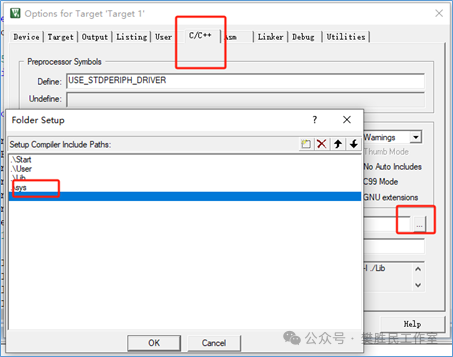
4 Add the path
4. Program Design
#include “stm32f10x.h”
#include “Delay.h”
int main(void)
{
GPIO_InitTypeDef GPIO_InitStructure;
RCC_APB2PeriphClockCmd(RCC_APB2Periph_GPIOC, ENABLE);
GPIO_InitStructure.GPIO_Pin = GPIO_Pin_13|GPIO_Pin_14;
GPIO_InitStructure.GPIO_Mode = GPIO_Mode_Out_PP;
GPIO_InitStructure.GPIO_Speed = GPIO_Speed_50MHz;
GPIO_Init(GPIOC, &GPIO_InitStructure);
GPIO_SetBits(GPIOC,GPIO_Pin_13|GPIO_Pin_14);
while(1)
{
GPIO_ResetBits(GPIOC,GPIO_Pin_13);
GPIO_SetBits(GPIOC,GPIO_Pin_14);
Delay(1000);
GPIO_ResetBits(GPIOC,GPIO_Pin_14);
GPIO_SetBits(GPIOC,GPIO_Pin_13);
Delay(1000);
}
}